In this wxPython Tutorial, we will demonstrate how to use the CheckBox Widget, alongside it’s various styles, features and functions. A complete list of options will be included here, alongside several code examples for your convenience.
wxPython CheckBox Syntax
The syntax structure required to create a CheckBox Widget in wxPython.
cb = wx.CheckBox(parent, id, label, pos, size, style, validator, name)parent: This is the Widget to which it is parented, such as a Panel.id: Widget ID. Default value is ID_ANY, which gives it the next available ID.label:The Text which you want to display on the Widget.pos:A tuple containing the coordinates of where the topleft corner of the CheckBox Widget should begin from.size:A tuple which defines the dimensions of the area occupied by the CheckBox.style:Used for styling the CheckBox with extra features.
wxPython CheckBox Styles
A list of available Styles for the CheckBox Widget.
| Style | Description |
|---|---|
| wx.CHK_2STATE | Creates a 2-State Checkbox (Default) |
| wx.CHK_3STATE | Creates a 3-State Checkbox (Not available in GTK1) |
| wx.CHK_ALLOW_3RD_STATE_FOR_USER | Allows the User to activate the 3rd State by clicking (By default, the 3rd State can only be triggered through code). |
| wx.ALIGN_RIGHT | Makes the text appear on the left of the checkbox |
wxPython CheckBox Methods
A list of available methods for the CheckBox Widget.
| Method | Description |
|---|---|
| GetValue() | Returns the State of the CheckBox (True/False) |
| Get3StateValue() | Returns an Enum (CheckBoxState) with the State of the CheckBox |
| Is3State() | Used to check whether the CheckBox is a 3-State CheckBox. |
| Is3rdStateAllowedForUser | Checks to see if the 3rd State is Allowed for User. Return type (True/False) |
| IsChecked() | Returns the State of the CheckBox (True/False) |
| Set3StateValue(state) | Sets the CheckBox to the given state. |
| SetValue(bool) | Sets the value for a 2-State Checkbox (either True or False) |
Example Code
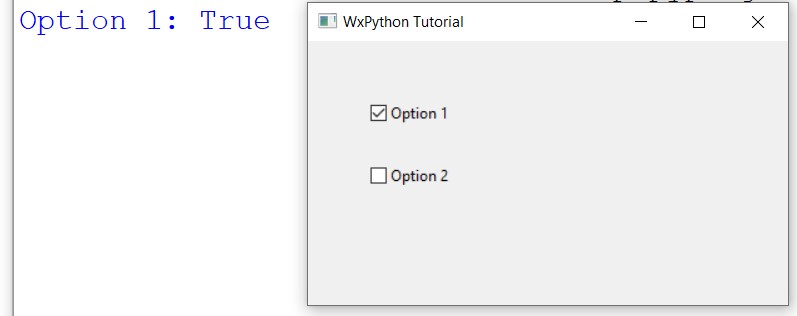
In this example we create two CheckBox Widgets in a wxPython Window.
Both CheckBox Widgets have been created with some simple labels and positioned near the center of the Panel. The Panel itself is Bound using the Bind() function to the wx.EVT_CHECKBOX and the CheckBoxEvent() function. Whenever a CheckBox within this Panel is clicked, the CheckBoxEvent() Function will be called.
The function CheckBoxEvent() simply prints out the Label of the CheckBox that was clicked.
import wx

class Window(wx.Frame):
    def __init__(self, title):
        super().__init__(parent = None, title = title)
        self.panel = wx.Panel(self)

        self.cb1 = wx.CheckBox(self.panel, label = "Option 1", pos = (50, 50))
        self.cb2 = wx.CheckBox(self.panel, label = "Option 2", pos = (50, 100))

        self.panel.Bind(wx.EVT_CHECKBOX, self.CheckBoxEvent)

        self.Centre()
        self.Show()

    def CheckBoxEvent(self, e):
        cb = e.GetEventObject()
        print(cb.GetLabel() + ": " + str(cb.GetValue()))

app = wx.App()
window = Window("WxPython Tutorial")
app.MainLoop()
The output of the above code, when the first CheckBox is clicked.

Creating a 3-State CheckBox
In this example we’ll make a 3-State CheckBox.
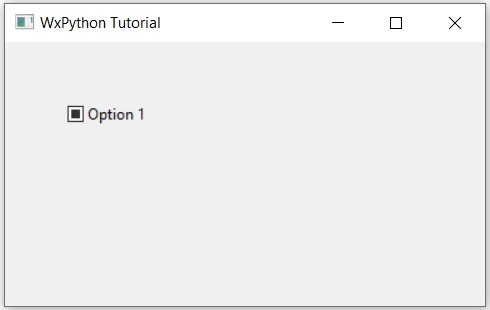
A 3-State CheckBox has 3 possible states, On, Off and an Intermediate state (picture of this state is included at the end). Since we can’t use Bool values for 3 States, we use an Enum called CheckBoxState.
In short, the 0 Index corresponds the Off state, 1 corresponds to True state and 2 corresponds to the Intermediate state.
In the below example, we initialize the CheckBox to the intermediate state by using the Set3StateValue() function, and in the CheckBoxEvent() function, print out the integer corresponding to the current state.
import wx

class Window(wx.Frame):
    def __init__(self, title):
        super().__init__(parent = None, title = title)
        self.panel = wx.Panel(self)

        self.cb1 = wx.CheckBox(self.panel, label = "Option 1", pos = (50, 50),
                               style = wx.CHK_3STATE | wx.CHK_ALLOW_3RD_STATE_FOR_USER)

        self.panel.Bind(wx.EVT_CHECKBOX, self.CheckBoxEvent)
        self.cb1.Set3StateValue(2)

        self.Centre()
        self.Show()

    def CheckBoxEvent(self, e):
        cb = e.GetEventObject()
        print(cb.Get3StateValue())

app = wx.App()
window = Window("WxPython Tutorial")
app.MainLoop()
Below is an image of the intermediate state selected.

This marks the end of the wxPython CheckBox Widget Tutorial. Any suggestions or contributions for CodersLegacy are more than welcome. Questions regarding the tutorial content can be asked in the comments section below.
