
This is a tutorial on layout management in PyQt6.
Creating widgets in PyQt6 is actually the easier part of the process of making a GUI application. Proper positioning, and Layout management of the widgets within the PyQt6 Window is even more essential. Without the setting up of proper containers and layouts to wrap around your widgets, your GUI application will neither be user-friendly nor will it be visually appealing.
Uptil this point, you may have been using the move method, however this isn’t the right way of doing it. PyQt comes with special widgets called layout managers which are specially to deal with placement of widgets inside the window. Even simple things like spacing between widgets, margins between the windows and padding are managed by Layout Managers.
The PyQt6 layout managers that we will go through today:
- QVBoxLayout
- QHBoxLayout
- QGridLayout
Absolute Positioning
Before we talk about the Proper Layout Managers in PyQt6, lets discuss Absolute Positioning. We will do a small demonstration of this using the move method. Even if it is not the recommended way, it is still a form of layout management in PyQt, and can be used for simpler projects.
The move(x, y) method takes two parameters, a X coordinate and a Y coordinate. Remember, the top-left hand corner has the coordinates (0,0) and they increase from top to bottom and left to right.
import sys
from PyQt6.QtWidgets import QWidget, QPushButton, QApplication

class Window(QWidget):
    def __init__(self):
        super().__init__()
        self.UI()

    def UI(self):
        Button1 = QPushButton('PyQt6', self)
        Button1.move(20, 10)

        Button2 = QPushButton('Layout', self)
        Button2.move(40, 50)

        Button3 = QPushButton('Management', self)
        Button3.move(60, 90)

        self.setGeometry(300, 300, 250, 200)
        self.setWindowTitle('PyQt6 Layout Management')
        self.show()

def main():
    app = QApplication(sys.argv)
    window = Window()
    sys.exit(app.exec())

if __name__ == '__main__':
    main()
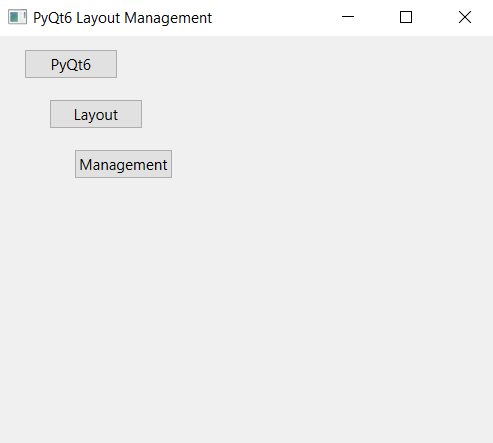
The output:
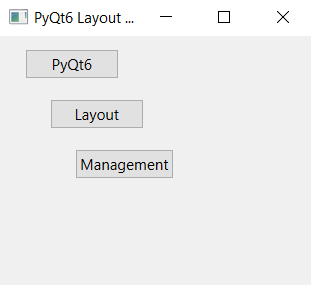
The problem here lies in the fact that the positioning is “Absolute”. This means that if the window is resized or adjusted in any way, the widgets will not change their position to accommodate this new change.
This isn’t a problem with layout managers though which will auto adjust the widgets according to how the window is manipulated/resized.
QVBoxLayout Manager
The PyQt6 QVBoxLayout arranges all the widgets inside it in a vertical column. The order in which you add the widgets to the layout changes how they appear in the PyQt window.
First we need to create the layout object using the QVBoxLayout Class. We’ll use the addWidget() method on the layout object we created to add the widgets we created to it. You can also pass in additional parameters to this function, such as an alignment like: Qt.AlignmentFlag.AlignCenter.
Finally, the most important is to actually add the layout we created, to our PyQt6 Window. In our Window Class, we just have to use the setLayout() function on “self” which represents the GUI window. Of course, the layout object we created earlier is going to be the parameter of this function.
import sys
from PyQt5.QtWidgets import (QWidget, QPushButton, QApplication,
                             QHBoxLayout, QVBoxLayout, QGridLayout)

class PyQtLayout(QWidget):

    def __init__(self):
        super().__init__()
        self.UI()

    def UI(self):
        Button1 = QPushButton('PyQt')
        Button2 = QPushButton('Layout')
        Button3 = QPushButton('Management')

        vbox = QVBoxLayout()
        vbox.addWidget(Button1)
        vbox.addWidget(Button2)
        vbox.addWidget(Button3)

        self.setLayout(vbox)
        self.setGeometry(300, 300, 250, 150)
        self.setWindowTitle('PyQt5 Layout')
        self.show()
The GUI output:

As you can see from the image below there is already some spacing between the widgets as well as some margins between the widgets and the edge of the window. The default settings are suffice for most cases, but we should know how to modify them if the need arises.
We have the following two functions for this purpose.
The setSpacing(n) function adjusts the spacing between the widgets. Pass any integer (n) into the brackets of the function, and “n” amount of padding will be applied (measured in picels).
The setContentsMargins(0,0,0,0) function controls the margins between the outermost widget and the GUI window. It takes four parameters, one for each side.
The above two functions work on any layout btw, not just the QVBoxLayout.
QHBoxLayout Manager
QHBoxLayout has the same concept and functionality as QVBoxLayout with only an Orientation change. Instead of vertically stacked widgets, the widgets here are placed side by side in a row.
Except for the changes to the initialization of the layout (using the QHBoxLayout Class instead), there is no difference to how we created the QVBoxLayout.
class PyQtLayout(QWidget):

    def __init__(self):
        super().__init__()
        self.UI()

    def UI(self):

        Button1 = QPushButton('PyQt')
        Button2 = QPushButton('Layout')
        Button3 = QPushButton('Management')

        hbox = QHBoxLayout()
        hbox.addWidget(Button1)
        hbox.addWidget(Button2)
        hbox.addWidget(Button3)

        self.setLayout(hbox)
        self.setGeometry(300, 300, 200, 200)
        self.setWindowTitle('PyQt5 Layout')
        self.show()
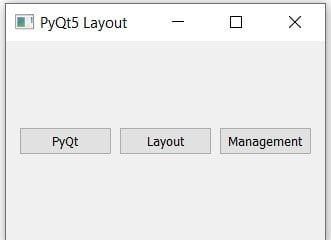
The GUI output of the above example:
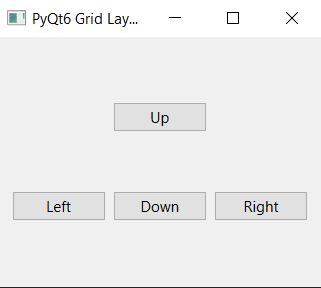
QGridLayout Manager
A very popular type of layout management that you’ll find in many other GUI libraries, the PyQt QGridLayout Manager.
Below is a small grid we created to show you how the coordinate system in the QGridLayout works. The first number in the pair represents the row number, and the second represents the column number.
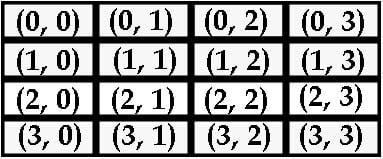
The Grid in the QGridLayout does not have a fixed size, and will keep increasing as you add widgets. (So you don’t have to define an initial size or anything) The above image is just for explanatory purposes, (3, 3) isn’t a limit to it’s size or anything.
The only significant change here is that when you’re adding a new widget into the layout, you have to specify the row and column number as the second and third parameter respectively.
class Window(QWidget):
    def __init__(self):
        super().__init__()
        self.UI()

    def UI(self):

        Button1 = QPushButton('Up')
        Button2 = QPushButton('Left')
        Button3 = QPushButton('Right')
        Button4 = QPushButton('Down')

        grid = QGridLayout()
        grid.addWidget(Button1, 0, 1)
        grid.addWidget(Button2, 1, 0)
        grid.addWidget(Button3, 1, 2)
        grid.addWidget(Button4, 1, 1)

        self.setLayout(grid)
        self.setGeometry(300, 300, 200, 200)
        self.setWindowTitle('PyQt6 Grid Layout')
        self.show()
The GUI output:
You can get even more creative with your layouts by creating multiple layouts and nesting them into each other. This allows you to create more complex and good looking layouts for your PyQt5 window. For example, you can insert a QHBoxLayout into a QVBoxLayout.
Remember, you can nest Layouts within each other as well, using the addLayout() method.
Don’t let your PyQt6 Journey end here! There are plenty of other tutorials we have out there for you!
This marks the end of the PyQt6 Layout management article. Any suggestions or contributions for CodersLegacy are more than welcome. Questions regarding the article content can be asked in the comments section below.