This is a tutorial on the JavaFX GridPane layout.
Unlike TilePane, which has a semi-grid-like approach, the JavaFX GridPane layout is completely based off a structure of rows and columns and comes with the appropriate functions required to manipulate this structure. Each component you add into the layout is added at a specific location in the grid, at a specific row and column number.
The GridPane layout’s grid follows certain rules. All components in the same row will have the same height, and all components in the same column will have the same width. Furthermore, different rows can have different heights and different columns can have different widths.
The JavaFX GridPane layout is represented by the javafx.scene.layout.GridPane class.
GridPane Layout
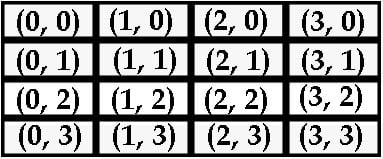
Before we start, you should understand the layout of the GridPane Class. A GridPane layout creates a matrix from intersections between rows and columns and places the components at these intersection points or “coordinates”.
When adding components to the layout, you will need both a row and a column number which decides where the component is placed. The column numbers increase from left to right and the rows increase from top to bottom. The below image will help you understand.

The GridPane layout will expand as you keep adding new components. You can even go all the way up to column 100 and row 100 if you want to.
JavaFX GridPane Example
First we create the 7 GUI components that we’ll be using in the GridPane layout. Next we create the layout itself, and add in some basic settings such as horizontal and vertical spacing between the components and padding between the layout and the window. Finally we individually add each component to the layout, giving a specific column and row number.
package application;

import javafx.application.Application;
import javafx.geometry.Insets;
import javafx.stage.Stage;
import javafx.scene.Scene;
import javafx.scene.control.Button;
import javafx.scene.control.Label;
import javafx.scene.control.TextField;
import javafx.scene.layout.GridPane;


public class Tutorial extends Application  {
	public static void main(String args[]){
		 launch(args);
	}

	@Override
	public void start(Stage primaryStage) throws Exception {

		TextField text1 = new TextField();
		TextField text2 = new TextField();

		Button button1 = new Button("Submit");
		Button button2 = new Button("Forgot Password");

		Label label1 = new Label(" Login Network System ");
		Label label2 = new Label("Username:");
		Label label3 = new Label("Password:");


        GridPane layout = new GridPane();

        layout.setPadding(new Insets(10, 10, 10, 10));
        layout.setVgap(5);
        layout.setHgap(5);

        layout.add(text1, 1,1);
        layout.add(text2, 1,2);
        layout.add(button1, 1,3);
        layout.add(button2, 0,3);
        layout.add(label1, 1,0);
        layout.add(label2, 0,1);
        layout.add(label3, 0,2);


		Scene scene = new Scene(layout, 300, 200);

		primaryStage.setTitle("CodersLegacy");
		primaryStage.setScene(scene);
		primaryStage.show();
    }
}
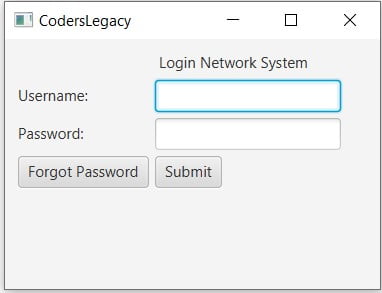
The GUI output of the above code. Notice the different column widths.

Managing this layout can be a little tricky, but as you can see from the image above, it can produce a very nice looking GUI.
GridPane Methods
A list of commonly used and useful methods for the Java GridPane layout.
| Method | Description |
|---|---|
add() | Takes 3 parameters, a component, a row number and a column number placing the component at the coordinate. |
setVgap() | The vertical gap between components. |
setHgap() | The horizontal gap between components. |
setMinSize() | Takes two parameters, width and size, setting the minimum width of the layout. |
setPadding() | Takes an Insets object as input as sets the padding between layout and window. |
setRowIndex() | Uses a component and a row number as parameters, setting the the component at that row. |
setColumnIndex() | Uses a component and a column number as parameters, setting the the component at that column. |
This marks the end of the JavaFX GridPane layout tutorial. Any suggestions or contributions for CodersLegacy are more than welcome. Questions regarding the article content can be asked in the comments section below.
