
Welcome to the Getting started with Java guide, based on one of the most popular languages in the world.
Java was created in 1995 by the Company Sun, and later bought in 2010 by Oracle, who currently own it. From it’s beginning, Java has been open source and free, available to anyone. Though Company Oracle has added a few paid features recently. More on this later.
Java is based off the Object Oriented Model, or OOP.
Why is Java so Popular?
For starters, it’s free and easily available. You’ll see many people getting started with Java as their first programming language.
Java was released shortly after C++, and is actually partly based on C++. Java was released and marketed as being simpler and cleaner to use than C++, and in many ways it is.
Due to this, Java and C++ code is actually very similar, allowing easy transition from C++ to Java or vice versa.
Another strong point is that Java runs on almost any platform. Java was released with the promise of “Write once, run anywhere”. As long as there is JRE (Java Runtime Environment) set up, java will run on that platform.
Due to it’s portability, Java is also the most popular programming language for mobile apps. And with the rise of mobile devices, Java’s use has increased as well.
Downloading Java
Downloading and installing Java has become a bit more complicated in recent years due to the introduction of paid features and multiple types.
If you aren’t interested in the details, simply download Java from this link and skip ahead.
There are three versions of Java right now. We’ll go through each of them briefly.
- Java SE, the standard edition. Contains the core functionality and is the starting point for all new developers or small businesses. Freely available to all for non-commercial purposes. You must take up a subscription to receive commercial support and license.
- Java EE, Enterprise edition. Comes with several advanced capabilities regarding application servers and such. Used when your applications requires a large distributed system. Not for the regular user. Free to download under the same conditions as the standard edition.
- Java ME, Micro edition. Used for embedded systems like Mobile devices. It provides a subset of the functionality of Java SE, but also introduces libraries specific to mobile devices.
What you’re going to download is called the Oracle JDK (Development Kit). There is also the Open JDK, which is a completely open source version. However, it has lesser support for it’s version, (Each version is only supported until the next one releases) and has a lower amount of features.
Just follow the above link, and download the Standard edition’s JDK. You will see different options based on your operating system.
Installing Java
Once you’ve downloaded the installer, you should run it and begin the installation process. The setup itself is simple and requires no additional information or steps.
The setup will by default ask for the C:\Program Files\Java\jdk_version file path as the destination for the Java files. It’s best to stick with this and not mess around.
It’s not too uncommon to run into issues while installing, so here are some of the common fixes. Else if you’re still having issues you can search online for more advice.
- Run the installer as administrator. This deals with any privilege problems that may occur.
- Remove any previous Java versions you may have installed. You can do this through the Control panel (if you have windows).
- Often, the Java installer does a silent download. There will be no pop up or confirmation that the installation has occurred. You can verify the installation by checking the
C:\Program Files\Javafile path. If you find the JDK files there, it installed correctly.
The above fixes should account for most the errors that occur during installation.
Running Java
First thing to do is add the Java.exe to the Environment path variable. This step can be skipped, but it will make things harder on you later on.
First you need to get to the Environment Variables page. You can get here in a variety of ways, either by searching for it directly or coming from the advanced settings page. You might see the following page.
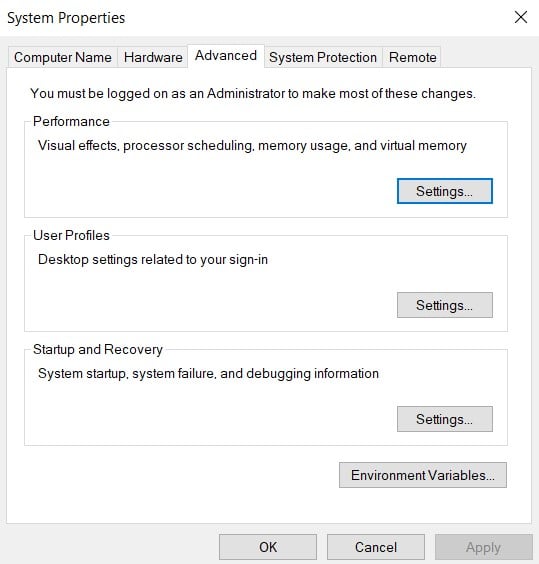
Click on the Environment variables button on the bottom and proceed. You need to edit the variable called Path here. Simply select the path variable then click the edit button.
Another window will now show up. Simply click the “new” button and add in the path of your java.exe. For me, the java.exe path is C:\Program Files\Java\jdk-14\bin. (The exe will always be in bin).
What does this do? This basically adds the java.exe to a list of file paths that your PC will automatically check when you execute something. In short, you can now execute a java file from anywhere in your computer without worrying about file paths.
Now, finally we run our program. Copy over the following code into your java program, name the file "MyClass.java“. Next, open your command prompt and navigate to the folder where the MyClass.java file is stored and run the following commands.
javac MyClass.javaThe javac compiles the java code into it’s bytecode.
java MyClassIf “Hello world” was printed out successfully, your setup has been successful. Don’t worry if you didn’t understand this process. In our next page, Java Syntax, we’ll explain the details of the java syntax.
Installing a Suitable IDE (optional)
One of the most important things to have while programming is a good IDE, or Integrated Development environment. While not compulsory, it’s highly recommended.
From advanced error detection, debugging, auto-suggest and other features, it makes programming much easier.
The Eclipse is the IDE we recommend. It used by a large number of developers, as it supports not only java, but many other programming languages as well.
You can download Eclipse from their downloads page.
Once you have it installed and you’ve got the hang of using basic Java, you should look online for additional tutorials on how to actually use it’s various features. Most programmers waste the potential of their IDE’s, using only a fraction of the IDE’s features.
This marks the end of our getting started with Java guide. Follow up in the next article, where we do an overview of the Java syllabus on our site, Coderslegacy.
Furthermore, to find out more about the JVM and JRE, how Java achieves it’s portability, byte code and more, see the Java Syntax page or our in-depth article on the JVM and Bytecode.
If you feel like there is some mistake, or improvement required in the above article, feel free to mention so below in the comments. Likewise any questions may also be asked.
Thanks!
Same here.