This article is a tutorial on the JavaFX TilePane Layout.
TilePane is a popular JavaFX layout component which uses a tile-based approach. For better understanding, you can think of it as a grid-based system which uses rows and columns to organized it’s components.
TilePane Layout Example
The below example utilizes 4 buttons through which we will demonstrate the use and abilities of the TilePane Layout.
package application;

import javafx.application.Application;
import javafx.stage.Stage;
import javafx.scene.Scene;
import javafx.scene.control.Button;
import javafx.scene.layout.TilePane;


public class Tutorial extends Application  {
	public static void main(String args[]){
		 launch(args);
	}

	@Override
	public void start(Stage primaryStage) throws Exception {

		Button button1 = new Button("Button1");
		Button button2 = new Button("Button2");
		Button button3 = new Button("Button3");
		Button button4 = new Button("Button4");

        TilePane layout = new TilePane(button1, button2, button3, button4);

		Scene scene = new Scene(layout, 350, 250);

		primaryStage.setTitle("CodersLegacy");
		primaryStage.setScene(scene);
		primaryStage.show();
    }
}
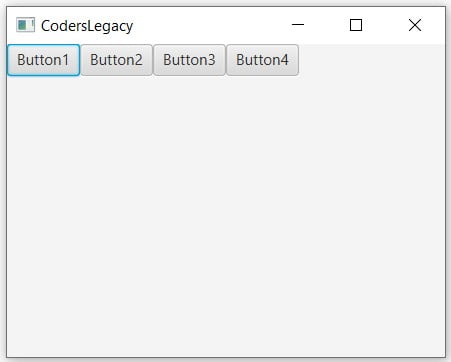
The GUI output of the above example:

In the next sections, we’ll be working on improving and customizing the JavaFX TilePane layout by adjusting the spacing, alignment, orientation and padding.
Spacing Options
We can use setHgap and setVgap functions to create horizontal and vertical spacing respectively between the GUI components.
We’re going to be removing the set width and height that we defined for Scene to allow the TilePane to take the shape it wants to. Setting a fixed width and height in this case will only cause problems (in most cases).
        layout.setHgap(20);
        layout.setVgap(20);

	Scene scene = new Scene(layout);

The purpose of using setVgap will become apparent in the next section.
Adjusting Columns and Rows
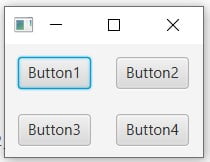
You can set the “Preferred” number of columns using the setPrefColumns()function. We also added in some CSS style to create some padding between the TilePane layout and edge of the windows.
        layout.setHgap(20);
        layout.setVgap(20);

        layout.setStyle("-fx-padding: 10");
        layout.setPrefColumns(2);

Likewise we could have also used the setPrefRows() function too.
Keep in mind that this only the “Preferred” number of columns and rows. It is not fixed. If the screen was to be enlarged or resized, the structure will change.
TilePane Properties
The JavaFX TilePane has a unusually high number of different properties which can be used to manipulate and style the arrangement of components in the layout. We’ve compiled of these properties down in the table below.
You’ve likely already recognized several of these properties as one’s we have used before. By adding a simple “set” or “get” before the below properties, we can create the appropriate function.
| Property | Description |
|---|---|
alignment | Represents the Alignment position of the TilePane. |
hgap | Represents the horizontal gap between the child components. |
vgap | Represents the horizontal gap between the child components. |
orientation | Represents the orientation of the TilePane. Can be either Orientation.HORIZONTAL or Orientation.VERTICAL. |
prefColumns | Represents the preferred number of columns in the layout. |
prefRows | Represents the preferred number of rows in the layout. |
prefTileHeight | Represents the preferred height of the layout. |
prefTileWidth | Represents the preferred width of the layout. |
tileHeight | Represents the height of a child component. |
tileWidth | Represents the width of a child component. |
tileAlignment | Represents the Alignment of a child component. |
If trying to create a function out of these properties, be sure to turn the first latter Capital as well, like setTileAlignment. This is because JavaFX follows camel casing.
This marks the end of the JavaFX TilePane layout tutorial. Any suggestions or contributions for CodersLegacy are more than welcome. Questions regarding the article content can be asked in the comments section below.
