This is tutorial number 16 in the pygame RPG series
We did a good job adding the “Next Stage” display that would after we pressed the “n” button to proceed with the next stage. The reason we did this of course, was to add some visual indication of our progress to the next stage. But there is still one visual indicator that we are missing.
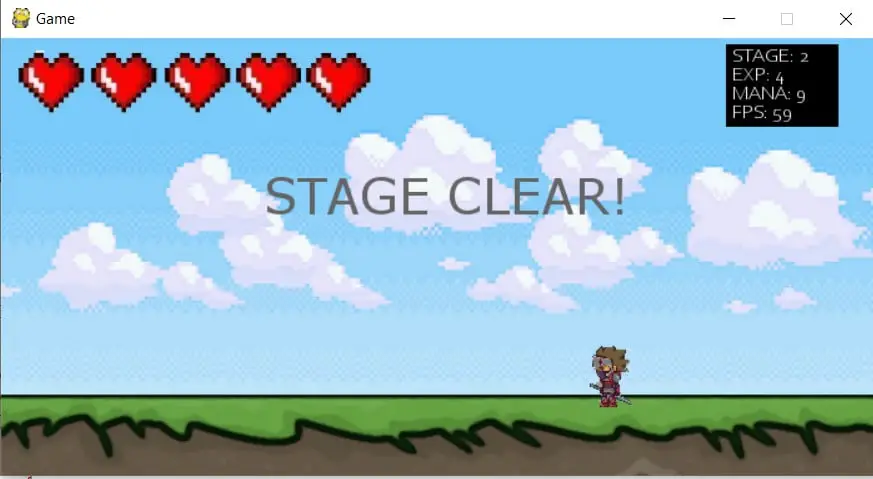
In this Pygame RPG Tutorial, we’re going to be working on a “Stage Clear” display, that triggers once all the enemies have been defeated.

Stage Display Class
We already created the StageDisplay Class earlier, so we’ll just be re-using it for the Stage Clear display.
First we’ll add a new variable in the __init__ function.
class StageDisplay(pygame.sprite.Sprite):
       ...
       self.clear = False
Next we’ll begin working on a new function that’s going to be responsible for sending out the stage clear message. It’s working is almost the exact same as the move_display() we created earlier.
      def stage_clear(self):
            self.text = headingfont.render("STAGE CLEAR!", True , color_dark)
            if self.posx < 720:
                  self.posx += 10
                  displaysurface.blit(self.text, (self.posx, self.posy))
            else:
                  self.clear = False
                  self.posx = -100
                  self.posy = 100
The only changes are to the text that is displayed in the render() function. And of course, it turns self.clear to False, to indicate that it’s complete, and in an “off” state.
Next up we just want to make a minor change to the move_display() function. Previously we would call the self.kill() function once it passed the Screen width (700).
      def move_display(self):
            # Create the text to be displayed
            self.text = headingfont.render("STAGE: " + str(handler.stage) , True , color_dark)
            if self.posx < 720:
                  self.posx += 5
                  displaysurface.blit(self.text, (self.posx, self.posy))
            else:
                  self.display = False
                  self.posx = -100
                  self.posy = 100
Now that we need the StageDisplay class for more than just displaying the “Next Stage” messages, we don’t want it to be killed. So instead, we’ll just reset it somewhere offscreen to the left, where it will wait for the next command.
Event Handler
The next step is for us to begin a tracking system where we can keep track of how many enemies have been killed. Earlier we have already created a system to keep track of enemies have been generated with the use the enemy_count variable. For this new system, we’ll be creating a new variable called dead_enemy_count.
class EventHandler():
      def __init__(self):
            self.enemy_count = 0
            self.dead_enemy_count = 0
            ...
And of course, both of these variables are part of the EventHandler class, as shown in the image below.
Enemy Class
Now that we have created a tracker for the number of dead enemies, we need to increment it at the right time. What is that right time? It’s when an enemies dies of course. Let’s move to the Enemy class for a brief change.
            if hits and player.attacking == True:
                  self.kill()
                  handler.dead_enemy_count += 1
We’re going to add a single line to the update() function of the enemy that increments the dead_enemy_count variable when the kill() command is being called.
Back to the EventHandler class now. We are now going to add a new function, that’s responsible for determining when to call the stage_clear() function we made earlier.
Uptil, what have we really been doing? What was the purpose of the dead_enemy_count variable? Here is where it will all make sense.
      def update(self):
            if self.dead_enemy_count == self.stage_enemies[self.stage - 1]:
                  self.dead_enemy_count = 0
                  stage_display.clear = True
                  stage_display.stage_clear()
This update function is something we’re going to run in every iteration of the game loop. It’s going to compare the number of dead enemies to the number of total enemies that will be generated in that particular level.
If the number of dead enemies is equal to the number of total enemies, it means all enemies have been defeated. It is under this condition that the code runs and the stage clear messages shows.
There’s still one last minor change we need to make to complete our logic.
      def next_stage(self):  # Code for when the next stage is clicked
            self.stage += 1
            print("Stage: "  + str(self.stage))
            self.enemy_count = 0
            self.dead_enemy_count = 0
Once the next_stage() function is called, we want to reset the enemy counts back to zero. We already had a line or enemy_count, so we’ll just add one for dead_enemy_count as well.
Game Loop
Although our main logic is complete, we need to actually make a few changes in the game loop to ensure our logic is actually executed.
The Problem: The stage clear function only increments the position of the text by about 5 pixels every time it’s run. We need to make sure to keep calling the stage_clear() function until it’s reached the end of the screen.
    # Render stage display
    if stage_display.display == True:
          stage_display.move_display()
    if stage_display.clear == True:
          stage_display.stage_clear()
The solution: Just like we did before with the stage display, we’re going to call the stage_clear() in every iteration of the game loop as long as the clear variable is set to True. Once it completes it’s journey, it will be set to False, also stopping the movement of the text.
Below we just have to add the handler.update() line near the other status bar related code. This ensures that the update function is run every iteration of the game loop, allowing it to accurately check whether the stage clear requirement has been met or not.
    # Status bar update and render
    displaysurface.blit(status_bar.surf, (580, 5))
    status_bar.update_draw()
    handler.update()
Showcase
Now for a small video that showcases what we’ve been building towards in this tutorial.
Next Section
In the next section we’ll be adding a new and very interesting feature into our RPG. It’s a feature that’s consistently found in every RPG, regardless of it’s type. Click on the button below to find out more!
This marks the end of the Pygame RPG – “Stage Clear” tutorial. Any suggestions or contributions for CodersLegacy are more than welcome. Questions regarding the tutorial content can be asked in the comments section below.
