The Button widget is one of the most basics widgets available to us in the Python Tkinter Library. It is a way for the user to interact with our Tkinter Window. Once the button is clicked, an action is triggered by the program.
Tkinter allows us to customize these buttons using a variety of different functions and parameters. Examples of such customizations include color, font type, font size, icons and images.
Button Widget Syntax
object = Button(master, options.....)Tkinter Button Options
A complete list of options for the Button Widget.
| No. | Option | Description |
|---|---|---|
| 1 | activebackground | The Background color when the cursor is over the button. |
| 2 | activeforeground | The Foreground color when the cursor is over the button. |
| 3 | bg | Background Color of the button |
| 4 | bd | Border size of frame in pixels. Default is 2. |
| 5 | command | Command to be executed when button is clicked. Typically set to a function call. |
| 6 | fg | foreground color |
| 7 | font | Text font for the button |
| 8 | height | Height of the button |
| 9 | highlightcolor | The text color when the widget is under focus. |
| 10 | image | Image to be displayed on the button. By default, image will replace the text. |
| 11 | justify | Changes the alignment of the text. Can be set to either LEFT, CENTER or RIGHT. |
| 12 | padx | padding to the left and right of the text. |
| 13 | pady | padding above and below the text. |
| 14 | relief | It specifies the type of the border. Default is Flat, other options include raised, flat, ridge, groove and sunken. |
| 15 | state | Default is NORMAL. DISABLED causes the button to gray out and go inactive. ACTIVE is the state of the button when mouse is over it. |
| 16 | underline | Default is -1. Set this option to under line the button text. |
| 17 | width | Width of the button |
| 18 | wraplength | If the value is set to a positive number, the text lines will be wrapped to fit within this length. |
Tkinter Button Example
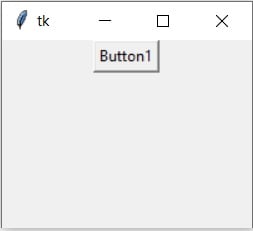
The following code will create a GUI with a button that displays the text “Hello World” to Console. If you wish to have the output display on the GUI, you should use Python Labels or the Message Box library.
from tkinter import *

def set():
    print("Hello World")

root = Tk()
root.geometry("200x150")

frame = Frame(root)
frame.pack()
button = Button(frame, text = "Button1", command = set)
button.pack()

root.mainloop()
Clicking this button will now activate the function called set and execute the code in it. Be sure to remove the parenthesis while writing the function name, else the function will run once regardless of whether you pressed the button or not.

Customizing the Button Widget
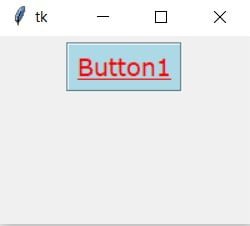
In this section we’ll show you the same button from the first example, but with a few enhancements to its look.
There are various options we have used in the below code example. Refer to the table above to understand what they stand for, and what possible values they accept.
from tkinter import *

def set():
    print("Hello World")

root = Tk()
root.geometry("200x150")

frame = Frame(root)
frame.pack()
button = Button(frame, text = "Button1", command = set,
                fg = "red", font = "Verdana 14 underline",
                bd = 2, bg = "light blue", relief = "groove")
button.pack(pady = 5)

root.mainloop()

This marks the end of the Python Tkinter Button Widget article. Any suggestions or contributions for CodersLegacy are more than welcome. Questions regarding the material in the article can be asked in the comments section below.
Here’s a link back to the Main Tkinter Article where you can learn about other cool widgets!
