This article covers the use of the Python Tkinter Label.
What is the Python Tkinter Label?
The most simplest Widget present in Python Tkinter, the Label is used to output simple lines of text on screen. Creative uses of it include displaying images within them.
You get several options to manipulate the text, such as underlining it, or even just a certain part of the text.
Syntax:
label = Label(Master, option1, option2.......)| No. | Option | Description |
|---|---|---|
| 1 | anchor | Controls the position of the text when the widget has more space than the text requires. Default is CENTER. Takes compass directions as values. N (North), S (South), E (East), SE (South east) etc. |
| 2 | bg | Background Color of the Label |
| 3 | bd | Border size of Label in pixels. Default is 2. |
| 4 | bitmap | Used to display graphics. Simply assign to this option a image or bitmap object. |
| 5 | cursor | When the mouse is hovering over this widget, it can be changed to a special cursor type like an arrow or dot. |
| 6 | font | Used to specify what font the text is to be displayed in. |
| 7 | fg | Foreground color. In this case, the color of the text or bitmap. |
| 8 | Height | The Height of the Label |
| 9 | image | Set this option to a image object to display an image in the label. |
| 10 | justify | Changes the alignment of the text. Can be set to either LEFT, CENTER or RIGHT. |
| 11 | padx | padding to the left and right of the text. |
| 12 | pady | padding above and below the text. |
| 13 | relief | It specifies the type of the border. Default is Flat, other options include RAISED and SUNKEN |
| 14 | text | Used to display text in the label. Use the new line character (“\n”) to insert newlines if you wish. |
| 15 | textvariable | Used to assign a variable which contains the text to be displayed. |
| 16 | Underline | Default is -1. Set this option to under line the text in the label. |
| 17 | width | The width of the Label. |
| 18 | wraplength | If the value is set to a positive number, the text lines will be wrapped to fit within this length. |
In the following examples, we’ll be using the option “textvariable” instead of text for labels. The advantage of having a variable is that it can be changed midway during execution. Otherwise, if this doesn’t matter to you, you can simple write a label as
label = Label(frame, text = "Hello World")Text Variables store the currently displayed text on the Label widget. Modifying the text variable of a label also affects the text on the label.
Tkinter Label Example:
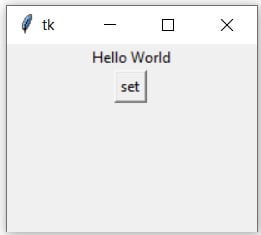
The below example will create a Label that initially display some other text, but when the button widget we created is pressed, the text of the Label will be set to something different.
from tkinter import *

def set():
    var.set("Good-Bye Cruel World")

root = Tk()
root.geometry("200x150")

frame = Frame(root)
frame.pack()

var = StringVar()
var.set("Hello World")

label = Label(frame, textvariable = var )
label.pack()
button = Button(frame, text = "set", command = set)
button.pack()

root.mainloop()
The Tkinter Label and button widget produced by the above code:

Remember that you can’t just assign any random value as a textvariable. You must first declare it using StringVar().
Editing a Label
Labels have the unique ability of being edited even after they have been created. You can use the configure attribute to edit a label. Remember, this only works if the Label has been created.
from tkinter import *

def changecolor():
    label.configure(fg = "blue")

root = Tk()
button = Button(root, text='Choose Color', command = changecolor).pack(pady=20)
label = Label(root, text = "Color", fg = "black")
label.pack()

root.geometry('180x160')
root.mainloop()
The code in the example above creates a button which calls a function when clicked. This function then changes the color of the label. You can edit more than just the color of the label, like it’s text for instance.
This marks the end of the Python Tkinter Label Article. You can head back to the main Tkinter article using this link.. Any suggestions or contributions for our site, CodersLegacy are more than welcome.

Looks like you forgot to put the full code in the “editing a Label” section. No import section and no reference to tk.Tk(). Might be wrong here but either way code doesn’t work when copied and pasted.
Thanks for pointing it out! It’s fixed now.