
The main difference between Tkinter and ttk lies within the name of ttk, which is “Themed Tkinter”. As an extension of Tkinter, ttk introduces many new features, out of which one of them is the concept of “themes”.
In ttk, a theme is a collection of styling options and settings which effect the look and feel of all widgets in the tkinter window. There are various themes available by default, allowing us to change between themes with a single line of code.
Furthermore, we can also download more themes and have them inserted into your tkinter application.
Default ttk Themes
Luckily, ttk has a bunch of themes already available for us to pick from. We can get a complete list of available themes using the below code.
import tkinter as tk
import tkinter.ttk as ttk

class Window:
    def __init__(self, master):
        s = ttk.Style()
        print(s.theme_names())

root = tk.Tk()
window = Window(root)
root.mainloop()
('winnative', 'clam', 'alt', 'default', 'classic', 'vista', 'xpnative')Bear in mind that the themes will vary from OS to OS. There are some themes available for all OS’s (e.g: “default” and “clam”), and some themes which are unique to some OS’s.
Look at the list above and try to guess which one’s are native to Windows (the OS on which this command was executed).
You can also find out which theme is currently in use with the following command.
import tkinter as tk
import tkinter.ttk as ttk

class Window:
    def __init__(self, master):
        s = ttk.Style()
        print(s.theme_use())

root = tk.Tk()
window = Window(root)
root.mainloop()
vistaModifying Themes
If you want to modify certain things about a theme, then you can do so using the theme_settings() function.
This function takes two parameters, firstly the name of the function whose settings you wish to modify. Secondly, it takes a Dictionary which contains the names of all the widgets. And each of these widgets have a nested dictionary inside, with all the styling methods such as “configure and “map”. And even further, we have a nested dictionary for each styling method, which has a bunch of key : value pairs, such as "padding" : 5.
As you can see, modifying a theme in this manner is a bit tricky, but also efficient if you need to make alot of changes. In the case of small changes, the widgets and their styles can be accessed individually as explained in our ttk Styling Tutorial.
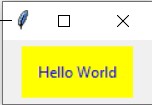
The following code modifies the styling options for the TButton style in the “default” theme.
import tkinter as tk
import tkinter.ttk as ttk

class Window:
    def __init__(self, master):
        self.master = master

        style = ttk.Style()
        style.theme_settings("default", {
           "TButton": {
               "configure": {"padding": 10},
               "map": {
                   "background": [("active", "yellow3"),
                                  ("!disabled", "yellow")],
                   "foreground": [("focus", "Red"),
                                  ("active", "green"),
                                  ("!disabled", "Blue")]
               }
           }
        })

        style.theme_use("default")

        button = ttk.Button(self.master, text = "Hello World")
        button.pack(padx = 5, pady = 5)

root = tk.Tk()
window = Window(root)
root.mainloop()
To summarize the changes made, the internal padding was increased to 10 and the background and foreground now change color based of the state of the widget. “active” means when the cursor is over it, “focus” is when the widget has been selected (pressed) and !disabled means any state but disabled.
Making your own ttk Themes
We will give you a brief outlook on how you can go about creating your own theme in ttk tkinter in this section.
Making your own theme from scratch is rather difficult, and not recommended. There are dozens of themes available online which you can use, if the default ones are not to your liking.
A theme can be created by using the theme_create() function which takes 1 – 3 parameters, with the first one being the theme name, which is mandatory. The second parameter (optional) is the name of the parent from which it will inherit all settings, styles and layouts. The third parameter (optional) is the settings for the theme, which we explored in the previous section.
Below is the code required to create a simple ttk theme.
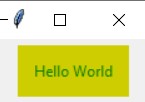
style.theme_create("Code")
style.theme_use("Code")
This has created an empty theme, and changed the current theme to it. Before we create any widgets, we need to define the style for it, otherwise it will throw an error. Creating the styles for so many widgets is pretty time-consuming, so we will just do one.
In the code below we have modified the default style for the Button widget. Now when we create the Button widget, it will have these settings.
import tkinter as tk
import tkinter.ttk as ttk

class Window:
    def __init__(self, master):
        self.master = master

        style = ttk.Style()
        style.theme_create("Code")
        style.theme_settings("Code", {
           "TButton": {
               "configure": {"padding": 10},
               "map": {
                   "background": [("active", "yellow3"),
                                  ("!disabled", "yellow")],
                   "foreground": [("focus", "Red"),
                                  ("active", "green"),
                                  ("!disabled", "Blue")]
               }
           }
        })

        style.theme_use("Code")

        button = ttk.Button(self.master, text = "Hello World")
        button.pack(padx = 5, pady = 5)

root = tk.Tk()
window = Window(root)
root.mainloop()
Pay close attention to the format in which the theme_settings() code is written! It’s just a series of Dictionaries and key-value pairs at the end of the day.
Watch the Video Version of this Tutorial for a more in-depth look into each individual setting and workings of ttk themes.
This marks the end of the Tkinter ttk Themes tutorial. Any suggestions or contributions for CodersLegacy are more than welcome. Questions regarding the tutorial content can be asked in the comments section below.