Welcome to the Getting started with C++ Guide. Here we’ll go through the best possible way for you to download and setup a C++ coding environment on your PC.

There are two things required to create a full C++ development environment. A C++ compilers and a good IDE. The compiler is what actually lets you run, debug and compile C++ code. The IDE is an additional software that provides you with extra tools such as debugging. You can code with just the compiler, but it will be using the command line. IDE is better for code development though.
If you’ve read our Article on choosing the ideal IDE you’ll see that we recommended Eclipse as a great IDE for C++ coding and development. However, Eclipse is a big IDE with a ton of features which can be very overwhelming for a beginner. In your starting days you’ll end up spending more time figuring out how to navigate Eclipse rather than focusing on learning C++.
If you’re someone new to programming and C++ in general, I highly recommend using the IDE Code Blocks instead. It’s another well reputed IDE with a easier learning curve. Furthermore it also comes with the C++ compiler bundled with it and will install automatically as part of the process. For this reason, for the rest of this article we’ll discuss the CodeBlocks IDE.
Anyone willing to use Eclipse can head over to their download page. Keep in mind you’ll likely have to set up the C++ compilers if you don’t have them already. There are two compilers for C++, Cygwin and MinGW. You can download either of them using the above links.
Back to CodeBlocks. Head over to their download page with the following link and download the version shown below. Any CodeBlocks download with the mingw word attached to it means the compiler for C++ is included.

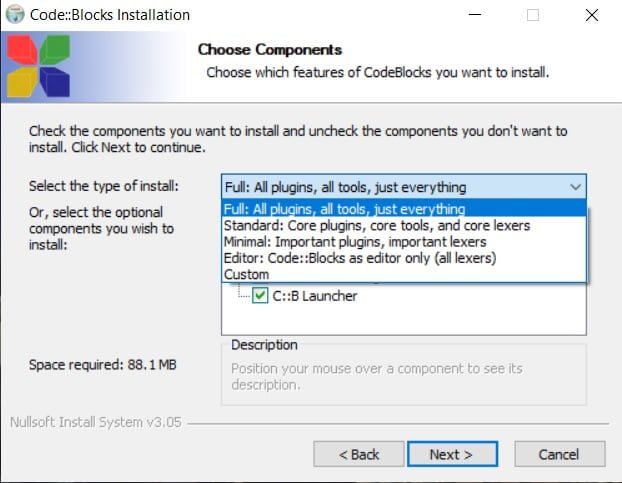
Once you’ve done this, run the setup, while picking the appropriate settings.

Once the setup is complete you will see the CodeBlocks front page and you now begin coding. Finally, let’s test our CodeBlocks installation by running a simple script that displays “Hello World” to console. Run the below code, and if you receive the same output, you have succeeded.

Issues with CodeBlocks Compiler
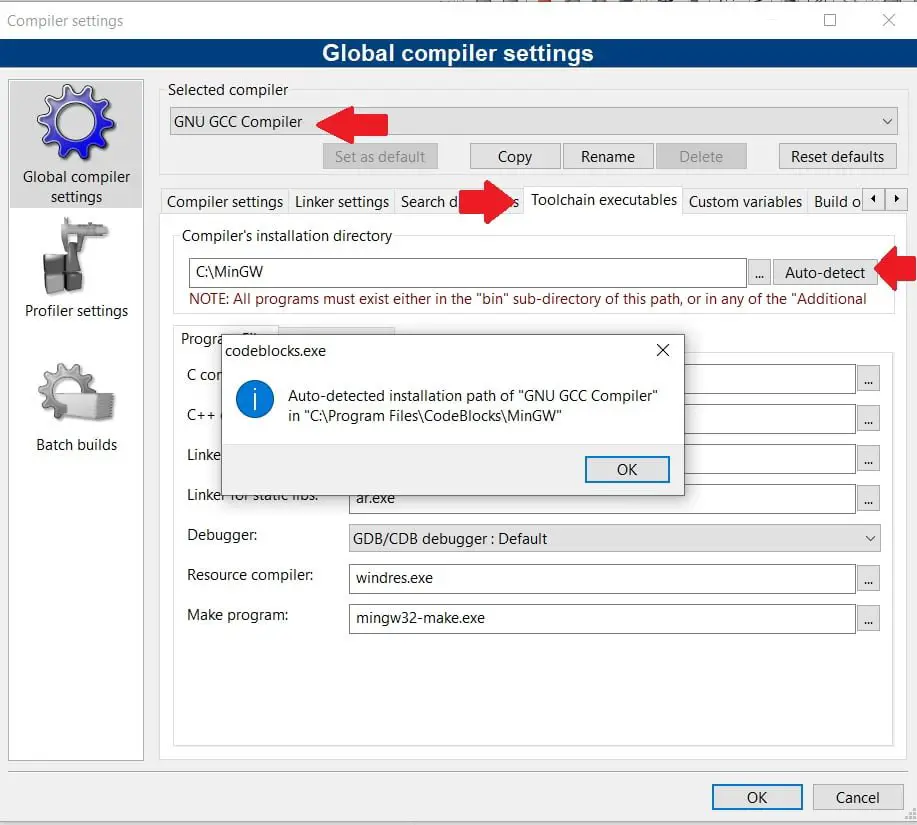
Normally, CodeBlocks should auto detect the mingw C++ compiler. But in the event that something goes wrong and it does not, you will have to do so manually. First go the settings tab, click on “Compiler”, select the GNU GCC Compiler and then go to the ToolChain executables sub-menu.
You should now see the following window.

You will likely see a compiler installation directory written there that is incorrect. You can click Auto-detect to try and get CodeBlocks to detect it again. If this doesn’t work, you’ll have to manually navigate to the minGW folder found in the CodeBlocks Installation folder.
Remember, if you have any other C++ compiler (such as Visual Studio C++), the process is the same. You can either manually locate exact location the C++ compiler and feed it into CodeBlocks, or use the auto-detect feature in the general vicinity of the installed C++ Compiler.
This marks the end of the Getting started with C++ guide. Any suggestions or contributions for CodersLegacy are more than welcome. Any questions can be directed to the comments section below.
