
In this article, we will be discussing the Python Heap Sort Algorithm in complete detail. We will start with it’s explanation, followed by a complete solution which is then explained by breaking it down into steps and explaining each of them separately.
At the end we have also included a small comparison of the Python Heap Sort with others similar algorithms. Be sure to also refer to the Video version of this tutorial (included at the end), which goes into extra depth and explanation of each individual step.
Methodology
The Heap Sort Algorithm focuses mostly on the creation of what we call a “max heap”. What is a “heap”? A heap is a special tree based data structures, with nodes that have children nodes. The first element in the heap, is known as the root node. The children of each node are smaller (in value) than the node itself.
(You don’t have to fully understand what a heap is right now. It will become clear as you proceed in the tutorial)
The entire heap sort process can be divided into three parts. We’ll include an explanation here for each process, so that when we walk you through it later, it will make more sense.
- Building an Initial Heap: This isn’t an actual step in the process, as it’s something that exists by default. We have to explain this though, as most people are unaware of how a heap is created and what it’s structure is like.
As mentioned earlier, the heap consists of nodes with upto two children. When creating the initial heap, you use the array that passed into the function for sorting. The first element becomes the root node, and then you put the second value as the left child node. (Left is always placed before right).
This continues until both child nodes have children or the array runs out. Then the child node are treated as parent nodes and given children. This continues till you have no values left.
- Building a Max Heap: In this step, we’ll take the initial heap and begin sorting it out. (Note: we aren’t sorting the array yet, just the heap). The goal is to ensure the largest value is at the top (a.k.a the first array index) and every node is greater than it’s children.
- Sorting the Array: This is the step that occurs after you’ve created the Max heap. The basic premise is that you swap the bottom most element of the heap with the root node, and then partition the heap to ignore the swapped out root node value. This continues until you have swapped all the values, at the end of which you’ll have a fully sorted array.
It sounds weird, but it’s actually because the root node is the largest value, so constantly moving it to the end, the largest, then the second largest and so on will create a sorted array.
Heap Sort Algorithm
The Heap Sort Algorithm in Python, is divided amongst two functions. One of them is responsible for creating the heap, and the other is responsible for the swapping of elements within the heap to build a max heap.
def max_heapify(arr,n,i):
    l = 2 * i + 1
    r = 2 * i + 2

    if l < n and arr[l] > arr[i]:
        largest = l
    else:
        largest = i

    if r < n and arr[r] > arr[largest]:
        largest = r

    if largest != i:
        arr[i], arr[largest] = arr[largest], arr[i]
        max_heapify(arr, n, largest)


def build_heap(arr):
    n = len(arr)

    for i in range(n, -1,-1):
        max_heapify(arr, n, i)

    for i in range(n-1,0,-1):
        arr[0] ,arr[i] = arr[i], arr[0]
        max_heapify(arr, i, 0)


arr = [33,35,42,10,7,8,14,19,48]
build_heap(arr)
print(arr)
Lets discuss the code function by function.
max_heapify: This function is meant to be recursively called, until the entire max heap has been created. The most important part here is the assignment of the left and right index. It may look random, but the array value positions actually have a pattern to them.
The formula is as follows. If you want the left child node of a node, multiply the index position by 2 and add 1. This is shown in the code as 2 * i + 1. For the right child node, you do 2 * i + 2.
Now pay attention to the image below. If you don’t understand why the nodes are placed the way they are, don’t worry. We aren’t explaining that yet. Just focus on the position numbers next to them.
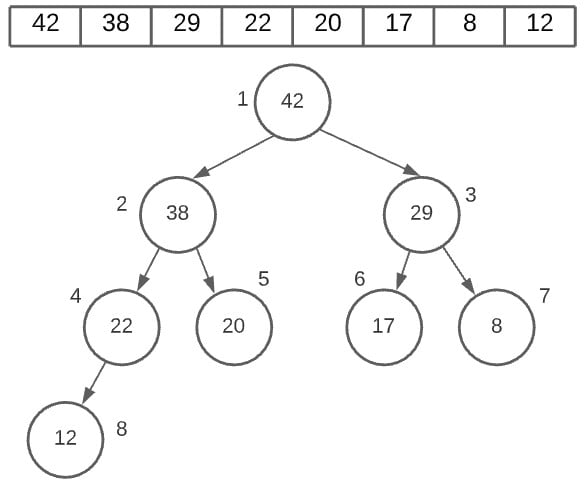
Take the root node as an example. It has the index 0 (position 1, but index 0). Now let’s say we want to find the right node index. We will do 2 * 0 + 2, which gives us the index 2. And indeed, the value 29 is stored at index 2.
build heap: This function is pretty straightforward. It just runs a for loop, and keeps calling the heapify() function until the max heap is created. The second for loop in it, does something similar, but swaps the root node with the last value.
Heap Sort Explanation
So now we are going to begin a proper, step by step demonstration of the Heap Sort Algorithm in Python. Remember the workings of the heap that I mentioned earlier.
Building the Initial Heap
This array of 8 numbers is what we will be sorting with the Heap Sort Algorithm.

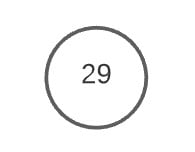
Let’s take the first element, and represent it with a bubble as shown below. This is the first node, which is meant to be where the root node (largest value) resides.
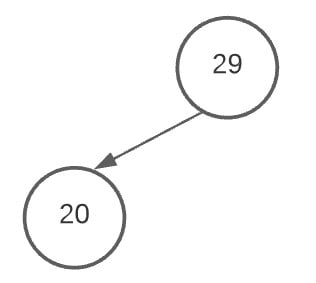
Now let’s take the second value (20) and place it in the left child node slot. Remember, as I mentioned earlier, we always fill the left slot before the right slot.
Next up is the right slot where we store 8.

Now that the root node has it’s child nodes added, we begin adding values to the child node. And once again, we start adding them in the left node first.
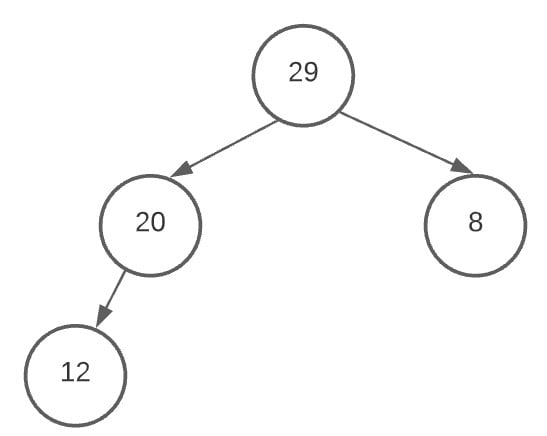
We’ve now added both 12 and 28 to the node of value 20.
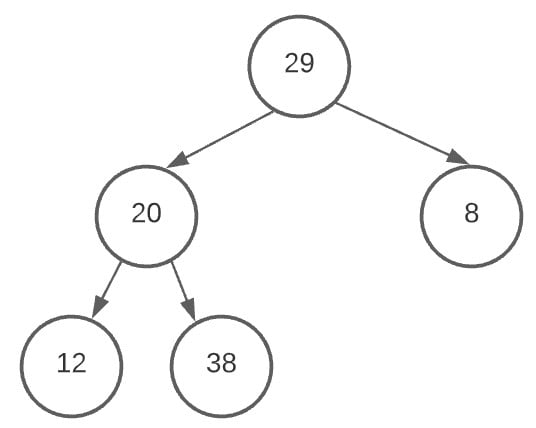
We will continue this process until the heap we have has all the values in the array.
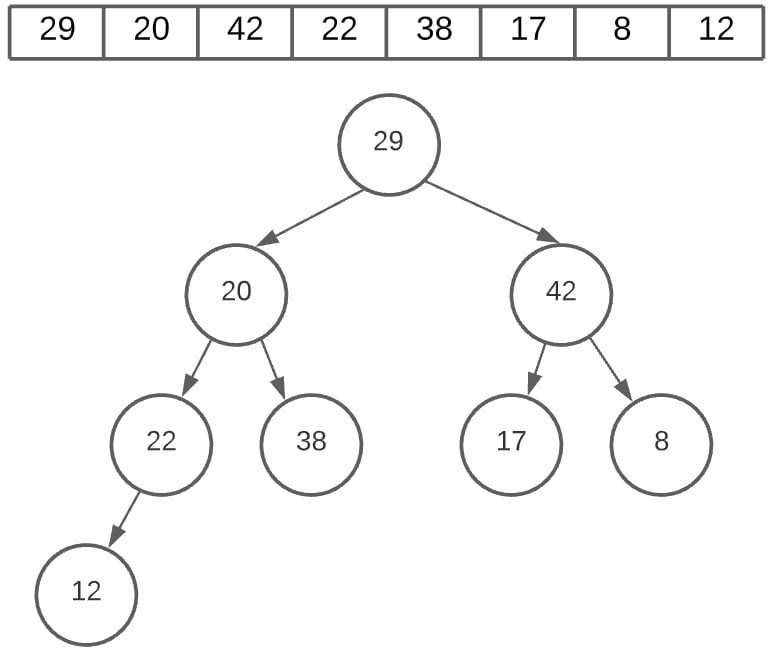
And finally, we are left with the below heap. Now as you can see, it grossly violates the conditions under which a max heap functions. The largest value 42, is currently near the bottom and almost all nodes are smaller than atleast one of their children.
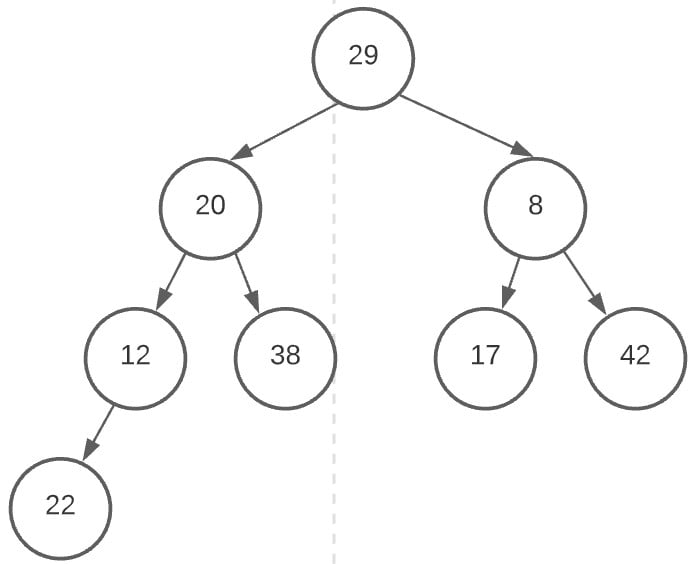
By now you will have grasped the basic structure of the Heap. In the next step, we’ll actually create the Max heap.
Building the Max Heap
Now let’s actually begin the real steps in sorting our array using Python Heap Sort. But first, a small explanation.
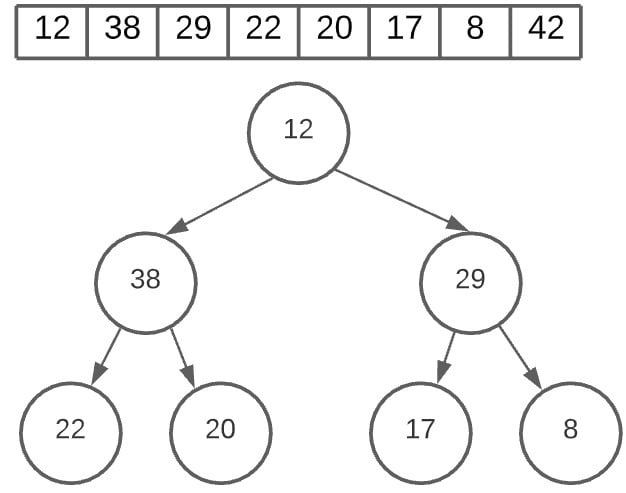
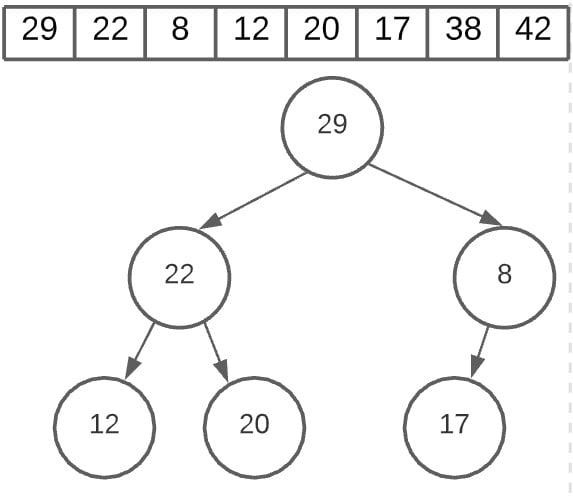
If you paid attention to the code and it’s explanation, then you’ll have some idea on how this sorting process will look. Basically, we check the children of each node, starting from the last one (in reverse basically). We then compare the node to both it’s children, and see it’s larger than both, otherwise we swap it with the largest child node.
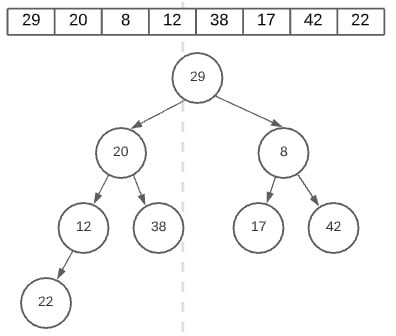
The Algorithm will ignore the 22, 17, 42 and 38 nodes as they have no children. The first swap occurs at the node “12”. This is because when compared it it’s child node(s), the node (22) was larger. Hence we swap the two.
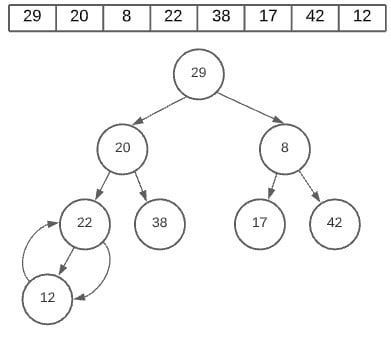
(Remember, we are just swapping values in an array. This Heap sort is just a visual representation of our Array right now).
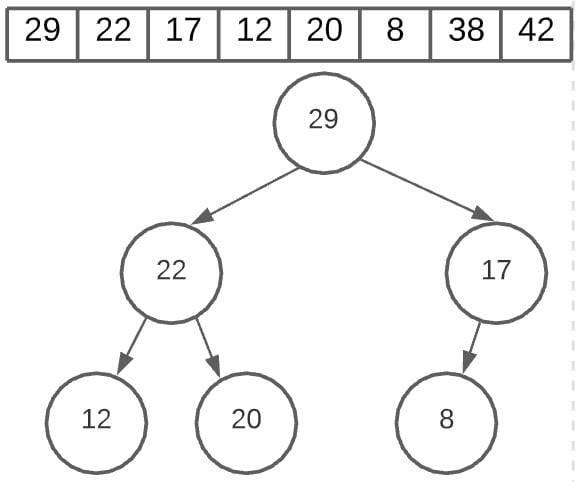
The next swap occurs at the node 8. This time the node has 2 child nodes. What we do now is to compare both of them against the parent node. The larger one is then swapped with the parent node. In this case, 8 with 42.
Remember, we are going in reverse order. If you look at the array, the value before 22 is 8, hence we moved to the node 8.
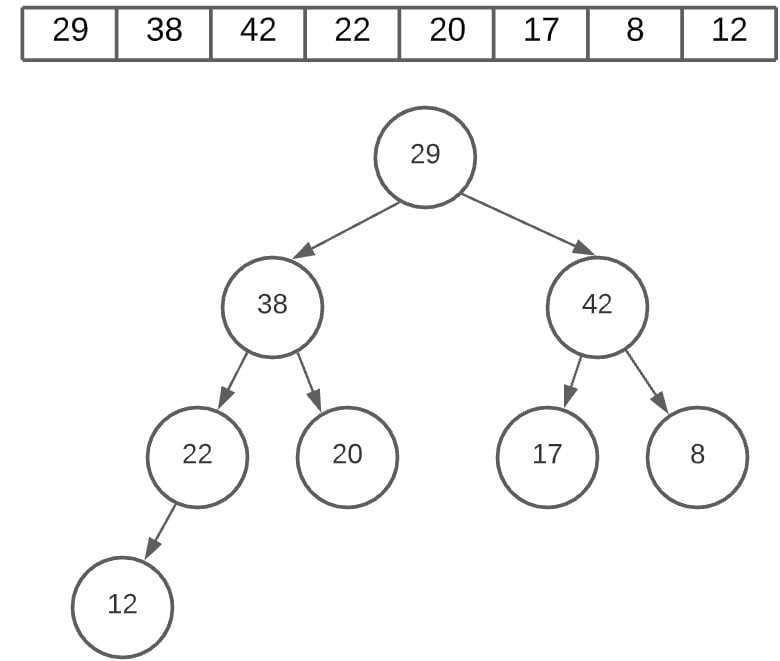
Now we move to the node 20. Once again, we have two child nodes, but 38 was larger, so we swapped 20 with it.
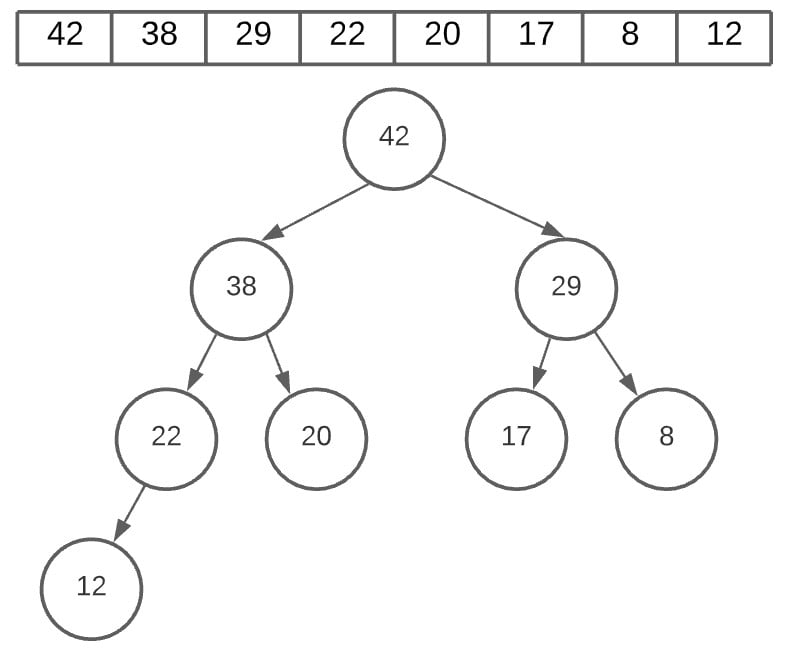
The final swap occurs at the root node location, where we swap 29 and 42.
Now that we have the max heap created, we can do a whole bunch of different things. For now though, we’ll just be sorting the array, which we will demonstrate in the next section.
Sorting the Array
All right, so are how we going to use the Max heap to sort the array? Well, there is one thing we know for sure. The root node is the largest element in the array. If you we move the root node to the end of the array, it will be in it’s correct position, since we are sorting in ascending order.
What we are going to do, is find the root node, swap it with the last value and then basically remove it from the heap. We aren’t actually removing it from the array, instead just narrowing our search range. Instead of searching from index 0 to 7, we will search from index 0 to 6. This is because index 7 has the correct value.
We will then create the max heap again (using the max_heapify function) and then repeat the whole process. Observe the process below to understand better.
The root node we currently have is 42 and the last node is 12. So we are going to swap both of them. Pay attention the values in the array. The Heap is just a visual representation of the array, which is where the real work is being done.
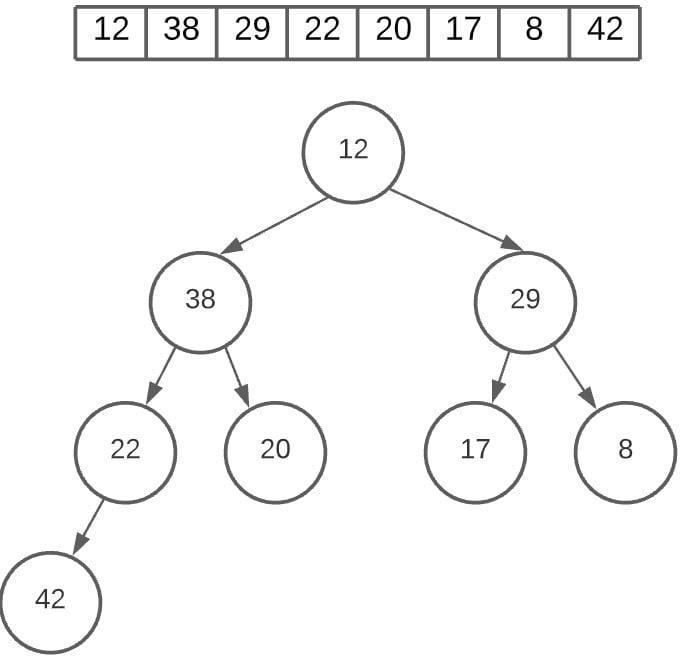
We will now remove 42 from the heap. Once again, we aren’t actually removing anything, we are just narrowing our search and creating a heap which doesn’t have 42.
Now we have to re-create the max heap, to find the next correct root node value.
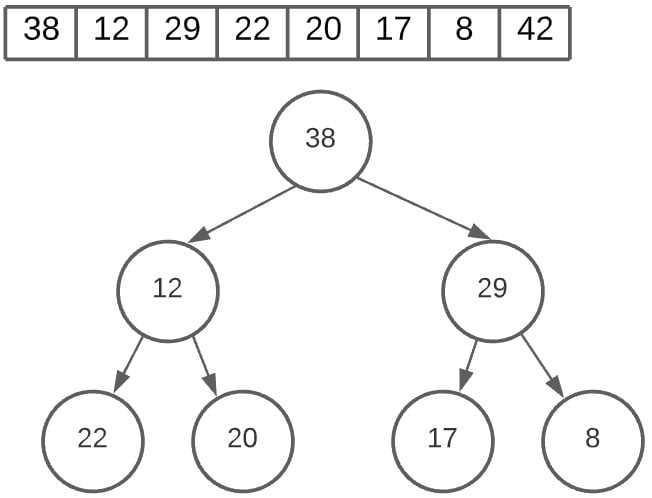
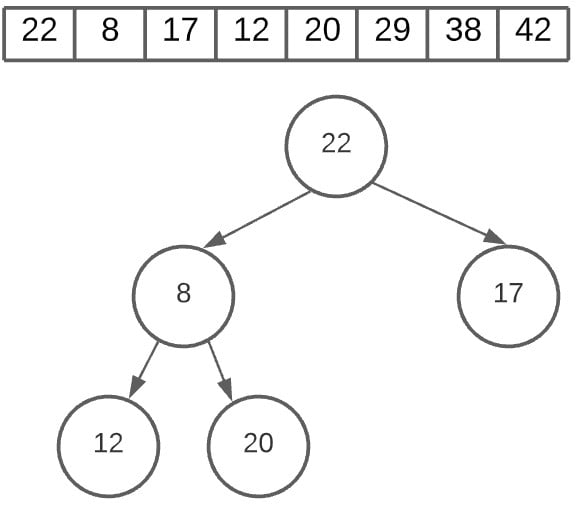
We’ll use the max_heapify function, and then recreate the heap as shown below. The new root node is now 38, after swapping with 12.
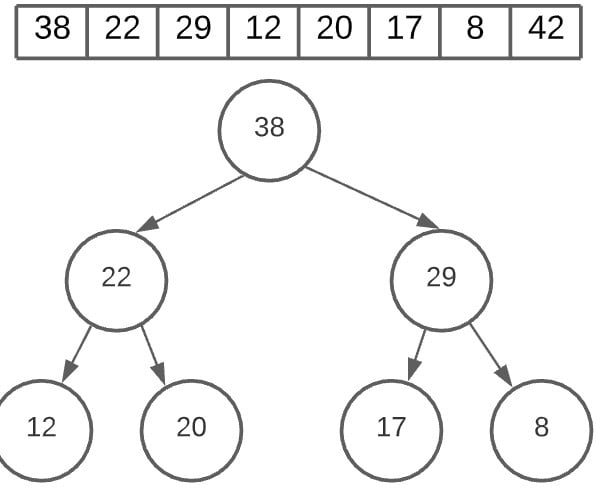
We aren’t done creating the heap yet. Another heapfiy call is made which swaps 22 with 12. We are now left with a correct max heap.
Once again, we will remove the last node (8) and swap it with the root node. The value 38 now occupies the second last position in the array.
Our next search will be excluding both 38 and 42.
Once again we will recreate the heap to find the next root node.
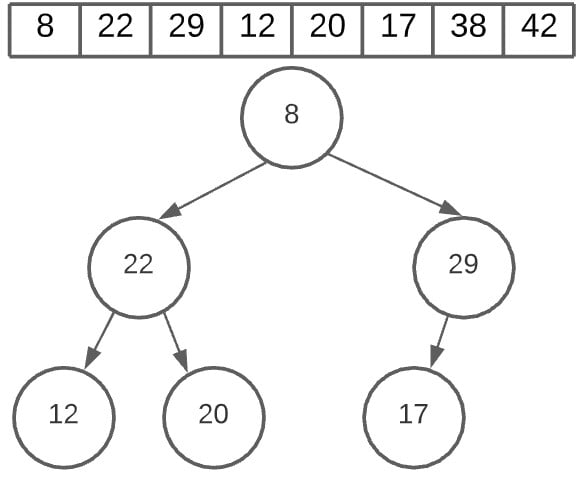
In this image below, we’ve swapped the latest root node (29) with the last value, which is once again 8.
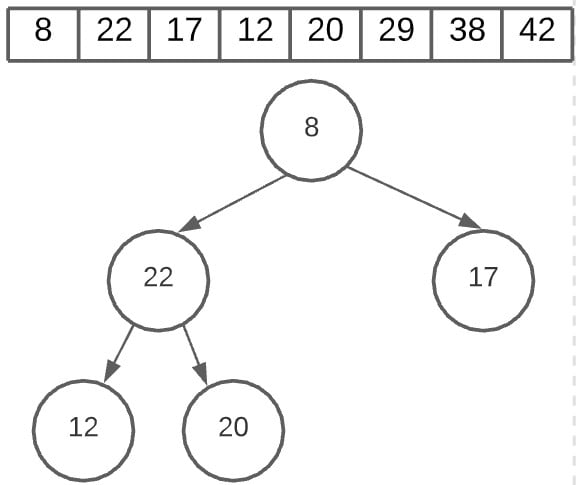
And again, we create the heap. (You won’t actually be doing this, you just need to reuse the heapfiy function you created earlier. Sorting the heap just takes an extra 2 lines of code).
You can see now that array is slowly being sorted, and we are almost half way done. We’ll just skip the next few steps because it’s getting really repetitive.
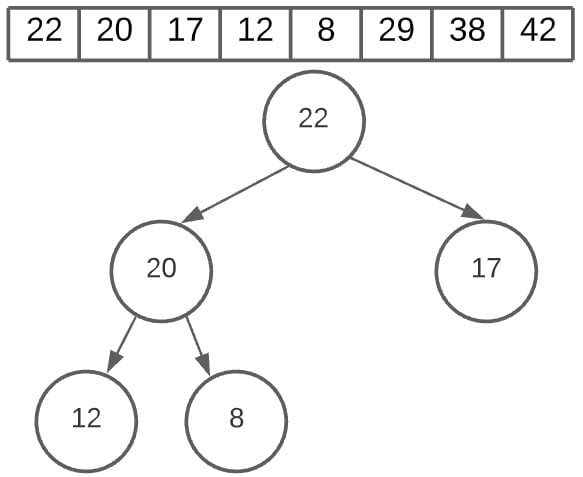
Towards the end, we are left with the following two nodes.
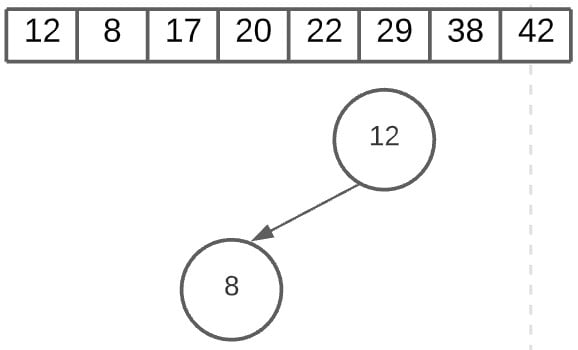
We’ll just swap the two, and be left with a completely sorted array.
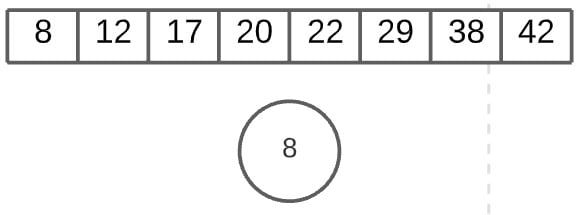
And thus ends the working of the Python Heap Sort Algorithm.
Video Tutorial
Heap Sort is one of the more complicated sorting algorithms, and is more than just a way of sorting arrays or lists in Python. Because of this it’s hard to fully convey it’s usage and logic in text form. While we have a complete explanation included here, along with working examples you might also want to check out the video version of this tutorial included below.
This marks the end of the Python Heap Sort Algorithm Tutorial. Any suggestions or contributions for CodersLegacy are more than welcome. Questions regarding the tutorial content can be asked in the comments section below.
Thanks
Simple, Clear, Ready to run. Useful algorithm.