
This Python Tutorial is an introduction to the popular game library “Pygame”.
Pygame is a game library used commonly to create 2-D games in Python. It comes with many important features such as Collision Detection, Sound and Music, Graphics, an Event System and much more. You can learn more about these amazing features by following our pygame series.
This introduction to Pygame, will cover all the core concepts you need to begin developing basic applications. You will learn how to draw, update and interact with objects on your Pygame window.
Introduction to Pygame
Before we introduce you to any Pygame code, the first thing you need to do is download and install it. The easiest and most common way of doing so is through the below pip command.
pip install pygameFollow the link given above if you have any trouble installing it.
Setting up your Pygame Window
The very first thing we need to do in any Pygame application is to setup our window to which we will be drawing and rendering text, shapes and other objects (depending on your use).
First we make the necessary imports.
import pygame
import sys
(We will need the sys library later to help exit the program successfully)
pygame.init()
screen = pygame.display.set_mode((400, 300))
Next we call pygame.init() which initializes the Pygame engine. (This is a must in all pygame applications). After this we need to create our “Screen” or “Display” object. This is done through the pygame.display.set_mode() function which takes a tuple containing the widget and height values.
The above code creates a display that is 400 pixels wide and 300 pixels in height.
Setting up the Game Loop
Our next step is to setup the “Game loop”.
A game loop is an infinite loop that runs forever, and only stops when a “QUIT” command is given. This sounds exactly like a regular game right? A game will not close until you press the quit button. Hence the game loop must also run infinitely as well.
The below format is what we use to create a Game loop in pygame. At the very end of the Game loop, we called the pygame.display.update() function, which updates the screen. Any processing or drawing to the screen will not be shown unless this function called.
while True:
    ## Processing
    ## Events
    ## Rendering

    pygame.display.update()
So now we have an infinite loop that updates the screen every iteration. But we have no way of interacting with our application yet. Let’s work on that.
Setting up the Event Loop
If you attempt to run the following code which we have written so far, you may run into an error when trying to close the Window (by pressing the exit button on the top-right corner)
import pygame
import sys

pygame.init()
screen = pygame.display.set_mode((400, 300))

while True:
    ## Processing
    ## Events
    ## Rendering

    pygame.display.update()
This is because we need to handle the “QUIT” event properly. Everything you do in pygame generates an “event”. A simple mouse click generates a “Mouse down” event. A keypress generates a “key down” event. Similarly, when you click the Exit button it generates a “Quit” event.
To handle this event and shutdown the window properly, we first need to detect the event. This can be done by calling pygame.event.get() in the start of the Game loop. This will return a list of every event that is currently occurring. By iterating through each event, we can find out whether the “Quit” event was called.
while True:
    events = pygame.event.get()
    for event in events:
        if event.type == pygame.QUIT:
            pygame.quit()
            sys.exit()
    pygame.display.update()
In the above code we successfully detect the QUIT event by checking the type attribute of each event. We then call the two functions necessary for a clean shutdown, pygame.quit() and sys.exit(). (Make sure to call pygame.quit() first)
You will learn more about events later and how you can even create your own custom events.
Drawing to the Screen
Using the Surface Class is an easy way to quickly create a Rectangular/Square object on the Screen. It takes a tuple of two values, the width and height respectively.
surface = pygame.Surface((50, 50))
surface.fill((0,255,0))
It also has a fill() method, which we can use to set the color by passing a tuple of RGB values. Each value in the tuple ranges from 0 – 255.
Here is the full code:
import pygame
import sys
pygame.init()
screen = pygame.display.set_mode((400, 300))
surface = pygame.Surface((50, 50))
surface.fill((0,255,0))
while True:
events = pygame.event.get()
for event in events:
if event.type == pygame.QUIT:
pygame.quit()
sys.exit()
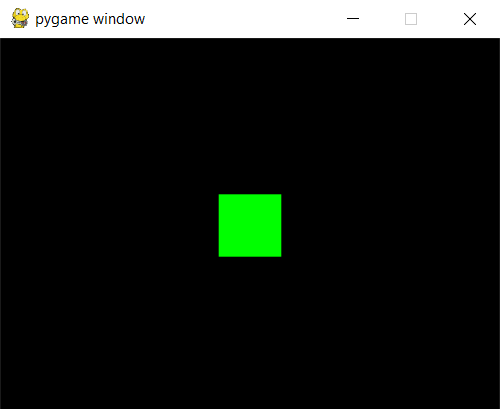
screen.blit(surface, (175, 125))
pygame.display.update()
The blit() function belonging to the screen object is used to draw the new surface to the screen. We also need to specify a location to where it will be drawn
Understanding how the Screen works
It is important to note here that this surface is being drawn to the screen every iteration of the game loop. This isn’t compulsory in this situation as we only have one object being drawn which is also stationary.
But in most cases where we have proper backgrounds and moving sprites, we need to re-render everything in every iteration.
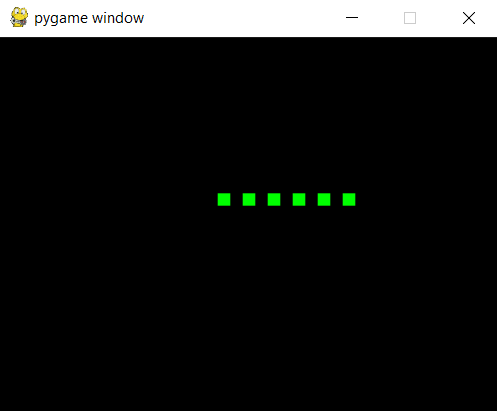
One important reason for this is how the Pygame window is like an art board. If you draw the Square in the center, then move it 100 pixels to the left, there will be two squares. This is because you drew the square to the screen twice. You cannot “erase” it, so instead you re-render the background which removes the old square.
The below code illustrates this. (Don’t worry about the keyboard-event code, that will be explained in the keyboard-events tutorial)
import pygame
import sys

pygame.init()
screen = pygame.display.set_mode((400, 300))

surface = pygame.Surface((10, 10))
surface.fill((0,255,0))

pos = [175, 125]

while True:
    events = pygame.event.get()
    for event in events:
        if event.type == pygame.QUIT:
            pygame.quit()
            sys.exit()
        if event.type == pygame.KEYDOWN:
            if event.key == pygame.K_RIGHT:
                pos[0] += 20
    screen.blit(surface, pos)
    pygame.display.update()
If you press the “Right Arrow Key” several times, you get the following output.
Now let’s fix this. Uptil now we have not had an actual background. Let us create one, which we will re-render every frame. This will fix our earlier problem. (if we do not re-render/re-draw it, we will face the same problem)
We will create a new “Surface” the same size as our Screen and start drawing it from the (0, 0) coordinate. This will result in it covering the whole Screen.
import pygame
import sys

pygame.init()
screen = pygame.display.set_mode((400, 300))
background = pygame.Surface((400, 300))

surface = pygame.Surface((10, 10))
surface.fill((0,255,0))

pos = [175, 125]

while True:
    events = pygame.event.get()
    for event in events:
        if event.type == pygame.QUIT:
            pygame.quit()
            sys.exit()
        if event.type == pygame.KEYDOWN:
            if event.key == pygame.K_RIGHT:
                pos[0] += 20

    screen.blit(background, (0, 0))
    screen.blit(surface, pos)
    pygame.display.update()
Make sure you draw the Background first, before anything else. Remember the art-board analogy. If you draw the Square first, then draw the Background, the square will be painted over.
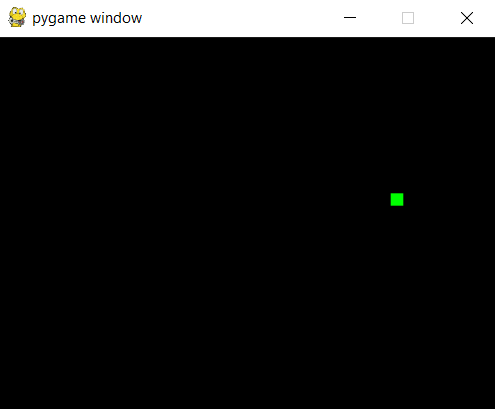
As you can see, the problem has now been solved!
Further Reading
Congratulations! Your introduction to Pygame has now been complete. To learn more about Pygame, and the various amazing things we can do with it, head over to our Pygame tutorials for beginners to learn more!
This marks the end of the Introduction to Pygame (for beginners) Tutorial. Any suggestions or contributions for CodersLegacy are more than welcome. Questions regarding the tutorial content can be asked in the comments section below.