
This is tutorial number 10 in our Pygame RPG series.
Stage and Level Generation in Pygame is a rather lengthy topic so expect the next two tutorials in this RPG series to also be discussing the same topic. By the end of the tutorial we’ll finally have more than one “area” in the game.
Stage Formats
While creating this RPG game, we came up with two different “formats” in which the fights would take place. We picked the more “RPG-ish” format for our tutorial series, and this is the format discussed in this article and carried forward into the future ones.
However, you may find it interesting to go and take a look at the alternate spinoff that we made. It features only a single level where there are an unlimited number of enemies spawning. The goal is simply to kill the maximum number of opponents before dying. So it’s less of an RPG and more of a Fighter game.
Removing Code
The first thing we are going to do is remove all the code regarding the enemy object we created. The reason being that it’s time to implement proper enemy and stage generation, not the random generation of enemies upon game start up.
So delete the line where we made the enemy object and three function calls we made in the game loop. Not following this step doesn’t matter much in this tutorial, but it will become a hindrance in the next when we implement enemy generation per level.
Building a Dungeon Entrance
It’s fairly common in RPG’s to have a specific building from where you enter a dungeon, or choose from a list of dungeons. In this section we’ll be adding our first structure into the game from where we will enter the dungeons to battle.
(It would be poor game design to put the Player directly into the dungeon upon starting/loading the game)
class Castle(pygame.sprite.Sprite):
      def __init__(self):
            super().__init__()
            self.hide = False
            self.image = pygame.image.load("castle.png")

      def update(self):
            if self.hide == False:
                  displaysurface.blit(self.image, (400, 80))
Note: If you decide to expand upon this game, you may want to consider making one single class for common (like houses). It would not be a good idea to create separate classes for each structure due to code length and repitivity.
Creating a window with Tkinter
We can’t spend too much time explaining how Tkinter works over here, so it’s best if you learn more about it in it’s own dedicated GUI tutorial. Just a brief overview will suffice.
The gist of it is as follows. First the Tkinter window is initialized and it’s dimensions are specified. Next we create three buttons with some basic information and link each button to a method using the command parameter. To wrap up we “place” each button at certain coordinates in the window.
class EventHandler():
      def __init__(self):
            self.enemy_count = 0
            self.battle = False
            self.enemy_generation = pygame.USEREVENT + 1

      def stage_handler(self):
            # Code for the Tkinter stage selection window
            self.root = Tk()
            self.root.geometry('200x170')

            button1 = Button(self.root, text = "Twilight Dungeon", width = 18, height = 2,
                            command = self.world1)
            button2 = Button(self.root, text = "Skyward Dungeon", width = 18, height = 2,
                            command = self.world2)
            button3 = Button(self.root, text = "Hell Dungeon", width = 18, height = 2,
                            command = self.world3)

            button1.place(x = 40, y = 15)
            button2.place(x = 40, y = 65)
            button3.place(x = 40, y = 115)

            self.root.mainloop()
The end result: (don’t attempt this until you’ve completed this tutorial first)
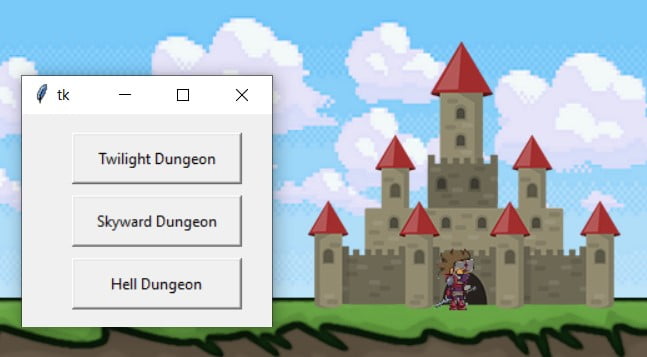
(You can also choose to skip out on the Tkinter and multiple dungeon feature by loading up a single dungeon when the player interacts with the Castle)
Creating Worlds
In the previous section we created three different buttons for three different dungeons. While in this tutorial series we will only be focusing on one, we want to atleast explain how to handle several dungeons.
The idea is that each dungeon will have only a few slight differences decided by the EventHandler’s three world functions. For instance in the world2() method, you can add a line of code that changes the images of the background object. This gives your dungeon a unique look. Furthermore, you can tweak other things like enemy generation rate or even the types of enemies spawned.
      def world1(self):
            self.root.destroy()
            pygame.time.set_timer(self.enemy_generation, 2000)
            castle.hide = True
            self.battle = True

      def world2(self):
            self.battle = True
            # Empty for now

      def world3(self):
            self.battle = True
            # Empty for now
We’ve left the other two methods empty for you, in case you choose to expand the game. Custom backgrounds, unique enemies, spawn rates, ground visuals are just a few of many things you can tweak.
Game Loop Modifications
Here we create the Castle() and handler() objects which we’ll be using later on in game loop. Remember, these are created outside of the game loop (just before it).
castle = Castle()
handler = EventHandler()
We’ve created the Castle and handler objects, but how do we trigger the GUI window we made? Our idea is quite simple. The player will go over to the castle entrance and press a specific button to interact with it. The code for this is shown below.
        if event.type == pygame.KEYDOWN:
            if event.key == pygame.K_e and 450 < player.rect.x < 550:
                handler.stage_handler()
            if event.key == pygame.K_SPACE:
                player.jump()
            if event.key == pygame.K_RETURN:
                if player.attacking == False:
                    player.attack()
                    player.attacking = True
We’ve added a new if statement as you can see. There are two conditions that must be fulfilled. First, the interact button (we’ve chosen “e”) must be pressed and the player must be standing at the Castle entrance. We’ve estimated (through trial and error) that the entrance is between the 450 and 550 x-coordinate. If these conditions are true, the window will appear.
    # Display and Background related functions
    background.render()
    ground.render()

    # Rendering Sprites
    castle.update()
    displaysurface.blit(player.image, player.rect)
Be sure to render the player after the castle. Otherwise if you move the Player over to castle, the castle will render itself over the Player, hiding it.
Next Section
And yes, there will no Enemy generating (yet!) because we are creating proper stages this time. Hence, we’ve removed the enemy.render() method. In the next section we’re going to focus on properly generating enemies, instead of the random generation we did last time.
This marks the end of the Pygame RPG Tutorial – Stage Generation. Any suggestions or contributions for CodersLegacy are more than welcome. Questions regarding the tutorial can be asked in the comments section below.
There is an error pop up: AttributeError: ‘Player’ object has no attribute ‘stage’
Since there is no stage defintion in Player class.