
PyQt6 widgets naturally look very modern and good looking, so you might not immediately feel the urge to make any changes. At some point however, you will need to make certain customizations and style changes to your widgets. For this we can use CSS Stylesheets in PyQt6, also known as QSS Stylesheets.
Some of you may already be familiar with CSS, and how it can be used in Web and Browser Applications. You will be pleased to know that syntax and style options are the same. This also allows you to use CSS related tutorials and resources to supplement your learning.
There are 4 different ways we can apply CSS Stylesheets in PyQt6. However, none of these technique conflict with each other, so they can all be used together as well.
Table of Contents
- Applying a CSS Stylesheet Globally
- Applying CSS Stylesheets on Containers
- CSS Styles on Widgets
- Creating a Separate CSS Stylesheet File
- Adding Special Effects with CSS
- Creating CSS Classes in PyQt
Applying a CSS Stylesheet Globally
The first thing you can do, is apply a CSS Stylesheet in a way that it effects the GUI application as a whole. This can be achieved by using the setStyleSheet() method on the QApplication object that we always create in any PyQt6 Application.
There are two reasons you might want to use this method. Firstly, you can use it to apply CSS styles on the Window itself (such as changing the background color or padding). Secondly, you can choose to define the Styles for various Widget Classes like QPushButton. Any widgets created from the QPushButton class will automatically have those CSS changes applied.
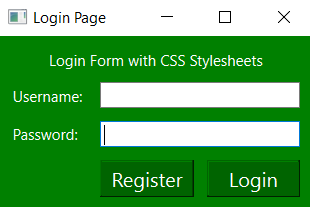
The below example illustrates both uses.
import sys
from PyQt6.QtCore import Qt
from PyQt6.QtWidgets import (
    QWidget, QPushButton, QApplication,
    QGridLayout, QLabel, QLineEdit
)

class Window(QWidget):
    def __init__(self):
        super().__init__()
        layout = QGridLayout()
        layout.setSpacing(10)
        self.setLayout(layout)
        self.setWindowTitle("Login Page")

        title = QLabel("Login Form with CSS Stylesheets")
        user = QLabel("Username: ")
        pwd = QLabel("Password: ")
        input1 = QLineEdit()
        input2 = QLineEdit()
        button1 = QPushButton("Register")
        button2 = QPushButton("Login")

        layout.addWidget(title, 0, 0, 1, 3, Qt.AlignmentFlag.AlignCenter)
        layout.addWidget(user, 1, 0)
        layout.addWidget(pwd, 2, 0)
        layout.addWidget(input1, 1, 1, 1, 2)
        layout.addWidget(input2, 2, 1, 1, 2)
        layout.addWidget(button1, 3, 1)
        layout.addWidget(button2, 3, 2)


app = QApplication(sys.argv)
window = Window()

app.setStyleSheet("""
    QWidget {
        background-color: "green";
        color: "white";
    }
    QPushButton {
        font-size: 16px;
        background-color: "darkgreen"
    }
    QLineEdit {
        background-color: "white";
        color: "black";
    }
""")

window.show()
sys.exit(app.exec())
Towards the end of the tutorial we will explore how to add in additional special CSS effects, such as hover and focus.
Applying CSS Stylesheets on Containers
This method is fairly similar to the first, but instead of being applied on the entire Application, it is applied on just one Container. For example, we typically create our Window using QWidget, which is a container type widget. Applying a Stylesheet on this container will effect all the widgets inside it.
Now, in our current application, we only have one window so it doesn’t make a difference if we apply it on QApplication, or our QWidget window. But if we had multiple windows, and we wanted different stylesheets for each, we would use this method.
Another situation where you might want to use this, is if you have multiple containers nested within your window. This is can be seen in larger applications when you have dozens of widgets in your application. Different containers in your Window may require different styles, in which case this will help.
Shown below is how we add stylesheets to containers using the setStyleSheet() method.
app = QApplication(sys.argv)
window = Window()

window.setStyleSheet("""
    QWidget {
        background-color: "green";
        color: "white";
    }
    QPushButton {
        font-size: 16px;
        background-color: "darkgreen"
    }
    QLineEdit {
        background-color: "white";
        color: "black";
    }
""")
Note: You can’t attach stylesheets to layout managers in PyQt6.
Applying CSS Stylesheets on Widgets
Sometimes we may need to make changes in just 1-2 widgets specifically. Or maybe we have 10 Labels, and we have applied a CSS style to all 10. But what if we want to make some minor changes in one of those 10 labels? What now?
Well, luckily we can make changes in the CSS styles for individual widgets as shown below. The setStyleSheet() method is available on almost everything!
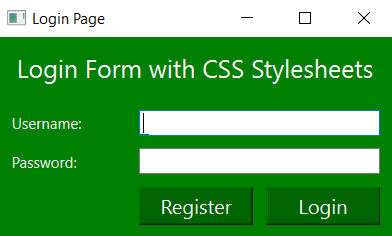
        title = QLabel("Login Form with CSS Stylesheets")
        title.setStyleSheet("font-size: 18px; padding-bottom: 10px;")
All we have done here, is make the title a bit bigger and added some spacing between it and the rest of the widgets.
Creating a Separate CSS Stylesheet File
In order to keep our code clean and tidy, we can move all the CSS out to a separate file instead.
Copy the code over to a new file, and name it something like styles.css. This is what it should look like.
QWidget {
    background-color: "green";
    color: "white";
}
QPushButton {
    font-size: 16px;
    background-color: "darkgreen"
}
QLineEdit {
    background-color: "white";
    color: "black";
}
Now we need to import this style sheet, and set it to our app, or window.
app = QApplication(sys.argv)
window = Window()

with open("styles.css","r") as file:
    app.setStyleSheet(file.read())

window.show()
sys.exit(app.exec())
Read the CSS file in the above manner, and the CSS styles will successfully be applied!
Adding Special Effects with CSS
Let’s modify our CSS a bit and even more fancier CSS properties, that trigger under certain conditions. For example, a very commonly used property is “hover”, which activates a special set of CSS styles when our mouse cursor is hovering over the widget.
Other similar properties are “focus”, “active” and “pressed”. “focus” is when you have actively selected a widget, such as a QLineEdit you have selected, or a button that you have pressed. Only one widget can be in focus at a time.
“active” is the default state for a widget. It’s opposite is “disabled”. “pressed” is similar to “focus” but it only lasts while you are actively interacting with the widget. For example, while a button is being held down, it is “pressed”, but after the mouse is released, it is no longer pressed, rather it is in “focus”.
In the below code, we have added three such effects. Try running the code yourself to see the changes, as most of them are dynamic and need to be interacted with to see the effects.
window = Window()
window.setStyleSheet("""
QWidget {
background-color: "green";
color: "white";
}
QPushButton {
font-size: 16px;
background-color: "darkgreen"
}
QLineEdit {
background-color: "white";
color: "black";
}
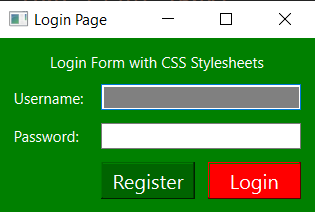
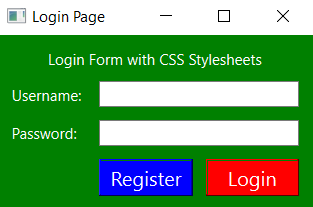
QPushButton:hover {
background-color: "red";
}
QPushButton:focus {
background-color: "blue";
}
QLineEdit:focus {
background-color: "grey";
}
""")
window.show()
sys.exit(app.exec())
Here is what the Login button looks like with the mouse hovering it.
In the below image, we are still hovering over “Login”, but we have also clicked on “Register” previously, so it’s currently in focus.
Creating CSS Classes in PyQt
One very handy feature we often use in CSS is the concept of Classes. Sometimes we may not want to apply the same style to all objects of a certain widget, such as the QPushButton or QLabel. What if you have several types of QLabels, like headings, regular text and quotes. It would make sense to have different styles for each type right?
By exploiting the class property in PyQt6, we can implement this feature in QSS as well. In our Login form, we have two types of Labels. The first is the title, and second is the username and password labels. Let’s make two different sets of CSS styles for them.
Using the setProperty() function, we will give a value to the “class” properties of each widget as shown below.
        title = QLabel("Login Form with CSS Stylesheets")
        title.setProperty("class", "heading")
        user = QLabel("Username: ")
        user.setProperty("class", "normal")
        pwd = QLabel("Password: ")
        pwd.setProperty("class", "normal")
Now it’s time to define the CSS styles for these Classes. Do keep in mind, that the styles we applied for QLabel will still apply on these. The effect is cumulative.
    .normal {
        font-size: 14px;
    }
    .heading {
        font-size: 20px;
        padding-bottom: 10px"
    }
Add the above styles to your stylesheet and watch the magic!
This marks the end of the PyQt6 CSS Stylesheets Tutorial. Any suggestions or contributions for CodersLegacy are more than welcome. Questions regarding the article content can be asked in the comments section below.
Thank You so MUCH!!!!
In the last css code snippet (for the classes), there shouldn’t be a double quote character at the end of line 6, this causes an error that will not allow the style to be applied.