
In this tutorial we will explore how to make the Tkinter Treeview Widget, “Editable”. In a previous tutorial, we wrote the following code to represent Product data in a Tabular format using the Treeview widget. But the problem with this approach, is that there is no way of editing the Table from the user’s perspective.
import tkinter as tk
from tkinter import ttk


class ProductTable(tk.Tk):
    def __init__(self, products, **kwargs):
        super().__init__(**kwargs)
        self.products = products
        self.tree = ttk.Treeview(self, columns=("ID", "Name", "Category", "Price"), show="headings")
        self.tree.heading("ID", text="ID")
        self.tree.heading("Name", text="Name")
        self.tree.heading("Category", text="Category")
        self.tree.heading("Price", text="Price")

        # Insert sample data into the Treeview
        for product in self.products:
            self.tree.insert("", "end", values=product)
        self.tree.pack(fill="both", expand=True)

products = [
        ("1001", "Product A", "Category 1", "$10.99"),
        ("1002", "Product B", "Category 2", "$15.49"),
        ("1003", "Product C", "Category 1", "$8.95"),
        ("1004", "Product D", "Category 3", "$12.99"),
        ("1005", "Product E", "Category 2", "$9.99"),
        ("1006", "Product F", "Category 1", "$7.50"),
        ("1007", "Product G", "Category 3", "$11.25"),
        ("1008", "Product H", "Category 2", "$14.99"),
        ("1009", "Product I", "Category 1", "$6.99"),
        ("1010", "Product J", "Category 3", "$10.00")
    ]

app = ProductTable(products)
app.mainloop()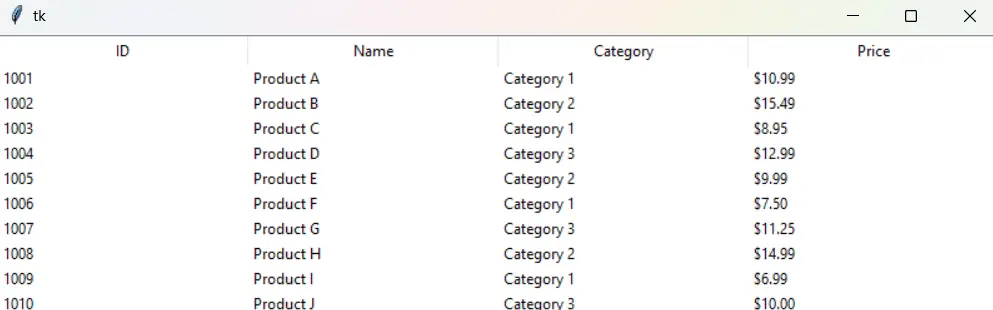
Ideally, we want the user to be able to interact with the Table with the mouse cursor, and edit whichever cell he likes. This is what we will do in this tutorial.
How to make the Treeview Table Editable
The first thing you need to understand, is that there is no native way of making the Treeview widget editable. No special parameter, or function that makes it editable. No.
Instead, what we have to do is come up with our own unique solution to make the Treeview widget editable. Basically we have to make the “edit” functionality ourselves. An innovative solution to this problem, is to create the “illusion” that we are editing the Treeview widget. Let me explain how this is possible.
Here is what we will do.
- When the user double-clicks on a Treeview cell, we will record these coordinates (available from the double click event).
- We will then use these coordinates to spawn an Entry widget at this location, with the same dimensions as the Treeview cell. The Entry widget will appear over the Treeview cell, hiding it temporarily.
- We will then copy the value (programmatically) from the Treeview cell to the Entry widget, and highlight the text in blue (giving it the appearance of selected text).
- The user can then modify the text inside the Entry widget, and when he is done, will press the Enter key. This will destroy the Entry widget, but before that, we will copy the new text from the Entry widget which the user modified, and update the Treeview cell with it.
Thus, our edit feature is complete. We will now share the code, piece by piece.
Code
First, we will define a special Entry widget class. This class will inherit from the regular Entry widget, and add a few extra methods and some custom initialization logic in the __init__ method. The code has been well commented to help you understand it.
class EntryPopup(ttk.Entry):
    def __init__(self, parent, iid, column, text, **kw):
        super().__init__(parent, **kw)
        self.tv = parent.tree  # reference to parent window's treeview
        self.iid = iid  # row id
        self.column = column

        self.insert(0, text)
        self['exportselection'] = False  # Prevents selected text from being copied to
                                         # clipboard when widget loses focus
        self.focus_force()  # Set focus to the Entry widget
        self.select_all()   # Highlight all text within the entry widget
        self.bind("<Return>", self.on_return) # Enter key bind
        self.bind("<Control-a>", self.select_all) # CTRL + A key bind
        self.bind("<Escape>", lambda *ignore: self.destroy()) # ESC key bind

    def on_return(self, event):
        '''Insert text into treeview, and delete the entry popup'''
        rowid = self.tv.focus()  # Find row id of the cell which was clicked
        vals = self.tv.item(rowid, 'values')  # Returns a tuple of all values from the row with id, "rowid"
        vals = list(vals)  # Convert the values to a list so it becomes mutable
        vals[self.column] = self.get()  # Update values with the new text from the entry widget
        self.tv.item(rowid, values=vals)  # Update the Treeview cell with updated row values
        self.destroy()  # Destroy the Entry Widget

    def select_all(self, *ignore):
        ''' Set selection on the whole text '''
        self.selection_range(0, 'end')
        return 'break' # returns 'break' to interrupt default key-bindings
Next, in the __init__ method of the Table class, we add the following line, binding the double left-click to a method that we will define in the next step.
self.tree.bind("<Double-1>", lambda event: self.onDoubleClick(event))Now we will define the double click method, which is responsible for spawning the Entry widget at the right location.
    def onDoubleClick(self, event):
            '''Executed, when a row is double-clicked'''
            # close previous popups
            try:  # in case there was no previous popup
                self.entryPopup.destroy()
            except AttributeError:
                pass

            # what row and column was clicked on
            rowid = self.tree.identify_row(event.y)
            column = self.tree.identify_column(event.x)

            # return if the header was double clicked
            if not rowid:
                return

            # get cell position and cell dimensions
            x, y, width, height = self.tree.bbox(rowid, column)
            print(x, y, width, height)

            # y-axis offset
            pady = height // 2

            # place Entry Widget
            text = self.tree.item(rowid, 'values')[int(column[1:])-1]
            self.entryPopup = EntryPopup(self, rowid, int(column[1:])-1, text)
            self.entryPopup.place(x=x, y=y+pady, width=width, height=height, anchor='w')
And that’s all. We can now run our code, and double click any cell to edit its values.
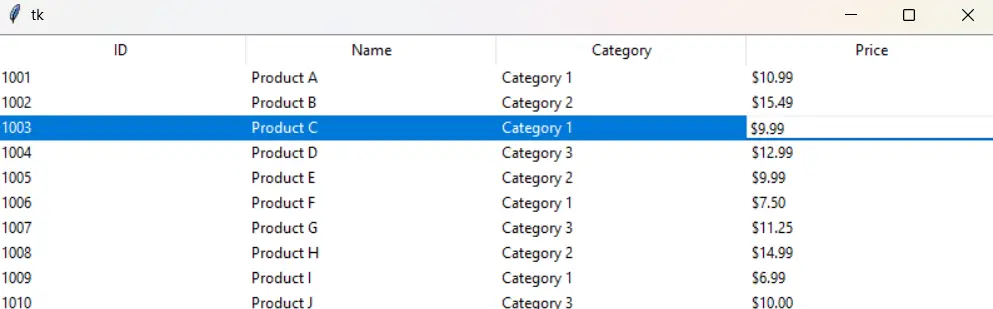
We have updated the price of Product-C to $9.99 from its old value $8.95. The best part about this, is that it looks 100% natural. Here is the complete code for the Table class (excluding the custom Entry class).
import tkinter as tk
from tkinter import ttk

class Table(tk.Tk):
    def __init__(self, data, **kwargs):
        super().__init__(**kwargs)
        self.data = data
        self.initialize_ui()

    def initialize_ui(self):
        # Create Treeview widget
        self.tree = ttk.Treeview(self, columns=("ID", "Name", "Category", "Price"), show="headings")
        self.tree.heading("ID", text="ID")
        self.tree.heading("Name", text="Name")
        self.tree.heading("Category", text="Category")
        self.tree.heading("Price", text="Price")
        self.tree.bind("<Double-1>", lambda event: self.onDoubleClick(event))

        # Insert sample data into the Treeview
        for product in self.data:
            self.tree.insert("", "end", values=product)
        self.tree.pack(fill="both", expand=True)

    def onDoubleClick(self, event):
            '''Executed, when a row is double-clicked'''
            # close previous popups
            try:  # in case there was no previous popup
                self.entryPopup.destroy()
            except AttributeError:
                pass

            # what row and column was clicked on
            rowid = self.tree.identify_row(event.y)
            column = self.tree.identify_column(event.x)

            # return if the header was double clicked
            if not rowid:
                return

            # get cell position and cell dimensions
            x, y, width, height = self.tree.bbox(rowid, column)
            print(x, y, width, height)

            # y-axis offset
            pady = height // 2

            # place Entry Widget
            text = self.tree.item(rowid, 'values')[int(column[1:])-1]
            self.entryPopup = EntryPopup(self, rowid, int(column[1:])-1, text)
            self.entryPopup.place(x=x, y=y+pady, width=width, height=height, anchor='w')

    def get_column(self, column_name):
        column_values = []
        for id in self.tree.get_children():
            column_values.append(self.tree.item(id, "values")[self.tree["columns"].index(column_name)])
        return column_values

    def get_row(self, row_index):
        print("get_children return value: ", self.tree.get_children())
        return self.tree.item(self.tree.get_children()[row_index], "values")

products = [
        ("1001", "Product A", "Category 1", "$10.99"),
        ("1002", "Product B", "Category 2", "$15.49"),
        ("1003", "Product C", "Category 1", "$8.95"),
        ("1004", "Product D", "Category 3", "$12.99"),
        ("1005", "Product E", "Category 2", "$9.99"),
        ("1006", "Product F", "Category 1", "$7.50"),
        ("1007", "Product G", "Category 3", "$11.25"),
        ("1008", "Product H", "Category 2", "$14.99"),
        ("1009", "Product I", "Category 1", "$6.99"),
        ("1010", "Product J", "Category 3", "$10.00")
    ]

app = Table(products)
app.mainloop()
This marks the end of the How to make ttk.Treeview Editable Tutorial. Any suggestions or contributions for CodersLegacy are more than welcome. Questions regarding the tutorial content can be asked in the comments section below.
It’s very useful.. Thanks