This Article covers the use of a Menu in Tkinter Python.
What is the Python Tkinter Menu?
The Python Tkinter Menu widget is used to create various types of menus in the GUI such as top-level menus, which are displayed right under the title bar of the parent window.
Syntax
menu = Menu(master, options..........) Fair warning before you proceed any further. Creating a fully fledged menu for your GUI application is considerably harder than the average widget due to the sheer size. A Tkinter Menu can be thought as a collection of many other widgets bundled into one.
The plus side is that using Menu’s properly in your GUI application significantly improves the functionality and makes it seem professional.
Menu Options:
A list of the most relevant options in Tkinter Menu’s.
| No. | Option | Description |
|---|---|---|
| 1 | activebackground | Color of the background when widget is under focus. |
| 2 | activeforeground | Color of the foreground when widget in under focus. |
| 3 | bg | Background color for the area around the widget. |
| 4 | bd | Size of the border around the widget. Default value is 2 pixels. |
| 5 | cursor | When the mouse is hovering over this widget, it can be changed to a special cursor type like an arrow or dot. |
| 6 | disabledforeground | Color of text for DISABLED items. |
| 7 | font | The type of font to be used for this widget. |
| 8 | fg | The color for the text. |
| 9 | image | Used to display an image |
| 10 | postcommand | procedure to be called when menu is brought up. |
| 11 | relief | It specifies the type of the border. Default is Flat, other options include RAISED and SUNKEN. |
Tkinter Menu Functions
A list of the most relevant Functions in Tkinter Menu’s.
| No. | Options | Description |
|---|---|---|
| 1 | add_command(options) | Adds menu items to the Menu. |
| 2 | add_radiobutton(options) | Adds a radio button item to the Menu |
| 3 | add_checkbutton(options) | Adds a Check Button item to the Menu. |
| 4 | add_cascade(options) | Used to introduce hierarchy into the Menu. |
| 5 | add_separator() | Adds a separator line in the menu to partition items. |
| 6 | add(type, options) | Adds an item of a specified type to the Menu. |
| 7 | index(item) | Returns the index of a specified Menu item. |
Tkinter Menu Example 1.
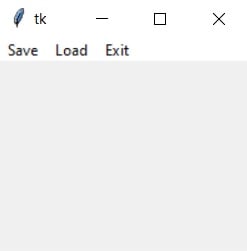
The following example uses a simple menu approach (without any hierarchy).
We’ve created three menu options here, Save, Load and Exit. The Save and Load procedures are linked to dummy functions for the purpose of this code. The Exit button calls the root.destroy command which destroys the Tkinter process.
Finally, we use the root.config to assign our menu object as the menu for the root tkinter window. Remember, you menu will not displayed unless it has been assigned to a window.
from tkinter import *

def save():
    #Code to be written
    pass

def load():
    #Code to be written
    pass

root = Tk()
root.geometry("200x150")
frame = Frame(root)
frame.pack()

mainmenu = Menu(frame)
mainmenu.add_command(label = "Save", command= save)
mainmenu.add_command(label = "Load", command= load)
mainmenu.add_command(label = "Exit", command= root.destroy)

root.config(menu = mainmenu)

root.mainloop()

Tkinter Menu Example 2.
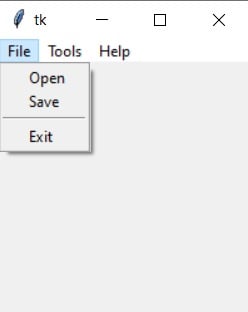
In this example, we use a hierarchical approach. This approach allows for drop down menu’s within your menu. Think of it as Nested Menu, where we have one main menu, which further contains 2 or more menus. We use the add_cascade to achieve this.
To keep the code size small and since this is only a demonstration, all commands lead back to an empty procedure. Furthermore, you should keep the value of tearoff equal to 0. This prevents the menu from being “torn off” into a new window. Most of you will not want this to show as it doesn’t look good visually.
Note the trend of values that the parameter master has taken. The main menu links to root, while the three Sub Menu’s link back to the Main menu.
from tkinter import *

def emptyfunc():
    #Code to be written
    pass

root = Tk()

# Main Menu
mainmenu = Menu(root)

# Menu 1
filemenu = Menu(mainmenu, tearoff = 0)
filemenu.add_command(label = "Open", command = emptyfunc)
filemenu.add_command(label = "Save", command = emptyfunc)
filemenu.add_separator()
filemenu.add_command(label = "Exit", command = root.destroy)
mainmenu.add_cascade(label="File", menu=filemenu)

# Menu 2
toolmenu = Menu(mainmenu, tearoff = 0)
toolmenu.add_command(label = "Find", command = emptyfunc)
toolmenu.add_command(label = "Debugger", command = emptyfunc)
toolmenu.add_command(label = "Replace", command = emptyfunc)
mainmenu.add_cascade(label="Tools", menu=toolmenu)

# Menu 3
helpmenu = Menu(mainmenu, tearoff = 0)
helpmenu.add_command(label = "Documentation", command = emptyfunc)
mainmenu.add_cascade(label = "Help", menu = helpmenu)

root.config(menu = mainmenu)
root.mainloop()

This marks the end of our Python Tkinter Menu Article. You should head over to the Python Menu Button Article next. It explores the concept of putting a menu in a button. Most of the syntax remains the same. There are also further examples of using check buttons and radio buttons in menu’s in that article.
You can head back to the main Tkinter article using this link.

how would I add a submenu to a menu?
You can do this, adding to the example 2 above:
submenu = tk.Menu(filemenu, tearoff=0)
submenu.add_command(label=”SubItem1″, command=empty_func)
filemenu.add_cascade(label=”Branch”, menu=submenu)
In the list of Tkinter menu options add_seperator() should be add_separator(). A simple spelling mistake, but it can really confuse and frustrate us newbies. haha
Corrected! Thanks for pointing it out.