
This Article covers the use of the Menu Button in Tkinter Python.
What is the Python Tkinter Menu Button?
A combination of both the button and menu widget, the Python Tkinter Menu button widget displays a drop down menu with a list of options once clicked. Otherwise it will only be showing one option.
If you haven’t been through our Tkinter Menu Article, head over there first and read more about menu’s. A menu button is just a button to which a menu is attached. Refer to the article to understand how that menu is made.
Menu Button Syntax:
MenuBttn = Menubutton(master, option..... )Menu Buttons Options
A complete list of options for the Tkinter Menu Button. Note however, that some will only work with the newer “ttk” version. A short segment on this is included at the end of the tutorial.
| No. | Option | Description |
|---|---|---|
| 1 | activebackground | Color of the background when widget is under focus. |
| 2 | activeforeground | Color of the foreground when widget in under focus. |
| 3 | bg | Background color for the area around the widget. |
| 4 | bd | Size of the border around the widget. Default value is 2 pixels. |
| 5 | cursor | When the mouse is hovering over this widget, it can be changed to a special cursor type like an arrow or dot. |
| 6 | direction | Sets the direction of the text relative to the Menu button. Options are, LEFT, RIGHT and ‘above’. |
| 7 | fg | The color for the text. |
| 8 | height | The height of the widget in terms of text lines. |
| 9 | highlightcolor | The text color when the widget is under focus. |
| 10 | image | Used to display an image |
| 11 | justify | Specifies how the text is aligned within the widget. One of “left”, “center”, or “right”. |
| 12 | menu | Used to assign a menu object to the menu button. Allows for a list of options to be displayed. |
| 13 | padx | Amount of padding in terms of pixels in the left-right directions. |
| 14 | pady | Amount of padding in terms of pixels for the area above and below the widget. |
| 15 | relief | It specifies the type of the border. Default is Flat, other options include RAISED and SUNKEN. |
| 16 | State | Default is NORMAL. DISABLED causes the Widget to gray out and go inactive. |
| 17 | text | The text displayed next on the Menu Button. |
| 18 | textvariable | Allows us to assign a variable to the Menu Button. Text displayed on the Menu Button can be changed by manipulating this variable. |
| 19 | width | Width of the widget in terms of number of characters. |
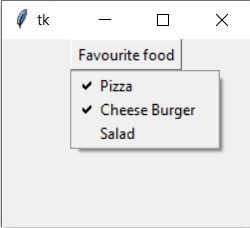
Menu Button Example 1.
This example explores the use of a Menu Button using a menu with Check Buttons.
Remember that the menu’s master option should always be the name of the Menu Button to which it is to be assigned. And you have to assign a menu to a Menu Button as shown in the example for it to actually display.
from tkinter import *

root = Tk()
root.geometry("200x150")
frame = Frame(root)
frame.pack()

MenuBttn = Menubutton(frame, text = "Favourite food", relief = RAISED)

Var1 = IntVar()
Var2 = IntVar()
Var3 = IntVar()

Menu1 = Menu(MenuBttn, tearoff = 0)

Menu1.add_checkbutton(label = "Pizza", variable = Var1)
Menu1.add_checkbutton(label = "Cheese Burger", variable = Var2)
Menu1.add_checkbutton(label = "Salad", variable = Var3)

MenuBttn["menu"] = Menu1

MenuBttn.pack()
root.mainloop()
Menu Button Example 2.
This example is the same as the above one, except this time we’re using Radio buttons instead of check buttons. As expected, this causes only one option to be selected at a time.
from tkinter import *

root = Tk()
root.geometry("200x150")
frame = Frame(root)
frame.pack()

MenuBttn = Menubutton(frame, text = "Favourite food", relief = RAISED)

Var1 = IntVar()

Menu1 = Menu(MenuBttn, tearoff = 0)

Menu1.add_radiobutton(label = "Pizza", variable = Var1, value = 1)
Menu1.add_radiobutton(label = "Cheese Burger", variable = Var1, value = 2)
Menu1.add_radiobutton(label = "Salad", variable = Var1, value = 3)

MenuBttn["menu"] = Menu1

MenuBttn.pack()
root.mainloop()
TTK MenuButton
The newer ttk library brings in some updated widgets which generally perform better than the originals. They offer more flexibility and have more options. Some of the above mentioned options only work with the ttk version of the Menu Button.
In the below section, we demonstrate how to do this, and we also use an option (textvariable) which is not available in the tkinter menu button.
from tkinter import *
import tkinter
from ttk import Menubutton

def f():
  var.set("Food")

root = Tk()

var = StringVar()

mb = Menubutton (root, textvariable = var)
mb.pack()
mb.menu =  Menu ( mb, tearoff = 0 )
mb["menu"] =  mb.menu

b = Button(root, text = "Click", command = f)
b.pack()

mayoVar = IntVar()
ketchVar = IntVar()

mb.menu.add_checkbutton ( label="mayo",
                          variable=mayoVar )
mb.menu.add_checkbutton ( label="ketchup",
                          variable=ketchVar )

mb.pack()
root.mainloop()
This marks the end of our Python Tkinter Menu Button article. You can head back to the main Tkinter article using this link. Any suggestions or contributions for CodersLegacy are more than welcome. Questions regarding the article tutorial content can be asked in the comments section below.
Dude, a lot of the parameters listed on this tutorial do not actually work when you write them into the code. For example, textvariable can’t go inside an .add(type, option) to a menu object, and neither can it go into the Menu() widget creation. This isn’t the only tutorial on this website with these mistakes! I have to try out every single parameter and half of them don’t work. Please clean this up!
I’m glad to see your feedback. I actually tried it out myself, and realized the issue.
You need to use the newer ttk MenuButton for these newer features. I will now include an example in this article. I’ll also try and work out an article which is dedicated to explaining ttk and it’s uses.
I wish I find a method to run python program from menu item based on mouse click. I tried but immediately python trying to run the program. Please help.
Also if from menu button is is ok
ttk in Python 3 is now included inside tkinter. So, for Python 3 tour ‘TTK MenuButton’ example should begin with
from tkinter import *
import tkinter
from tkinter.ttk import Menubutton
……….