
In this article we’ll be covering the Tkinter grid layout manager. Tkinter grid is one out of three layout managers used to control the placement of widgets on a Tkinter window.
The other two layout managers are pack() and place(). In this article however, we’ll simply cover Tkinter grid and it’s various usages.
Using the Grid Layout
The grid layout has 4 main options that you can use while positioning widgets.
row– The row at which the widget is to be placedcolumn– The column at which the widget is to be placedcolumnspan– The number of columns the widget will occupyrowspan– The number of rows the widget will occupy
There is no limit to the number of columns and rows you can have in the grid. The highest column and row numbers you enter into your grid, will become the determine the number of rows and columns.
A short example on the use of the Grid Layout in Tkinter.
import tkinter as tk

root = tk.Tk()

frame = tk.Frame(root)
frame.pack(pady = 10, padx = 10)

button1 = tk.Button(frame, text = "Button 1")
button1.grid(row = 0, column = 0, padx = 5, pady = 5)

button2 = tk.Button(frame, text = "Button 2")
button2.grid(row = 0, column = 1, padx = 5, pady = 5)

button3 = tk.Button(frame, text = "Button 3")
button3.grid(row = 1, column = 0, padx = 5, pady = 5)

button4 = tk.Button(frame, text = "Button 4")
button4.grid(row = 1, column = 1, padx = 5, pady = 5)

root.mainloop()
Output:
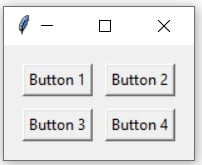
The above Tkinter window automatically divided itself into 2 columns and 2 rows after judging the input passed to it. If you want adjust the amount of space allocated to a single widget, use the columnspan and rowspan options.
Arranging widgets in a Table-format
One of my favorite usages, is to create a spread-sheet like window through the use the Entrybox and grid system.
The concept is very simple. The grid system works of a system of rows and columns. Using two for loops enables us to set up a two dimensional system, allowing us to create entry boxes in a table like format.
from tkinter import *

root = Tk()
root.geometry('300x300')

for x in range(10):
    for y in range(6):
         entry = Entry(root, width = 6)
         entry.grid(row = x, column = y)

root.mainloop()
The above code produces the below output.
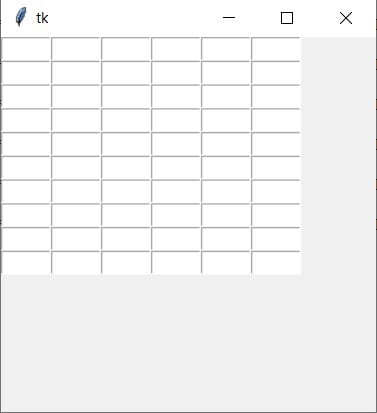
This code can further be customized by changing the width, changing the padding between the entry boxes etc.
This marks the end of the Tkinter grid layout tutorial. Any suggestions or contributions for CodersLegacy are more than welcome. Questions regarding the article content can be asked in the comments section below.
this is not good to understand
modify this and add also columnspan