
In this tutorial we will cover the ttk Tkinter Treeview Widget through a series of examples. The Treeview widget is used to display items in a tabular or hierarchical manner. It has support for features like creating rows and columns for items, as well as allowing items to have children as well, leading to a hierarchical format.
Tkinter ttk Treeview – Syntax
The syntax require to create a Tkinter Treeview Object.
tree = ttk.Treeview(container, **options)
Options that the Treeview Class accepts:
| Option | Description |
|---|---|
| columns | A list of column names. |
| displaycolumns | A list of column identifiers (either symbolic or integer indices) specifying which data columns are displayed and the order in which they appear, or the string “#all”. |
| height | The number of rows visible. |
| padding | Specifies the internal padding for the widget. Can be either an integer or a list of 4 values. |
| selectmode | One of “extended”, “browse” or “none”. If set to “extended” (default), multiple items can be selected. If “browse”, only a single item can be selected at a time. If “none”, the selection cannot be changed by the user. |
| show | A list containing zero or more of the following values, specifying which elements of the tree to display. The default is “tree headings”, i.e., show all elements. |
Treeview Example# 1
In this example we will create a simple Treeview ttk Widget and fill in some data into it. We have some data already stored in a text file which will be reading and adding to the Treeview widget in our read_data() widget.
The Data
This is what the data looks like, stored in CSV format.
Bob,[email protected],20000
Harrison,[email protected],23000
Jane,[email protected],19000
Mark,[email protected],15000
Emilia,[email protected],27000
John,[email protected],21000
Morax,[email protected],0
Ali,[email protected],30000
Shaman,[email protected],5000
Coder,[email protected],25000
Using the Python split() function, we can easily break each line around the commas and obtain all three values (the name, email and salary) in a list.
Using the Python split() function on the first line would give us:
[ "Bob", "[email protected]", "20000" ]Creating the Treeview Widget
Now let’s focus back on the actual Treeview widget.
        columns = ("email", "salary")

        self.tree= ttk.Treeview(frame, columns=columns ,height = 20)
        self.tree.pack(padx = 5, pady = 5)
As shown in the above code, we first need to define a list/tuple of column names. We have left out the column “Name” because there already exists a (default) column with a blank name. We will later rename it to “Name”.
We then assign that list/tuple to the columns option in Treeview. The height option defines the number of rows to be shown.
        self.tree.heading('#0', text='Name')
        self.tree.heading('email', text='Email')
        self.tree.heading('salary', text='Salary')
Next up we define the “headings”. There is a difference between column and heading, where the column is the actual column, whereas the heading is just the title of the column that appears when the widget is displayed. As you can see in the code above, we are giving each a column a name. “#0” is the name of the default column.
    def read_data(self):
        f = open("Data.txt", "r")

        for index, line in enumerate(f):
            temp = line.rstrip().split(',')
            self.tree.insert('', tk.END, iid = index,
                                 text = temp[0], values = temp[1:])
Finally there is the read_data() function, which does everything we said before. We read the data line by line, using the rstrip() function to get rid of extra trailing spaces and newline characters, and then split(“,”) to split the line across the commas.
Finally we call the tree.insert() function, which takes many parameters. The first is the parent, which is left as an empty string if there is none. Second is the position where we want to add the new item. Right now we are just appending it, so we do tk.END, which appends it to the end.
Next is iid, which is the item ID used to later track the item in question. Then we have text to which we will assign the first value in the list (the name), and into value we will pass the the other 2 values we obtained from the file.
The complete code:
import tkinter as tk
import tkinter.ttk as ttk
from tkinter import simpledialog


class Window:
    def __init__(self, master):
        self.master = master
        columns = ("email", "salary")

        self.tree= ttk.Treeview(self.master, columns=columns ,height = 20)
        self.tree.pack(padx = 5, pady = 5)

        self.tree.heading('#0', text='Name')
        self.tree.heading('email', text='Email')
        self.tree.heading('salary', text='Salary')

        self.read_data()


    def read_data(self):
        f = open("Data.txt", "r")

        for index, line in enumerate(f):
            temp = line.rstrip().split(',')
            self.tree.insert('', tk.END, iid = index,
                                 text = temp[0], values = temp[1:])


root = tk.Tk()
window = Window(root)
root.mainloop()
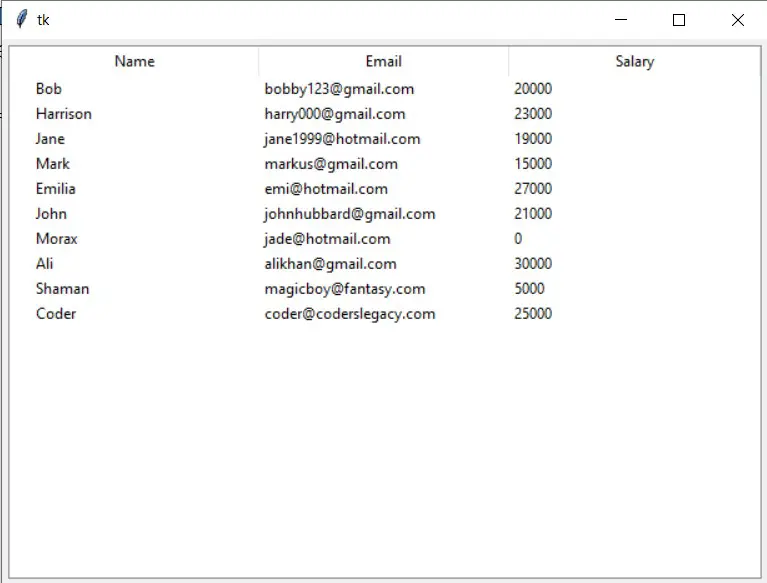
The output:
Treeview Example# 2
In this example we have added two new buttons, linked to two new functions. Let’s a look at each function, one by one.
This is the first function, add_data() that we can use to add a new Record on the spot. It takes input from the user first using the simpledialog prompt, and then inserts a new Record into the Treeview widget using that data.
We also ask for the parent, and if the user simply hits enter which results in an empty string, there will be no parent. Else he can enter a value like 0 or 1, which will make the new record the child of Record 0 or Record 1 respectively.
    def add_data(self):
        parent = simpledialog.askstring("Input", "Parent? (if any)")
        name   = simpledialog.askstring("Input", "Enter the Name")
        email  = simpledialog.askstring("Input","Enter the Email")
        salary = simpledialog.askstring("Input","Enter the Salary")

        self.tree.insert(parent, tk.END, text= name, values=(email, salary))
Here we have the delete_data() function, which is responsible for deleting a record. Using the focus() function, we gain access to the row_id of the currently selected Record. We can now call the delete() function on it to remove it from the table.
    def delete_data(self):
        row_id = self.tree.focus()
        if (row_id != ""):
            self.tree.delete(row_id)
The complete code:
import tkinter as tk
import tkinter.ttk as ttk
from tkinter import simpledialog


class Window:
    def __init__(self, master):
        self.master = master
        columns = ("email", "salary")

        self.tree= ttk.Treeview(self.master, columns=columns ,height = 20)
        self.tree.pack(padx = 5, pady = 5)

        self.tree.heading('#0', text='Name')
        self.tree.heading('email', text='Email')
        self.tree.heading('salary', text='Salary')

        button= ttk.Button(root, text= "Add Record", command=self.add_data)
        button.pack(padx = 5, pady = 10, side = tk.RIGHT)

        button= ttk.Button(root, text= "Delete Record", command=self.delete_data)
        button.pack(padx = 5, pady = 10, side = tk.RIGHT)

        self.read_data()


    def read_data(self):
        f = open("Data.txt", "r")

        for index, line in enumerate(f):
            temp = line.rstrip().split(',')
            self.tree.insert('', tk.END, iid= index, text= temp[0],
                                                     values= temp[1:])

    def add_data(self):
        parent = simpledialog.askstring("Input", "Parent? (if any)")
        name   = simpledialog.askstring("Input", "Enter the Name")
        email  = simpledialog.askstring("Input","Enter the Email")
        salary = simpledialog.askstring("Input","Enter the Salary")

        self.tree.insert(parent, tk.END, text= name, values=(email, salary))


    def delete_data(self):
        row_id = self.tree.focus()
        if (row_id != ""):
            self.tree.delete(row_id)


root = tk.Tk()
window = Window(root)
root.mainloop()
The output:
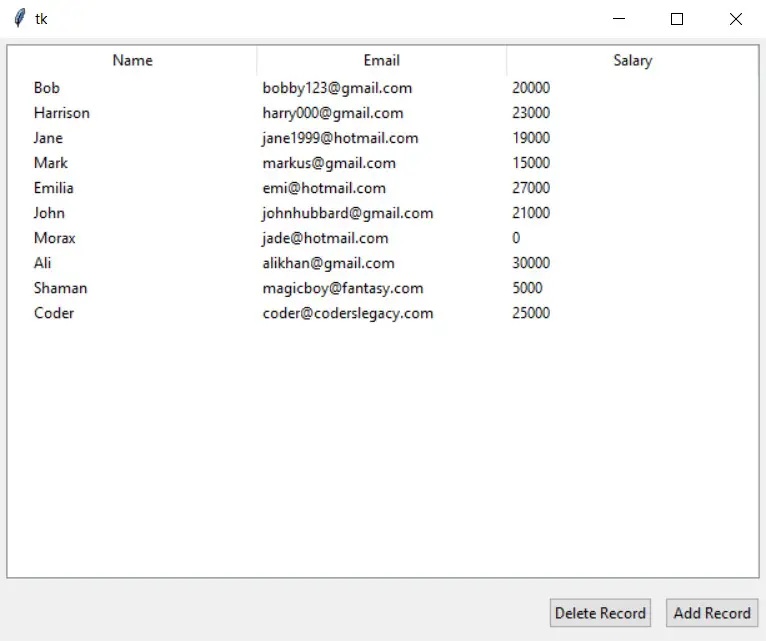
After Deleting record 8 and adding a Child Record to Record 1:

Treeview Item Options
The following item options may be specified for items in the insert and item widget commands.
| Option | Description |
|---|---|
| text | The text label for the item. |
| image | An Image, displayed to the left of the label. (Requires a Tk image object) |
| values | The list of values associated with the item. Each item should have the same number of values as the widget option columns. If there are fewer values than columns, the remaining values are assumed empty. If there are more values than columns, the extra values are ignored. |
| open | True/False value indicating whether the item’s children should be displayed or hidden. |
| tags | A list of tags associated with this item. |
Treeview Tag Options
The following options may be specified on tags:
| Option | Description |
|---|---|
| foreground | Specifies the text foreground color. |
| background | Specifies the cell or item background color. |
| font | Specifies the font to use when drawing text. |
| image | Specifies the item image, in case the item’s image option is empty. |
This marks the end of the Tkinter ttk Treeview Widget Tutorial. Any suggestions or contributions for CodersLegacy are more than welcome. Questions regarding the tutorial content can be asked in the comments section below.
hiya, great tutorial … question: how might we auto-set the width of the columns
so the columns are only as wide as needed, but no wider?
As far as I’m aware, its not possible. A quick look through the various methods for this Class also revealed no such function. It starts off with a default width of 200 pixels for columns. You can change this width individually for each column if you know how big your data will be.
e.g: self.tree.column(“#1”, width=100)
Treeview has not width option. The overall requested width for the Treeview widget is based on the sum of the column widths. So:
1) Gave each column the same width of value that together added up to the desire width of my treeview widget.
2) Let minwidth be the desired column widths for all columns (i.e. 90)
tree_col_width = parent_frame.winfo_width() // len(tree[“columns”])
for col in tree[‘columns’]:
tree.column(col, width=tree_col_width, minwidth=90, anchor=“e”)