
In this tutorial we will discuss the wxPython GridSizer Layout Sizer.
The wxPython GridSizer is one of the five sizers in wxPython designed to help with the layout management of widgets in the window. As the name suggests, it creates a grid of rows and columns in which widgets can be placed.
Below is the syntax and parameters for creating the GridSizer.
wx.GridSizer(rows = 1, cols = 0, vgap = 0, hgap = 0)The first two parameters are for the number of rows and columns, and the third and fourth determine the vertical and horizontal distance (padding) between the rows and columns.
wxPython GridSizer Example#1
Like any sizer, we can use the Add() method to easily add new widgets into our GridSizer. The other two parameters are for proportion and flags (There are many overloaded versions of this function).
The below example create 4 StaticText Widgets in order to place them inside the Grid. We’ve used the wx.ALIGN_CENTER flag so that they appear in the center of the cell they are placed in.
import wx

class Window(wx.Frame):
    def __init__(self, title):
        super().__init__(parent = None, title = title)
        panel = wx.Panel(self)

        grid = wx.GridSizer(2, 2, 5, 5)

        grid.Add(wx.StaticText(panel, label= "Text"), 0, wx.ALIGN_CENTER)
        grid.Add(wx.StaticText(panel, label= "Text"), 0, wx.ALIGN_CENTER)
        grid.Add(wx.StaticText(panel, label= "Text"), 0, wx.ALIGN_CENTER)
        grid.Add(wx.StaticText(panel, label= "Text"), 0, wx.ALIGN_CENTER)

        panel.SetSizer(grid)

        self.Centre()
        self.Show()

app = wx.App()
window = Window("WxPython Tutorial")
app.MainLoop()
The output of the above code:
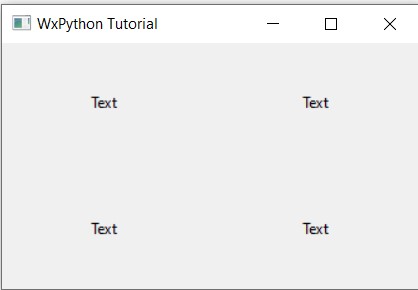
Remember, the order in which you add widgets to the GridSizer is important. The first widget added will appear in the (0, 0) slot, and then next will appear in the (0, 1) slot and so on.
Don’t forget to use the SetSizer() on the panel at the end, otherwise your widgets won’t display properly!
wxPython GridSizer Example#2
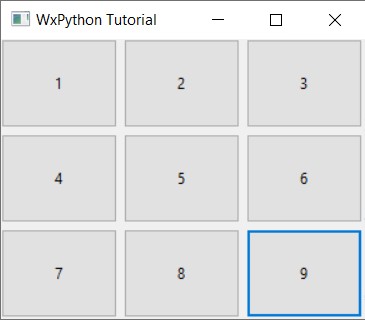
Another way of adding alot of widgets quickly into a GridSizer is using the AddMany() function. It’s basically a list of widgets being passed into the AddMany() method.
import wx

class Window(wx.Frame):
    def __init__(self, title):
        super().__init__(parent = None, title = title)
        panel = wx.Panel(self)

        grid = wx.GridSizer(3, 3, 5, 5)

        grid.AddMany([ (wx.Button(panel, label= "1"), 0, wx.EXPAND),
                       (wx.Button(panel, label= "2"), 0, wx.EXPAND),
                       (wx.Button(panel, label= "3"), 0, wx.EXPAND),
                       (wx.Button(panel, label= "4"), 0, wx.EXPAND),
                       (wx.Button(panel, label= "5"), 0, wx.EXPAND),
                       (wx.Button(panel, label= "6"), 0, wx.EXPAND),
                       (wx.Button(panel, label= "7"), 0, wx.EXPAND),
                       (wx.Button(panel, label= "8"), 0, wx.EXPAND),
                       (wx.Button(panel, label= "9"), 0, wx.EXPAND)])

        panel.SetSizer(grid)

        self.Centre()
        self.Show()

app = wx.App()
window = Window("WxPython Tutorial")
app.MainLoop()
The output of the above code:
There are several other types of GridSizers which inherit some of it’s functionality while adding in some new feature of their own. First we have FlexGridSizer which has the ability to have rows and columns of different sizes. Last is GridBagSizer which inherits from FlexGridSizer, adding in the ability to place widgets at specific locations in the grid.
Follow the links to learn more about them, and how they are often better than GridSizer.
This marks the end of the wxPython GridSizer Tutorial. Any suggestions or contributions for CodersLegacy are more than welcome. Questions regarding the tutorial content can be asked in the comments section below.