
In this article, we will explore how to create and install imported certificates for your windows-based web server.
A website has a front end for the user interface and a back end for the server. Windows-based web servers are popular because they support compatible applications, networks, and web services. It offers features specific to the Windows operating system, like storing website files and serving the data to users.
You can use them to host websites, but securing them is crucial. An SSL certificate can encrypt data for security. This article explains how to import a website certificate on your Windows server.
What is an SSL Certificate?
An SSL certificate is a digital certificate that helps verify the identity of a website owner and the organization it belongs to. It also enables secure communication between the web server and browser.
Types of SSL Certificates
- Domain Validation (DV) certificates verify the ownership of the domain and who controls the domain name. This certificate does not require any more details of the organization than the domain ownership proof.
- Organization Validation (OV) certificates require more information about the organization than domain ownership proof. OV certificates are primarily suitable for businesses that must prove their credibility to customers.
- Extended Validation (EV) certificates verify domain ownership and the organization’s legitimacy and validate location, business registration, and other essential aspects of any enterprise.
- Single domain certificates are used to secure one domain name only, such as exampledomain.com.
- Wildcard certificates help businesses to secure one primary domain and several associated subdomains.
- Multi-domain certificates apply to multiple domains such as exampledomain.com, *.exampledomain.com, and others.
An SSL certificate will have information like,
- Domain name of the certificate owner
- Details of organizations, devices, and person to whom the certificate is issued
- Name and information of Certificate authority(CA)
- Associated sub domains
- Issue and expiry date
- Public key of the website
To understand why an SSL certificate has a public key to the website and the significance of security key pairs, you need to understand how it works.
How does SSL work?
SSL uses asymmetric and symmetric encryption. Asymmetric encryption involves a public and private key pair, while symmetric encryption uses a shared key for data exchange between the browser and server. SSL communication can be divided into two steps.
Step 1- SSL handshake
Step 2- Data transfer
The SSL handshake is the step where your Windows web server and browser exchange a public key to generate a session key, which creates secure communication.
The data transfer step is where the Windows web server and the browser use the session key for the encryption-decryption process. This makes sure that data is secure and cyber attackers cannot access it.
Now that we know how SSL works, let us understand how to import website certificates for your server and assign it.
Install the Certificates
If you use a Windows-based website server, the best way to install certificates is to use Windows Internet Information Server (IIS), which supports SSL communications. Find a suitable type of certificate such as OV SSL, Wildcard SSL, or Multi-domain SSL from the leading CA.
Step 1: CSR generation
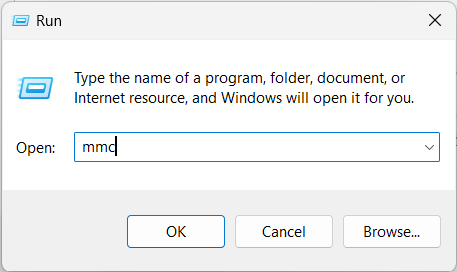
Open MMC in the Windows server by typing Win+R and typing “mmc” in the run wizard.
Go to File & click on Add/Remove snap-in

Select the “Certificates” in Add/Remove snap-in and click on “Add.”
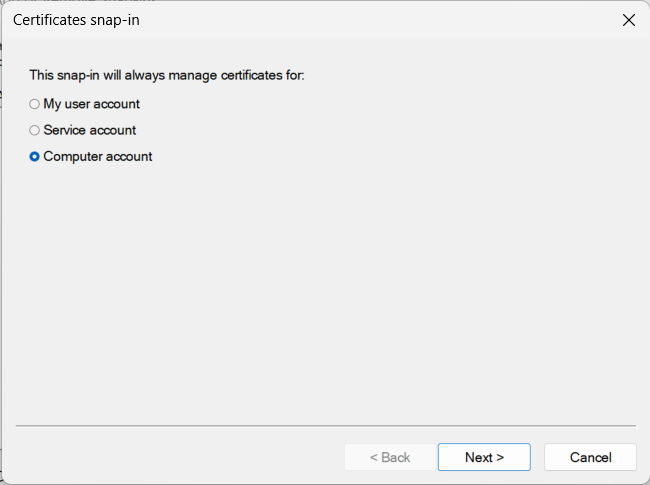
In the new window, choose “Computer Account.”
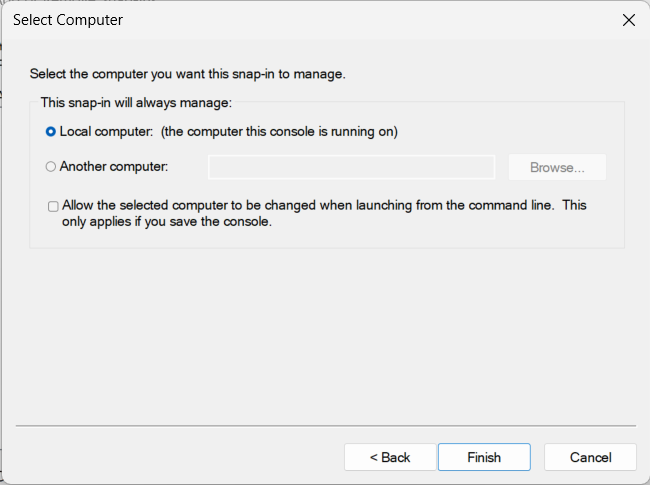
Select a local computer option and click on finish.
Next, select the certificate under console root and click ok.
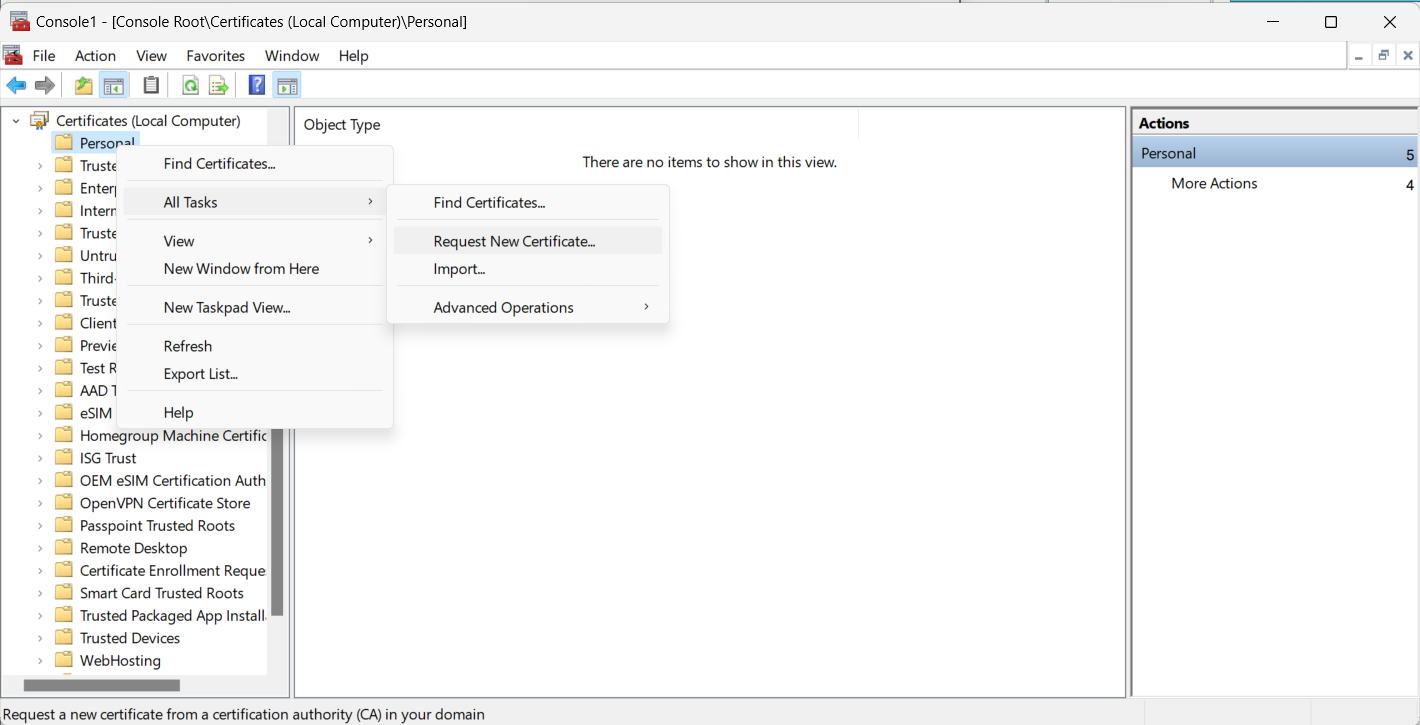
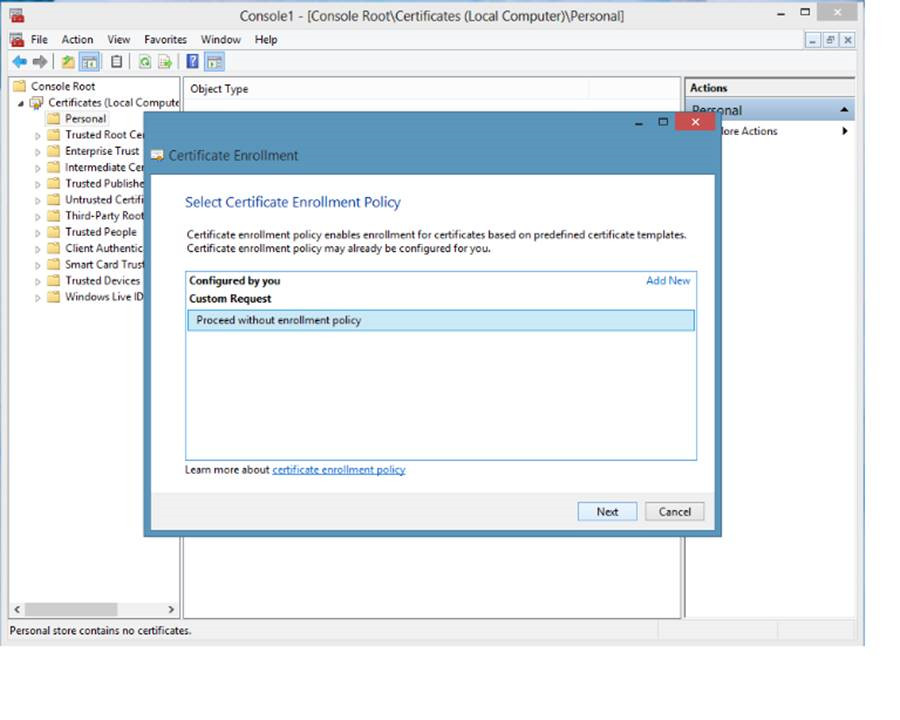
Now, go to a personal folder under the newly added certificate and click on all tasks to choose “Request New Certificate.” A new wizard will open asking whether your device is enrolled or not for certificate Skip the enrollment and click on next.
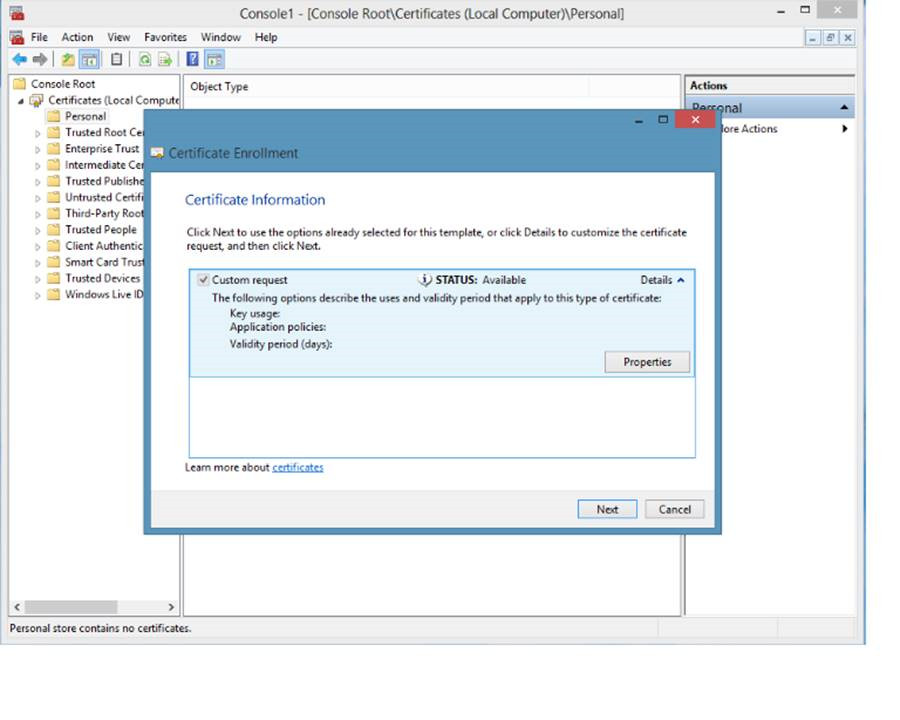
Click next and select the “PKCS # 10 “option. Now edit the properties by clicking on it from the details drop-down menu.
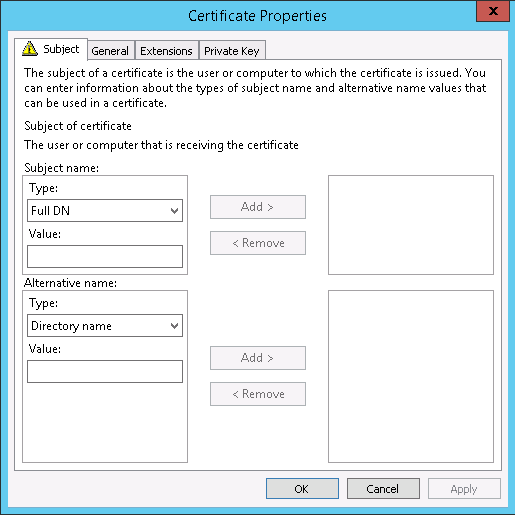
Enter a friendly name for the CSR and click on apply. Next, add CSR details by access the subject name under subject tab.
Next, click on the private key tab and the drop-down showing different key options. Further, select the key size of 2048 check if the option to make the private key exportable is active, and click ok.

Select the Base 64 option in the next wizard and click next.
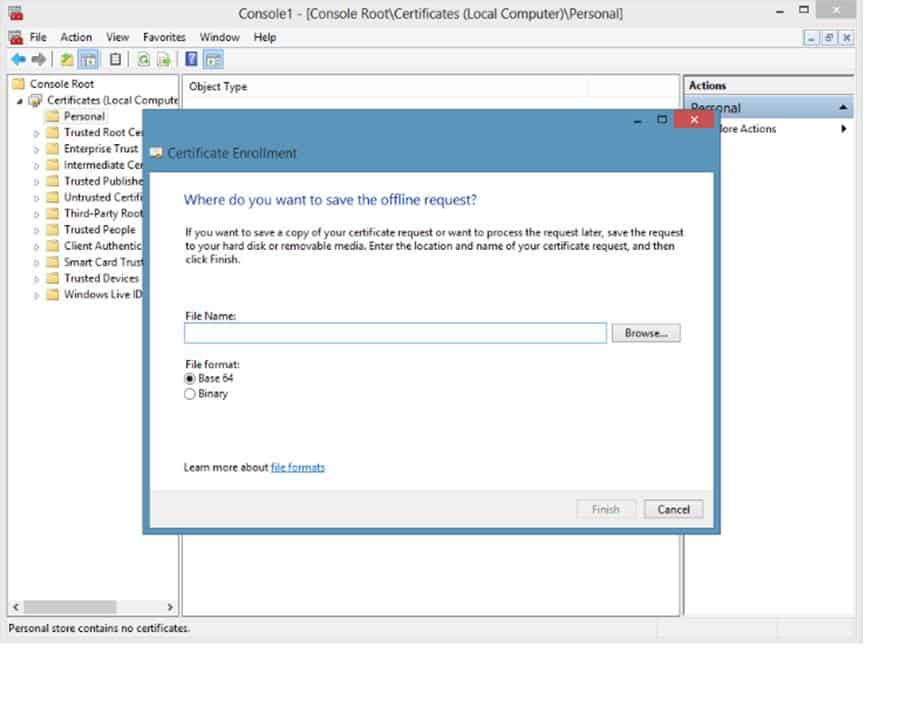
Click on browse and select a location on your device to save the CSR file.
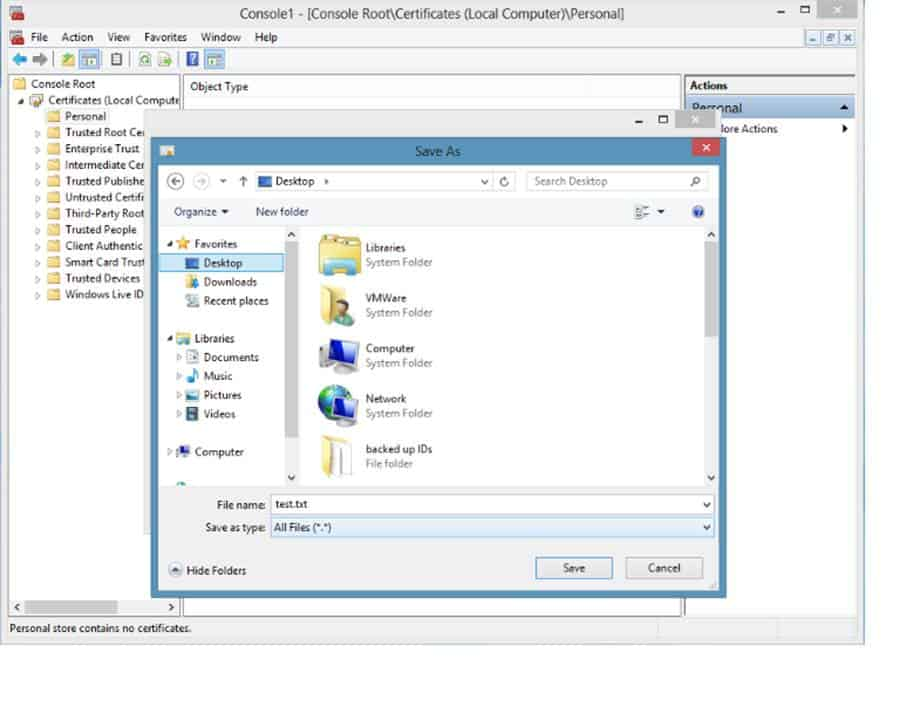
Click on finish, and your CSR is generated. Copy the contents of this file by opening it on a notepad. Copy the entire content from:
— –BEGIN NEW CERTIFICATE REQUEST — —
to
— –END NEW CERTIFICATE REQUEST — –.
And submit it to CA for validation and issuance of SSL certificate.
Once you have the certificates, you must import them from the local computer store. Installing an SSL certificate on a Windows-based server has two parts. First is to import the certificate and then assign the imported certificate to the website.
Let us first import the website certificate.
Step by Step Import the certificate into the local computer store.
The process to import a website certificate on your local computer begins by first opening the web server.
- After opening the Windows-based web server, go to start and type run
- Next, type MMC and select OK.
- Now click on the file on the top menu and select Add/Remove snap-in.
- In the Add/Remove snap-in dialog box, select Add after selecting certificates
- Select the computer account and click on next.
- Further, select the local computer (the computer on which the console is running on) and then finish
The above steps are similar to CSR generation, but now you must access the page of certificate import wizard.
- Go to the console’s left pane and double-click on “Certificates.”
- Right click on personal->All task-> Import.

A new import certificate wizard will open.
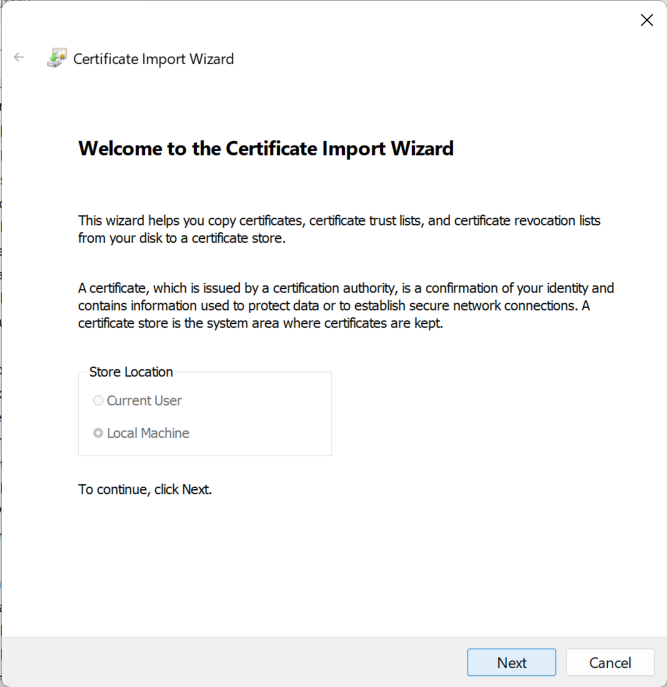
Click on next, and provide the file path for the certificate on your local device.
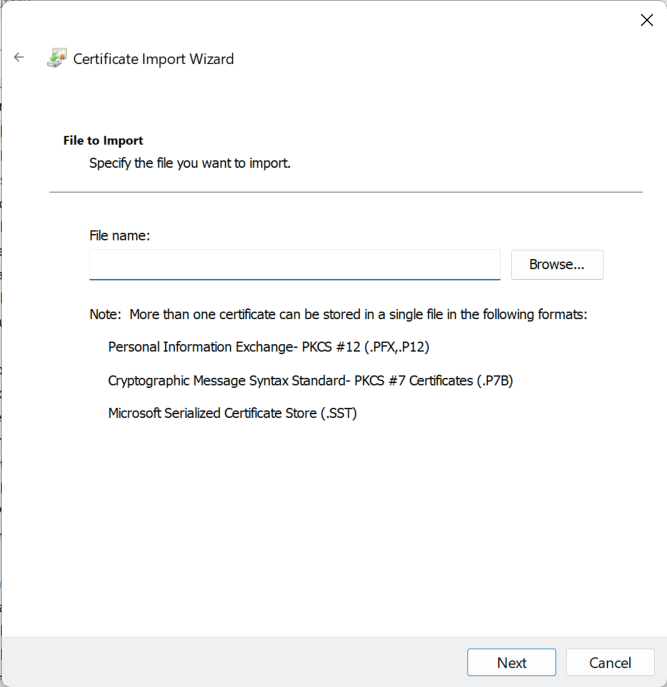
Click on next and provide a password if needed. Select “Place all certificates in the following store” on the certificate store page and click next. Your website certificate is now imported. So, let us discuss how to assign an imported certificate to the website.
Assign the Imported Certificate to the Website
To assign the imported certificate to the website, you need to use IIS, which you will find under Admin tools accessible through “Start” on your Windows device.
- Select your server and double-click on the “web sites” option on the right pane.
- Now select the directory security option and server certificate under it.
- A new wizard will open with the message “Web Certificate Wizard”
- Select next and on the server certificate page select “Assign an existing certificate.”
- Click on Next and select the installed certificate from different options on the “Available Certificates” page.
- Configure the SSL port number that will be 443 by default on the SSL port page.
- Click on next and on the certificate summary page review all the necessary information.
- Click next and you will be on “Completing the Web Server Certificate Wizard.”
- Select finish and then OK to assign the imported certificate to the website.
Conclusion
As the cyberattacks continue to increase and websites face constant threats from newer vulnerabilities, it is crucial to secure the server. Using SSL certificates, you can secure a Windows-based web server and ensure a secure experience. Follow specific steps to import, install, and assign certificates for your website, which may vary according to business requirements.