
This tutorial covers Custom Dialogs in JavaFX.
JavaFX being the large GUI Library that it is comes with several built in dialogs such as Alert Dialogs and Input Dialogs. These “built-in-dialogs” do offer a certain degree of customization, but sometimes fall short of what we want.
Learning how to create custom dialogs in JavaFX allows you to control everything about the dialog that appears. All the way from it’s appearance to the number of GUI components in the dialog.
Creating Custom Dialogs
Most tutorials for Custom dialogs in JavaFX will have you create the custom dialog within the same window, which really defeats the purpose. The custom dialog is meant to appear in a separate window, which you can interact with separately.
In order to achieve all this, we’ll be creating a second class for our custom dialog box where we will store all the related code. This approach will keep our code more readable, and most importantly, more reusable.
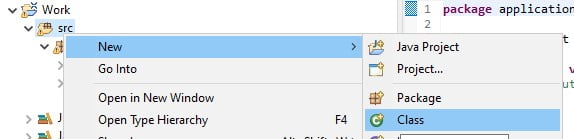
If you’re using either Eclipse or IntelliJ simply right click on the “src” folder that you see on the left hand side of the screen, hover over “new” and click “Class”.
You don’t have to follow this approach, you can simply take the concept that we explain here and reuse it for a non-class approach. Understanding comes first.
Custom Alert Dialog
We’ll start off with making a custom alert dialog in JavaFX since it’s pretty simple (just a single component needs to be displayed).
We’ll start by creating the “main” window from where the dialog will be triggered. Since this window isn’t the focus, we’ll leave it as bare-bone as possible. There is only a simple button that calls the display method from the other class that we are about to create, AlertDialog.
We’ve passed as parameter (to the display function) some text which is to be displayed on the dialog. Further explanation of this will be found in the section for the dialog.
package application;

import javafx.application.Application;
import javafx.stage.Stage;
import javafx.scene.Scene;
import javafx.scene.control.Button;
import javafx.scene.layout.StackPane;


public class Main extends Application  {
	public static void main(String args[]){
		 launch(args);
	}

	@Override
	public void start(Stage primaryStage) throws Exception {

		Button button = new Button("Click me");
		button.setOnAction(e -> {
			AlertDialog.display("JavaFX Custom Dialog Demo");
		});

		StackPane layout = new StackPane(button);
		Scene scene = new Scene(layout, 300, 200);

		primaryStage.setTitle("JavaFX Custom Dialog");
		primaryStage.setScene(scene);
		primaryStage.show();
    }
}
As we mentioned earlier, the custom dialog must be created in a separate window. In order for this to happen, we need to create a second stage, a second scene and a second layout etc. All of this we’re going to place within the new class we just created.
Second Window
In this part we are going to create a Class which stores the dialog code called AlertDialog. We’ve discussed the method of creating a new class earlier in this article. As you’ll see in the example below, it’s mostly the same regular JavaFX code that you’ve been using up to now.
One new addition is the initModality() method, used to ensure that you can only interact with one window at a time. With the APPLICATION.MODAL setting, once the dialog appears, you will not be able to interact with any other window till the dialog is closed. Whether you add this feature or not, is upto you (though it’s recommended for most cases).
The label will display a custom text, depending on the value of the parameter that was given. This value is set to the label using the setText() method. This functionality adds more re-usability and flexibility into the code.
package application;

import javafx.application.Application;
import javafx.geometry.Pos;
import javafx.stage.Modality;
import javafx.stage.Stage;
import javafx.scene.Scene;
import javafx.scene.control.Label;
import javafx.scene.layout.VBox;


public class AlertDialog {
	public static void display(String text) {

		Stage stage = new Stage();
		stage.initModality(Modality.APPLICATION_MODAL);

		Label label = new Label(text);

		VBox layout = new VBox(label);
		layout.setAlignment(Pos.CENTER);

		Scene scene = new Scene(layout, 200, 100);

		stage.setTitle("Dialog");
		stage.setScene(scene);
		stage.show();
	}
}
Below is the image of output after clicking the button on the main window.
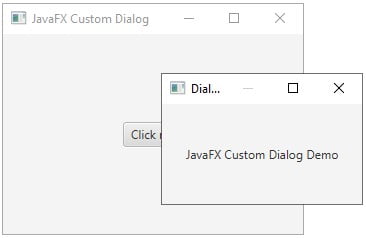
Notice how the main window is grayed out behind our Dialog.
Custom Input Dialog
In this example we’ll do something that the standard inputdialog in JavaFX can’t. Taking advantage of the “custom” dialog, we’ll create a login prompt with two entry fields for the username and password respectively.
package application;

import javafx.application.Application;
import javafx.geometry.Pos;
import javafx.stage.Stage;
import javafx.scene.Scene;
import javafx.scene.control.Button;
import javafx.scene.control.Label;
import javafx.scene.layout.VBox;


public class Main extends Application  {
	public static void main(String args[]){
		 launch(args);
	}

	@Override
	public void start(Stage primaryStage) throws Exception {

		Label label = new Label("");
		Button button = new Button("Click me");

		button.setOnAction(e -> {
			String input = AlertDialog.display();
			label.setText(input);
		});

		VBox layout = new VBox(button, label);
	    layout.setAlignment(Pos.CENTER);
	    layout.setSpacing(10);

		Scene scene = new Scene(layout, 300, 200);

		primaryStage.setTitle("JavaFX Custom Dialog");
		primaryStage.setScene(scene);
		primaryStage.show();
    }
}
Second Window
The following code is rather large, with most of it being used to create a large number of widgets and adding them to the layout. It’s lengthy, but pretty simple if you’ve gone through our JavaFX tutorial.
The main focus here are the two text-fields in which the user will enter his input. Using the getText() methods we will retrieve these inputs and return them back to the main window. (Don’t forget that this is a function that has been called by the main window).
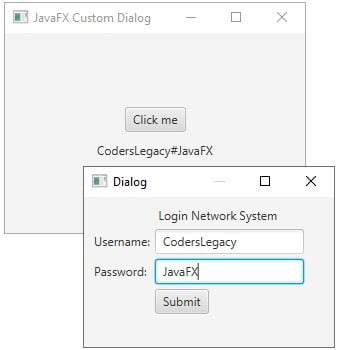
Java doesn’t support multiple returns in a single function, so we concatenated both the password and the username into one (separated by a “#”) and returned it. You can easily split it later or return an array instead with two separate values if you wish.
package application;

import javafx.application.Application;
import javafx.geometry.Insets;
import javafx.geometry.Pos;
import javafx.stage.Modality;
import javafx.stage.Stage;
import javafx.scene.Scene;
import javafx.scene.control.Button;
import javafx.scene.control.Label;
import javafx.scene.control.TextField;
import javafx.scene.layout.VBox;


public class AlertDialog {

	 static String password, username;

	public static String display() {
		Stage stage = new Stage();
		stage.initModality(Modality.APPLICATION_MODAL);

		TextField text1 = new TextField();
		TextField text2 = new TextField();

		Button button = new Button("Submit");
		button.setOnAction(e -> {
			 username = text1.getText();
			 password = text2.getText();
			 stage.close();
		});

		Label label1 = new Label(" Login Network System ");
		Label label2 = new Label("Username:");
		Label label3 = new Label("Password:");

        GridPane layout = new GridPane();

        layout.setPadding(new Insets(10, 10, 10, 10));
        layout.setVgap(5);
        layout.setHgap(5);

        layout.add(text1, 1,1);
        layout.add(text2, 1,2);
        layout.add(button, 1,3);
        layout.add(label1, 1,0);
        layout.add(label2, 0,1);
        layout.add(label3, 0,2);

		Scene scene = new Scene(layout, 250, 150);
		stage.setTitle("Dialog");
		stage.setScene(scene);
		stage.showAndWait();

		return username + "#" + password;
	}
}
It’s also necessary to change the show() method to showAndWait(). The JavaFX showAndWait() causes the main window (which called this function) to “wait” for a response (returned values). Excluding this line would cause the execution of the function to continue.
Below is the a screenshot of us interacting with the GUI output.
If you wish to learn more about how this Login dialog was created using the GridPane layout, you can check it’s respective tutorial. You can also learn how to create a proper password field (hidden text) with the PasswordField component.
You can create all kinds of different Custom dialogs. You’re limited only by the situation and your creativity.
This marks the end of the JavaFX Custom Dialogs tutorial. Any suggestions or contributions for CodersLegacy are more than welcome. Questions regarding the article content can be asked in the comments section below.