
This article covers the Stage Widget in JavaFX.
A Stage in JavaFX represents the primary window of a GUI application. In it all the GUI widgets such as the Scene, Buttons and Labels are contained. For every new window you want to create in your GUI program, you will need to create a new Stage.
Since the Stage object is the very foundation of the JavaFX GUI, we’re also going to discuss several other concept related to the basic code required to create a GUI program, so don’t be surprised.
Difference between the Stage and Scene
The area covered by the Green region is what we call the scene, and the red area is the stage. Try not to confuse the two.
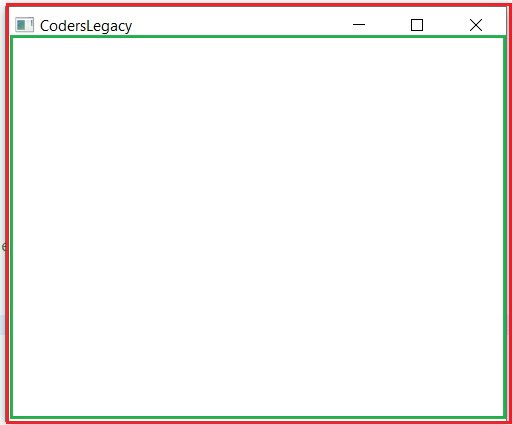
An easy way of differentiating between the two is that the Stage is always constant, whereas the scene can change it’s appearance.
If this is still confusing you, just take a look at the browser you must be viewing this page in. The browser tab, the search bar, the extensions (Chrome) etc. That’s all part of the stage. Even when you switch tabs, that part remains constant. What you’re viewing, the “content area” is the scene.
Creating a Stage object
Below is an example of us creating a Stage object using the Stage class.
Stage stage = new Stage();However, the above format is rarely used (unless you’re trying to create multiple stages or something).
In the next section, we’ll go through a proper explanation that will teach you everything you need to know before moving on to the actual widgets.
JavaFX Stage Example
Almost all GUI programs made in JavaFX will have a certain part of their code that doesn’t change. This is the starting code that is required to get an empty JavaFX GUI window up and running, hence why all GUI programs have it in one way or the other.
package application;

import javafx.application.Application;
import javafx.stage.Stage;
import javafx.scene.Scene;

public class Tutorial extends Application {

	public static void main(String args[]){
		 launch(args);
	}

	@Override
	public void start(Stage primaryStage) throws Exception {

		StackPane layout = new StackPane();
		Scene scene = new Scene(layout, 400, 300);

		primaryStage.setTitle("CodersLegacy");
		primaryStage.setScene(scene);
		primaryStage.show();
    }
}
Examining the Code
We’ll proceed by examining this code line by line, explaining each one individually.
package application;This line is here due to the way we setup JavaFX on the Eclipse IDE. It’s possible this may not be here if you are using another IDE or set things up differently.
import javafx.application.Application;
import javafx.stage.Stage;
import javafx.scene.Scene;
Here are the three imports we will need. Usually we will need far more, maybe even a dozen or more if you have a large GUI program. But for an empty GUI window, we just need these three.
public class Tutorial extends Application {Defines the main class. The extends Application part makes our Class inherit from the application class in JavaFX. This brings in JavaFX functionality into our class.
public static void main(String args[]){
	launch(args);
}
Another compulsory function required. The launch(args) code launches the JavaFX application, which enables us to begin using JavaFX code.
@Override
public void start(Stage primaryStage) throws Exception {
Our main method where we will be writing all our code. This is also where the Stage is defined (in the parameters). We will be using the primaryStage object through the rest of our code now.
StackPane layout = new StackPane();
Scene scene = new Scene(layout, 400, 300);
Don’t worry about these lines. Just copy them for now, they will be explained in separate articles later on. Just know that the first line creates a layout which determines how the widgets are placed, and the second creates a Scene, where the widgets are placed.
primaryStage.setTitle("CodersLegacy");
primaryStage.setScene(scene);
primaryStage.show();
Here are the three main functions related to our JavaFX Stage.
The setTtitle() method sets the title for the window. (Scroll back up and see the first image we posted)
The setScene() method determines the Scene to be placed in the window. Can also be used to switch Scenes during execution.
The show()is what actually causes the GUI window to appear. If you don’t call this function, the GUI window will not display.
Now that you know how to setup a Basic Window in Java, its time to begin populating it with GUI widgets. For this you need to learn how to create a JavaFX scene.
This marks the end of the JavaFX Stage article. Any suggestions or contributions for CodersLegacy are more than welcome. Questions regarding the article content can be asked in the comments section below.