
This article covers the Scene widget in JavaFX.
The JavaFX Scene object is where all the Visual Components of the GUI are stored. Any widgets that you create will show up on the Scene. The Scene object also controls the dimensions of the display area.
Do not confuse the Scene component with the Stage component. The Stage is the actual window, where as the Scene is everything within that window. However, every Scene object must be linked back to a Stage object.
To begin using this object, use the following import: javafx.scene.Scene.
JavaFX Scene Example
Below is the simple creation of a Scene object in JavaFX. If you’re having any trouble understanding the non-Scene related code, you need to read our JavaFX and Stage object tutorials.
import javafx.application.Application;
import javafx.stage.Stage;
import javafx.scene.Scene;
import javafx.scene.layout.StackPane;

public class Tutorial extends Application  {
	public static void main(String args[]){
		 launch(args);
	}

	@Override
	public void start(Stage primaryStage) throws Exception {
		StackPane layout = new StackPane();

		Scene scene = new Scene(layout, 300, 300);

		primaryStage.setTitle("CodersLegacy");
		primaryStage.setScene(scene);
		primaryStage.show();
    }
}
There are only two Scene related lines here. We’ll proceed to examine them one by one.
Scene scene = new Scene(layout, 300, 300);
The above code is the main Scene object creator. It takes three parameters, first a layout object such as StackPane, VBox, Group etc. The second and third parameters represent the width and height of the Scene respectively.
primaryStage.setScene(scene);
Every Stage must be displaying one Scene at any given time. The setScene() methods determines the current Scene to be displayed. You can also use this method to switch between Scenes mid-code.
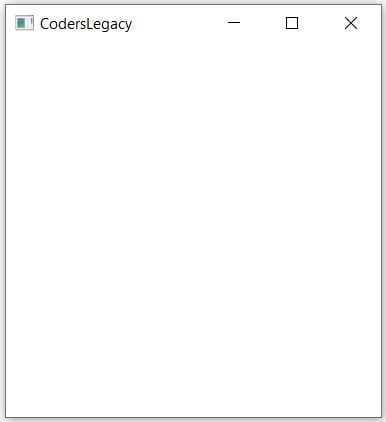
This is the output of the above code. Currently it’s empty since we have created any widgets. You can either head back to the main JavaFX article to learn about them or keep going to learn how to customize your Scene window.
Customizing the Scene
Besides being able to change the size of the Scene, we can change how the cursor appears on the the Scene. Common types of special cursors include the cross-hair, open-hand and wait.
Using the setCursor() function you can set the cursor type of your choice.
scene.setCursor(Cursor.HAND);A list of all possible options for the Cursor:
- Cursor.OPEN_HAND
- Cursor.CLOSED_HAND
- Cursor.HAND
- Cursor.CROSSHAIR
- Cursor.DEFAULT
- Cursor.WAIT
- Cursor.MOVE
- Cursor.V_RESIZE
- Cursor.H_RESIZE
- Cursor.TEXT
How to change the Scene Color
You can also change the Color of the Scene by using the setFill() method on it.
scene.setFill(Color.BLUE);
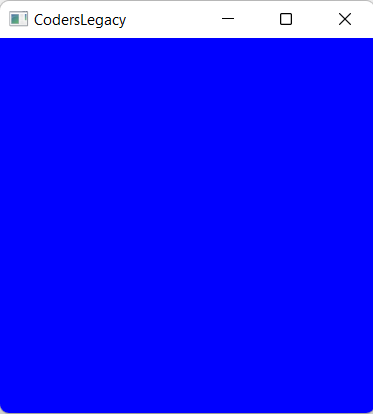
We can either use the prebuilt colors provided by JavaFX as shown above, or we can use Hex-color codes as shown below.
scene.setFill(Color.web("#Ab1073"));
For more tips and tricks on Colors in JavaFX, as well as Background Colors for Layouts, follow the link for more!
Switching between two Scenes
There isn’t really any new syntax here, just a new concept that’s fun to learn. You may find this useful when developing your own GUI application in JavaFX.
import javafx.application.Application;
import javafx.stage.Stage;
import javafx.scene.Scene;
import javafx.scene.control.Button;
import javafx.scene.layout.StackPane;

public class Tutorial extends Application  {
	public static void main(String args[]){
		 launch(args);
	}

	@Override
	public void start(Stage primaryStage) throws Exception {
		StackPane layout = new StackPane();
		StackPane layout2 = new StackPane();

		Scene scene = new Scene(layout, 300, 300);
		Scene scene2 = new Scene(layout2, 200, 200);

		Button button = new Button("Forward");
		button.setOnAction(e -> primaryStage.setScene(scene2));

		Button button2 = new Button("Backwards");
		button2.setOnAction(e -> primaryStage.setScene(scene));

		layout.getChildren().addAll(button);
		layout2.getChildren().addAll(button2);

		primaryStage.setTitle("CodersLegacy");
		primaryStage.setScene(scene);
		primaryStage.show();
    }
}
It’s necessary for each Scene to have it’s own unique layout. You cannot use the same layout object for both Scenes. Similarly, only add those objects into the layout that you want to see on that specific scene.
Below is the output of the above code.
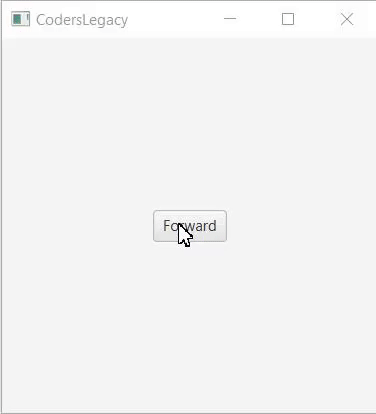
If you had trouble trying to understand this, you can check a more detailed version over here.
This marks the end of the JavaFX Scene article. Any suggestions or contributions for CodersLegacy are more than welcome. Questions regarding the article content can be asked in the comments section below.