
Testing is a crucial part of the development process, ensuring that your React applications are robust and bug-free. Jest is a popular testing framework that simplifies the testing workflow for React applications. In this guide, we’ll walk through the steps to set up Jest for a React application created using Vite and TypeScript.
Installing Jest and Dependencies
The first thing you need to do is install the following dependencies. It may seem like alot, but this is because of some complications involved due to Jest not being compatible (out of the box) with Typescript or Vite.
npm install --save-dev jestThis command is responsible for installing the base Jest package.
npm install --save-dev @babel/preset-env @babel/preset-reactBabel presets for environment and React are essential for transpiling JavaScript and JSX code, ensuring compatibility across different environments.
npm install --save-dev @testing-library/react @testing-library/jest-dom@testing-library/react provides utilities for testing React components, while @testing-library/jest-dom adds custom Jest matchers for asserting on DOM elements.
npm install ts-jest @types/jest --save-devts-jest is a TypeScript preprocessor for Jest, enabling the testing of TypeScript code. @types/jest provides TypeScript type definitions for Jest.
npm install ts-node @types/testing-library/jest-dom --save-devts-node is required for running TypeScript files directly in Node.js. @types/testing-library/jest-dom provides TypeScript type definitions for Jest DOM.
npm install jest-environment-jsdomjest-environment-jsdom is a Jest environment for running tests in a simulated DOM environment. It ensures that your React components can be tested in a realistic browser-like environment.
npm install identity-obj-proxy --save-devidentity-obj-proxy is a simple utility for creating identity-based proxies. In the context of Jest, it is often used to mock CSS modules.
Configuring Jest for Vite and TypeScript
Now that we have the necessary dependencies installed, let’s configure Jest to work seamlessly with a Vite and TypeScript setup. The configuration involves creating and updating several files.
1. Create a new file called: jest.config.js in the root directory
This file contains Jest configuration options. You’ll need to specify the test environment, file extensions to be considered, and any setup files. Copy paste the following content into this file:
export default {
    preset: 'ts-jest',
    testEnvironment: 'jest-environment-jsdom',
    transform: {
        "^.+\\.tsx?$": "ts-jest"
    // process `*.tsx` files with `ts-jest`
    },
}
2. Create a new file called .babelrc in the root directory
This file is used to configure Babel presets for Jest.
{
    "presets": [
      "@babel/preset-env",
      ["@babel/preset-react", { "runtime": "automatic" }]
    ]
}
3. Update the .eslintrc.cjs file
Update the .eslintrc.cjs file configuration to allow Jest to understand the file extensions used in your project.
module.exports = {
...
...
  extends: [
    'eslint:recommended',
    'plugin:@typescript-eslint/recommended',
    'plugin:react-hooks/recommended',
    'react-app',      // Add this
    'react-app/jest'  // Add this
  ],
...
...
4. Update the package.json file
Finally, we need to add a “script” in the package.json file so that we can run Jest from the command line.
...
...
  "scripts": {
    "dev": "vite",
    "build": "tsc && vite build",
    "lint": "eslint . --ext ts,tsx --report-unused-disable-directives --max-warnings 0",
    "preview": "vite preview",
    "test": "jest"  // Add this
  },
...
...
Ready your Code for Testing
Testing of React applications using Jest is usually done on a component level. We test individual components, one at a time. Here is the code we will be testing in the this tutorial. A simple counter component, with a label and two buttons which can increment and decrement the value of the counter.
const Counter = () => {
    const [counter, setCounter] = useState(0);

    const incrementCounter = () => {
        setCounter((prevCounter) => prevCounter + 1);
    };

    const decrementCounter = () => {
        setCounter((prevCounter) => prevCounter - 1);
    };

    return (
        <div className="flex w-12 py-4">
            <Button onClick={incrementCounter}>
                +
            </Button>
            <p className="text-center m-auto p-2">{counter}</p>
            <Button onClick={decrementCounter}>
                -
            </Button>
        </div>
    );
};
For our convenience, we will be modifying the code slightly to include a special property into the elements of this component, which we want to interact with (the label and the two buttons). This property is called "data-testid". Jest can use this property to easily locate these elements.
        <div className="flex w-12 py-4">
            <Button data-testid="increment" onClick={incrementCounter}>
                +
            </Button>
            <p className="text-center m-auto p-2" data-testid="counter">{counter}</p>
            <Button data-testid="decrement" onClick={decrementCounter}>
                -
            </Button>
        </div>
You do not have to do this however, as Jest has other means of detecting elements (such as by their displayed text).
Write your Test Case
Now, it’s time to write out the test case. The following code has been commented thoroughly to help explain what’s going on.
import {render, fireEvent, screen } from "@testing-library/react";
import Counter from "../components/Counter";
// test block
test("increments counter", () => {
// render component in test environment
render(<Counter></Counter>)
// select elements within the component
const incrementBtn = screen.getByTestId("increment");
const decrementBtn = screen.getByTestId("decrement");
const counter = screen.getByTestId("counter")
// interact with incrementBtn
fireEvent.click(incrementBtn)
// Verify value has been incrmented
expect(counter.innerHTML).toBe("1")
// interact with decrementBtn
fireEvent.click(decrementBtn)
// Verify value has been decrmented
expect(counter.innerHTML).toBe("0")
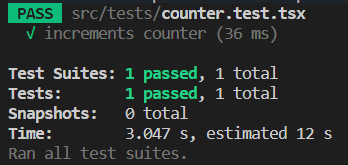
})Now run this testing using the following command:
npm run testYour test should now execute, and (hopefully) pass.
Conclusion
This marks the end of the “Jest for React Apps with Vite and TypeScript” Tutorial. Any