

In the ever-evolving landscape of web development, securing your applications and ensuring user authenticity is paramount. One of the widely adopted methods for achieving this is through token-based authentication. JSON Web Tokens (JWT) have emerged as a popular choice due to their simplicity, scalability, and versatility. In the Python ecosystem, the pyJWT library stands out as a powerful tool for working with JWTs, upon which this tutorial is based.
What are JWT’s
JSON Web Tokens (JWT) are a secure and compact way of transmitting information between parties. They consist of three parts:
- A header specifying the signing algorithm
- A payload containing the data
- A signature to verify the token’s integrity.
Imagine you’re mailing a package. The header is like the label on the package, indicating how it’s sealed. The payload is the actual content of the package – your data. The signature is the seal on the package, ensuring it hasn’t been tampered with during delivery.
In the online world, this “package” is a token, often used for authentication. When you log in, a server generates a JWT containing your user ID and some info. This JWT is then sent back to you. Next time you make a request, you attach this token. The server checks the signature to ensure it’s valid and reads the data in the payload to identify you.
Think of JWT as a digital passport for your online identity. It’s like showing your ID at a bar – it proves who you are, but it doesn’t reveal sensitive details. Plus, because it’s signed, you can trust it’s genuine.
What makes JWT powerful is that it’s compact, making it easy to send between parties. Also, it’s secure because the signature is generated using a secret key. If someone tries to tamper with the token, the signature won’t match, and the server knows something fishy is going on.
Structure of a JWT
JWTs consist of three main parts: the header, the payload, and the signature. These parts are concatenated with dots (‘.’) to form a compact string. Each part is Base64-encoded, making it URL-safe.
1. Header
The header typically contains two parts: the type of the token, which is JWT, and the signing algorithm being used, such as HMAC SHA256 or RSA. For example:
{
  "alg": "HS256",
  "typ": "JWT"
}
2. Payload
The payload contains the claims. Claims are statements about an entity (typically, the user) and additional data. There are various claims commonly used, such as “iss” (issuer), “sub” (subject), “exp” (expiration time), and more.
{
  "sub": "AuthToken",
  "name": "CodersLegacy",
  "iat": 1261939863
}
Sensitive data such as passwords are not used in the payload, as it is a security risk.
3. Signature
To create the signature part, the encoded header, encoded payload, and a secret key are combined using the specified algorithm. This signature is used to verify that the sender of the JWT is who it says it is and to ensure that the message wasn’t changed along the way.
Installing pyJWT
The first step is to install the pyJWT library. You can do this using pip:
pip install PyJWTNow that you have pyJWT installed, let’s explore some common use cases.
Creating a JWT
To create a JWT, you’ll need a secret key and some claims to include in the payload. Let’s assume you’re building a simple authentication system. Here is a simple example:
import jwt  # Not a typo
import datetime

# Your secret key, keep this secure!
secret_key = "secret_key"

# Sample payload with user information
payload = {
    "user_id": 11,
    "username": "CodersLegacy",
    "exp": datetime.datetime.utcnow() + datetime.timedelta(days=1)
}

# Create the JWT
token = jwt.encode(payload, secret_key, algorithm='HS256')
print(token)
This produces the following token:
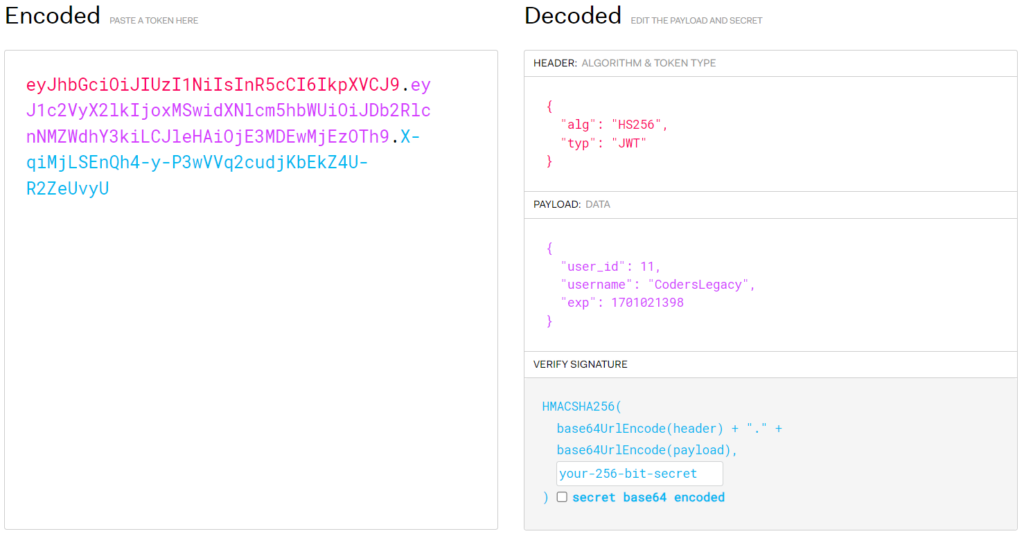
eyJhbGciOiJIUzI1NiIsInR5cCI6IkpXVCJ9.eyJ1c2VyX2lkIjoxMSwidXNlcm5hbWUiOiJDb2RlcnNMZWdhY3kiLCJleHAiOjE3MDEwMjEzOTh9.X-qiMjLSEnQh4-y-P3wVVq2cudjKbEkZ4U-R2ZeUvyUIf you pay close attention to the token, you will notice it has three segments, each separated by a dot character. These parts represent the Header, Payload, and Signature respectively.
Just to be clear, this code is meant to be located on the server. When the user (client) makes first contact with the server and logs in successfully, this code will be executed, the token generated, and returned to the client. Every time the user sends a new request to the server (e.g. download a file, fetched profile data, etc. etc.) this token is sent along with the request. The server will then decode and verify the token, and accept the request (if the token was valid).
About the Secret Key
Normally the secret key that we use would be something more fancy, complicated, and lengthy. Similar to those randomly generated passwords (but longer). You can find several key generators online, and many libraries created for this purpose. There are even more complex setups that can be used (depending on your requirements) involving two keys, a public key, and a private key. That is out of the scope of this tutorial however.
Verifying JWT tokens
A quick and easy way to verify JWT tokens during development is to use this site, jwt.io. It is used to verify JWT tokens, and display the data inside it. Here is a screenshot of the site decoding our token from the previous step.
But how would we realistically do this in our applications?
For the take of this tutorial, we will assume you have a functioning backend (or similar application setup to receive this token). Once the token has been received, you can use the following code:
import jwt

def verify_token(token, secret_key):
    try:
        payload = jwt.decode(token, secret_key, algorithms=['HS256'])
        print(payload)
    except jwt.ExpiredSignatureError:
        print("Token has expired.")
    except jwt.InvalidTokenError:
        print("Invalid token.")
By passing in our token to this function, if the token is valid and has not expired, the decoded payload is printed; otherwise, appropriate error messages are displayed.
{'user_id': 11, 'username': 'CodersLegacy', 'exp': 1701021398}Refreshing JWT Tokens
In real-world scenarios, it’s common to implement token refreshing to maintain user sessions securely. To explain this in simpler terms, most JWT tokens are set to expire in an hour. So if a user has been actively logged in for over an hour and sends a new request to the server, the token will be expired and the request rejected by the server (and the user likely will be logged out).
To fix this problem, we introduce the concept of a refresh token, which improves the user experience by automatically generating the user a new token with the first token expires.
Here is a function which refreshes a token by creating a new one with an extended expiry, and sending it back to the user.
import jwt

def refresh_token(old_token, secret_key):
    try:
        # Decode the old token to get user information
        old_payload = jwt.decode(old_token, secret_key, algorithms=['HS256'])

        # Update expiration time
        old_payload['exp'] = datetime.datetime.utcnow() + datetime.timedelta(days=1)

        # Create a new token with updated payload
        new_token = jwt.encode(old_payload, secret_key, algorithm='HS256')
        return new_token
    except jwt.ExpiredSignatureError:
        print("Old token has expired.")
    except jwt.InvalidTokenError:
        print("Invalid old token.")
This way, users can stay authenticated without having to log in frequently.
Conclusion
JSON Web Tokens provide a reliable and scalable solution for implementing token-based authentication in your Python applications. With the pyJWT library, you have a powerful tool at your disposal for encoding, decoding, and verifying JWTs. Whether you’re building a web API, securing a single-page application, or implementing user authentication, mastering pyJWT will undoubtedly elevate the security and user experience of your applications.
And so concludes our pyJWT Tutorial.