
If you are interested in learning about Blitting in Matplotlib, this tutorial is the perfect place for you!
Blitting is a term that’s used in computer graphics and refers to a technique that’s used to dramatically speed up the rendering of dynamic graphics. In matplotlib, blitting is a technique that’s used to make real-time updating of data much faster. This can be especially useful when you’re working with large amounts of data and want to update your graph on the fly.
What is Blitting?
Blitting is a technique that takes a snapshot of the static parts of your graph, such as the background, any labels, static elements, and saves them. This allows you to update the dynamic parts of the graph without having to redraw the entire thing every time.
So, what are the benefits of using blitting in matplotlib?
For starters, it significantly improves the performance of your graph updates. This can be especially helpful when you’re working with large datasets and need to update the graph frequently. Additionally, it’s a great way to create smooth and seamless animations, making your graph even more eye-catching and interactive.
We conducted a simple performance benchmark in this matplotlib tutorial using code without blitting, and with blitting. Here are the results.
With Blitting:      2.62 seconds

Without Blitting:   5.73 seconds
Pretty good right? Let’s find out how this was possible.
Matplotlib Blitting Tutorial
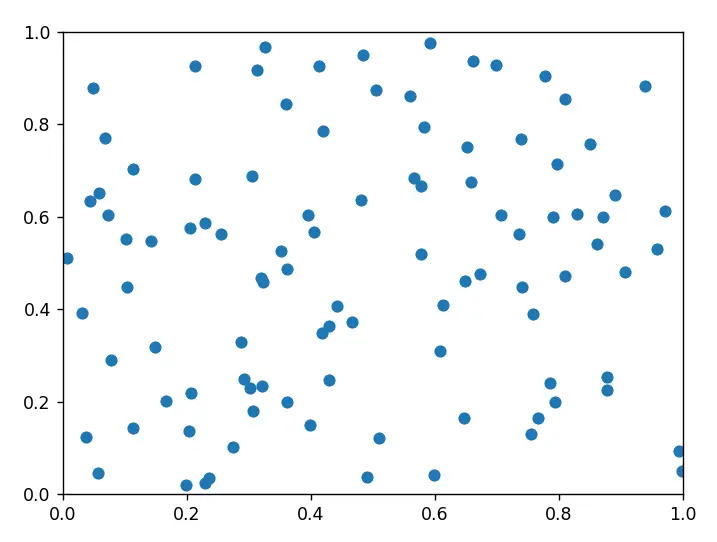
This tutorial will show you how to use the blitting technique in matplotlib to improve the performance of updating dynamic graphics. To illustrate this, the tutorial will show you how to generate a scatter plot and add new (randomly generated) data points to it in real-time.
First, we will write our code without the use of any blitting. This will give us a good reference point to begin with, and also help us get a better idea of our goal.
import matplotlib.pyplot as plt
import numpy as np

# Generate data
x = []
y = []

# make a new figure
fig, ax = plt.subplots()
scatter = ax.scatter(x, y)

plt.axis([0, 1, 0, 1])
plt.show(block=False)

for i in range(100):
    x = np.append(x, np.random.rand())
    y = np.append(y, np.random.rand())
    scatter.set_offsets(np.c_[x,y])
    fig.canvas.draw()
    fig.canvas.flush_events()

plt.show()
The above code generates the below scatterplot.
Creating a Blitting Manager Class
Next, we will create a Class to encapsulate all of the blitting logic, and creating a scalable solution to managing multiple dynamic graphs. This is also the recommended approach according to the matplotlib team themselves. The best thing about using this approach, is that we can easily enable blitting in any code within 2-3 lines using this Class. The only downside is the extra time required to make the Class.
The below code is actually from the matplotlib documentation, with some minor changes.
class BlitManager:
    def __init__(self, canvas, animated_artists=()):
        self.canvas = canvas
        self._artists = []
        self._bg = None

        for a in animated_artists:
            self.add_artist(a)

        self.cid = canvas.mpl_connect("draw_event", self.on_draw)


    def on_draw(self, event):
        """Callback to register with 'draw_event'."""
        if event is not None:
            if event.canvas != self.canvas:
                raise RuntimeError
        self._bg = self.canvas.copy_from_bbox(self.canvas.figure.bbox)
        self._draw_animated()


    def _draw_animated(self):
        """Draw all of the animated artists."""
        fig = self.canvas.figure
        for a in self._artists:
            fig.draw_artist(a)


    def add_artist(self, art):
        """Add a new Artist object to the Blit Manager"""
        if art.figure != self.canvas.figure:
            raise RuntimeError
        art.set_animated(True)
        self._artists.append(art)


    def update(self):
        """Update the screen with animated artists."""

        if self._bg is None:
            self.on_draw(None)
        else:
            # restore the background
            self.canvas.restore_region(self._bg)
            # draw all of the animated artists
            self._draw_animated()
            # update the GUI state
            self.canvas.blit(self.canvas.figure.bbox)
        # let the GUI event loop process anything it has to do
        self.canvas.flush_events()
We will now proceed to begin explaining the above code, method by method. First up is the init method, created during the creation of a BlitManager object.
The __init__ method
The __init__ method is the constructor for the BlitManager class. It takes two arguments: canvas and animated_artists. The canvas argument is used to store the FigureCanvas instance on which the animated artists will be drawn. This can be obtained from any figure object, by accessing the .canvas attribute.
The animated_artists argument is an iterable of artists that will be drawn on the canvas. Only include the artists here which are meant to be changed during the execution of the program.
    def __init__(self, canvas, animated_artists=()):
        self.canvas = canvas
        self._artists = []
        self._bg = None

        for a in animated_artists:
            self.add_artist(a)

        self.cid = canvas.mpl_connect("draw_event", self.on_draw)
The _artists attribute is initialized as an empty list to store all the artists that will be added to the BlitManager. The _bg attribute is initialized as None and it will be used to store the background of the canvas.
The for loop iterates over the animated_artists and adds each of them to the BlitManager using the add_artist method.
Finally, we connect the “draw event” to the on_draw() method. The draw event occurs whenever an object os drawn to the canvas.
The add_artist() Method
The add_artist method is used to add a new artist object to the BlitManager. For those unfamiliar with the term “artist”, it refers to any object plotted to the window (like a line).
We have some validation in place over here to ensure that the figure which the artist belongs to, and the figure of the canvas are the same.
    def add_artist(self, art):
        """Add a new Artist object to the Blit Manager"""
        if art.figure != self.canvas.figure:
            raise RuntimeError
        art.set_animated(True)
        self._artists.append(art)
We also the set the animated property of the artist to True, before adding into the _artists list. If animated is True, then the artist will not be drawn when fig.draw() is called. Instead, it will only be drawn when you manually call draw_artist(). This is commonly done when using blitting.
The draw_animated() Method
    def _draw_animated(self):
        """Draw all of the animated artists."""
        fig = self.canvas.figure
        for a in self._artists:
            fig.draw_artist(a)
The _draw_animated method is used to draw all the artists stored in the _artists attribute of the BlitManager object. The method iterates over all the artists in _artists and calls the draw_artist method of the Figure instance with each artist as the argument.
The on_draw() Method
This is the callback function that will be called every time the draw_event is triggered. The first few lines are just normal error handling, but the second last line with the copy_from_bbox() method is important.
    def on_draw(self, event):
        """Callback to register with 'draw_event'."""
        if event is not None:
            if event.canvas != self.canvas:
                raise RuntimeError
        self._bg = self.canvas.copy_from_bbox(self.canvas.figure.bbox)
        self._draw_animated()
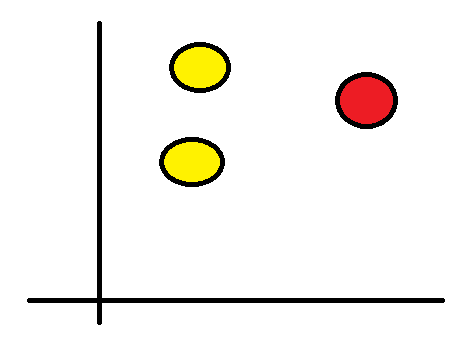
To understand the purpose of copy_from_bbox() we need to understand the concept of the “background” in blitting. Here are some diagrams to help us understand this concept.

Shown above is the current state of a graph, with 3 points. The red point is the point we wish to move to a different location. The yellow ones are static.
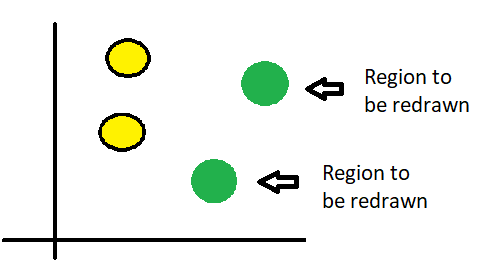
The below graph shows us the new position of the graph.
Without blitting, what would have happened is that the whole graph would have been cleared and redrawn to get the above output. But with blitting, we maintain a “background” which usually contains all the static elements in the canvas. It is important to keep in mind that the background and canvas data are actually just a buffer of RGBA pixels.
Whenever a new artist is added, or an existing artist is modified, the blit() function (to be shown later) compares the old background to the new changes, to identify which pixels have different. The pixels which have changed, are updated and redrawn to the screen. Those pixels which were not modified, are not drawn to the screen again.
To come back to the code from earlier, all we are doing is storing a background of the canvas before we make any changes.
The update() Method
Here is the main method of the BlitManager Class.
    def update(self):
        """Update the screen with animated artists."""

        if self._bg is None:
            self.on_draw(None)
        else:
            # restore the background
            self.canvas.restore_region(self._bg)
            # draw all of the animated artists
            self._draw_animated()
            # update the GUI state
            self.canvas.blit(self.canvas.figure.bbox)
        # let the GUI event loop process anything it has to do
        self.canvas.flush_events()
Here we can see the theory from earlier come into play. This function is called when we want to update the canvas/screen. First we restore the background to the canvas, then we draw the updated artists. Then the blit() method is called, which uses the comparing logic from earlier and redraws the necessary locations.
Finally, here is sample code from earlier, but with blitting logic included. The lines with blitting have been highlighted.
import matplotlib.pyplot as plt
import numpy as np
import time
from BlitManager import BlitManager  <---

# Generate data
x = []
y = []

x2 = np.random.rand(100)
y2 = np.random.rand(100)

# make a new figure
fig, ax = plt.subplots()
scatter = ax.scatter(x, y)

bm = BlitManager(fig.canvas, [scatter])  <---
plt.axis([0, 1, 0, 1])
plt.show(block=False)
plt.pause(.1)  <---


for i in range(100):
    x = np.append(x, np.random.rand())
    y = np.append(y, np.random.rand())
    scatter.set_offsets(np.c_[x,y])
    bm.update()  <---

plt.show()
We made one additional adjustment here, which we did not talk about earlier. We need used plt.pause(.1) which pauses the window for 0.1 seconds initially before we begin redrawing. This is necessary to allow caching of the window, which is needed by matplotlib.
Now try running this code yourself to see the magic!
When to use Blitting?
It is worth mentioning that if we had drawn all of points in the scatter plot at the same time, instead of one-by-one, then there is no point in using blitting. If this data is not meant to update or change in the future, and you only intend to draw it once, using blitting will not improve performance.
This is because blitting is designed to be used with dynamic, animated data that needs to be constantly updated on the screen, such as in a simulation or game.
It is also important to note that while blitting can improve performance, it may not always be the best option. For example, if the data you are working with is simple and straightforward, or if the updates are infrequent, then using blitting may not provide a noticeable improvement in performance. In these cases, it may be simpler and more straightforward to simply redraw the entire image from scratch.
This marks the end of the Matplotlib Blitting Tutorial. Any suggestions or contributions for CodersLegacy are more than welcome. Questions regarding the tutorial content can be asked in the comments section below.
This was a great tutorial, well explained, and worked perfectly. Thank you very much!