
Pygame is a very barebones library and offers little support for basic features required in games, such as Buttons and Menus. We could create our own Menu Screens in Pygame from scratch, but we have a much easier and better alternative called the pygame-menu library.
The Pygame-Menu library offers support for all kinds of menus, complete with many additional features like progress bars, sub-menus and prebuilt themes. Today’s tutorial will be an introduction to this library, and will teach you how to put together a simple menu in less than 30 lines of code.
We have a separate tutorial on how to create your own Button Class from Scratch in pygame, so check that out too if you are interested.
Create a simple Menu in Pygame
Before you continue with this tutorial, download the library using the following (or any equivalent) command:
pip install pygame-menuNow let’s begin writing some code for our Menu. We will do a step-by-step explanation for your understanding.
from time import sleep
import pygame
import pygame_menu
from pygame_menu import themes

pygame.init()
surface = pygame.display.set_mode((600, 400))
First we need to make a few essential imports, and setup some basic code. If you are unfamiliar with some of the pygame concepts being used here, refer to our pygame tutorial series.
Menu Class in Pygame
The most important Class from the pygame_menu module is “Menu”. We can use this Class to create a Menu object, or even more than one. A proper menu system actually comprises of multiple menus, with one parent menu containing several submenus. A submenu can also act as a parent menu which contains a submenu(s).
The below example shows us creating two Menus. We have the mainmenu and the level menu, where the levelmenu is meant to be the submenu of mainmenu.
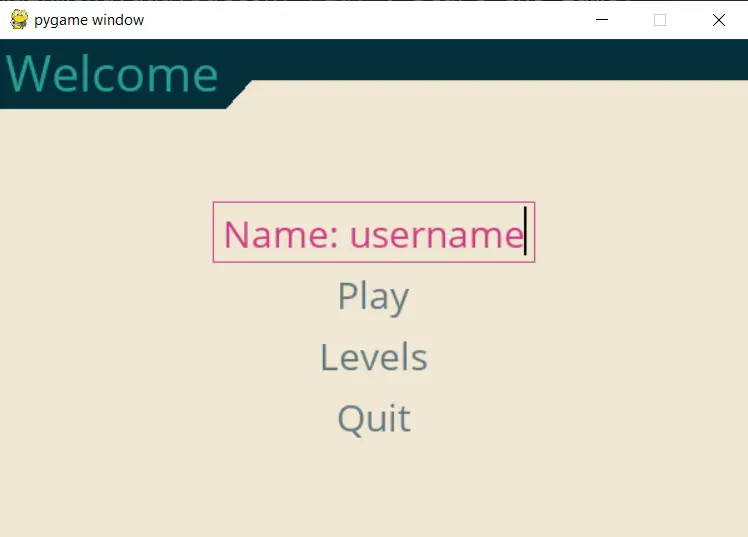
mainmenu = pygame_menu.Menu('Welcome', 600, 400,
theme=themes.THEME_SOLARIZED)
mainmenu.add.text_input('Name: ', default='username', maxchar=20)
mainmenu.add.button('Play', start_the_game)
mainmenu.add.button('Levels', level_menu)
mainmenu.add.button('Quit', pygame_menu.events.EXIT)
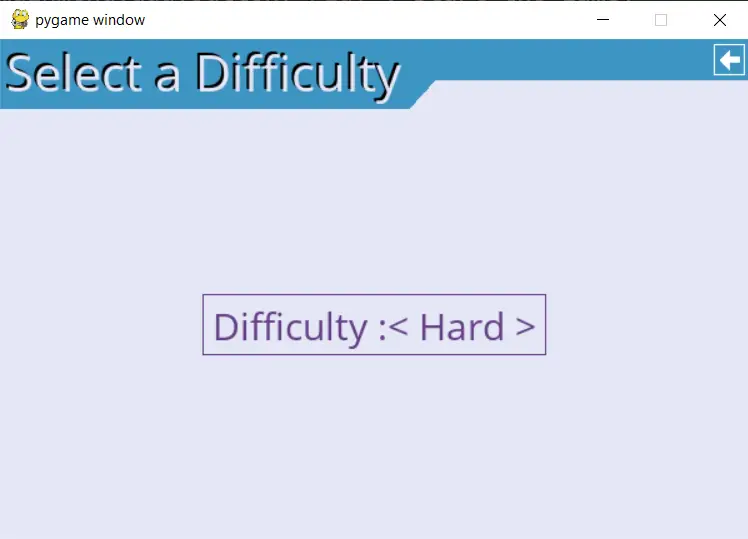
level = pygame_menu.Menu('Select a Difficulty', 600, 400,
theme=themes.THEME_BLUE)
level.add.selector('Difficulty:',[('Hard',1),('Easy',2)], onchange=set_difficulty)
Each Menu can add to itself various widgets such as Buttons, Text Labels, Selectors and Progressbars, as shown above. Most of the parameters are self-explanatory.
The “button” widget takes a function name as the second parameter (which is called when the button is clicked). The “selector” widget has a parameter called onchange which takes a function name as parameter, which is called whenever we access the “selector”.
Now let’s actually define those functions that we used earlier as parameters.
The set_difficulty() and start_the_game() functions are left relatively empty. We don’t have much use for them right now. (Remember we are just making a Menu here, not the actual game).
def set_difficulty(value, difficulty):
    print(value)
    print(difficulty)

def start_the_game():
    pass

def level_menu():
    mainmenu._open(level)

...
...
...

mainmenu.mainloop(surface)
The level_menu() function on the other hand is important because it opens the submenu “level”. If you remember, we never actually specified “level” as a submenu of Menu. However, whenever you pass a Menu into the _open() method, it becomes a submenu of the Menu to whom the _open() method belongs.
Finally at the end we run mainloop() which begins an infinite loop where our Menu is drawn and updated. This syntax is similar to the one used in Tkinter mainloop.
Code – Part#1
Now let’s combine our code and run it to see the output!
from time import sleep
import pygame
import pygame_menu
from pygame_menu import themes

pygame.init()
surface = pygame.display.set_mode((600, 400))

def set_difficulty(value, difficulty):
    print(value)
    print(difficulty)

def start_the_game():
    pass

def level_menu():
    mainmenu._open(level)


mainmenu = pygame_menu.Menu('Welcome', 600, 400, theme=themes.THEME_SOLARIZED)
mainmenu.add.text_input('Name: ', default='username', maxchar=20)
mainmenu.add.button('Play', start_the_game)
mainmenu.add.button('Levels', level_menu)
mainmenu.add.button('Quit', pygame_menu.events.EXIT)

level = pygame_menu.Menu('Select a Difficulty', 600, 400, theme=themes.THEME_BLUE)
level.add.selector('Difficulty :', [('Hard', 1), ('Easy', 2)], onchange=set_difficulty)

mainmenu.mainloop(surface)
Here is the output, the “main menu” which is the first to show up. You can use both the mouse and your keyboard keys to navigate this menu.
And here is the Level Selector Menu. My clicking on the selector widget or pressing “enter” you can change the selection.
Changing our Approach
Using mainloop() to start your menu program is easy, but also has some downsides. For example, if you wish to write pygame and pygame_menu code in the same file then you cannot do so with mainloop().
This is because mainloop() starts an infinite loop, whose working we cannot modify. Hence we will change our approach a bit, and use a slightly more advanced but much better way of creating an infinite execution loop.
We will replace the following line:
mainmenu.mainloop(surface)
With this:
while True:
    events = pygame.event.get()
    for event in events:
        if event.type == pygame.QUIT:
            exit()

    if mainmenu.is_enabled():
        mainmenu.update(events)
        mainmenu.draw(surface)

    pygame.display.update()
As you can see, it’s 100% pygame code, and now you can begin writing pygame code inside of this infinite loop as well.
Let’s continue our Menu program a little further and show you how we can make it even better.
Creating the Loading Menu
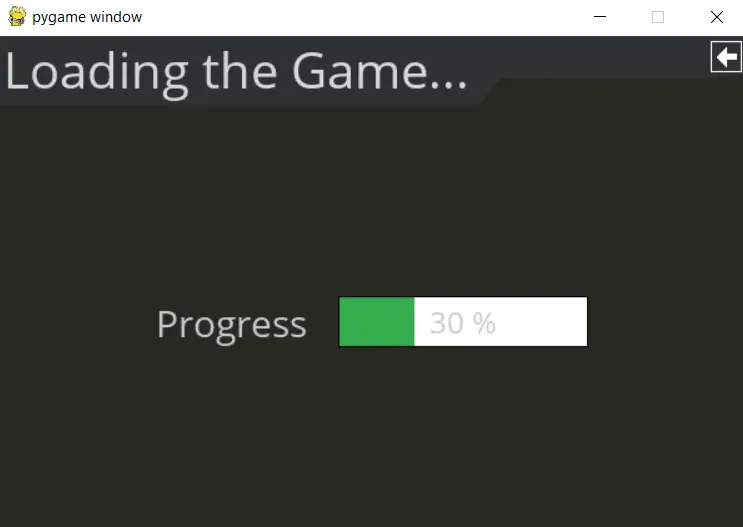
We will be creating a new Menu called the “Loading Menu”. This menu will trigger whenever we click the “Play” button. It features a single widget, the “progressbar”, which will show the loading progress for the game.
loading = pygame_menu.Menu('Loading the Game', 600, 400, theme=themes.THEME_DARK)
loading.add.progress_bar("Progress", progressbar_id = "1", default=0, width = 200)
update_loading = pygame.USEREVENT + 0
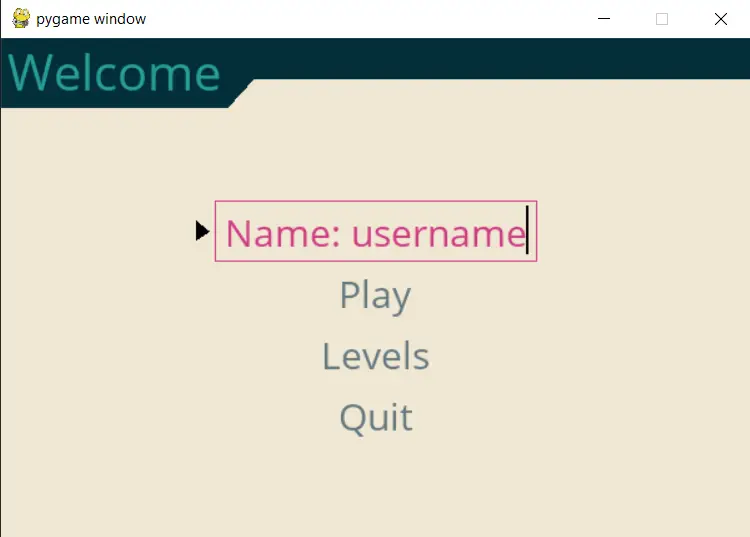
arrow = pygame_menu.widgets.LeftArrowSelection(arrow_size = (10, 15))
We have also created an event for the progressbar, which will be needed to update the progressbar’s value at fixed intervals.
The pygame_menu module also comes with several “selection effects” such as the Arrow Selection widget. This gives us a nice a little arrow that hangs around the currently selected widget. We have created the arrow in the above code, and we will draw it to the window in the next section.
Modifying the Game Loop
This code section features two main parts. First we need to register the Pygame UserEvent that we just made. Just like how we deal with pygame.QUIT, we have written some code for our new event as well.
First we acquire the progressbar widget from the loading menu using the get_widget() method and the progressbar id (which we defined in the previous section). Then we use the progress bar’s built in functions to increment it’s value by 1. If it reaches a value of 100, we disable the user event by setting timer to 0.
while True:
    events = pygame.event.get()
    for event in events:
        if event.type == update_loading:
            progress = loading.get_widget("1")
            progress.set_value(progress.get_value() + 1)
            if progress.get_value() == 100:
                pygame.time.set_timer(update_loading, 0)
        if event.type == pygame.QUIT:
            exit()

    if mainmenu.is_enabled():
        mainmenu.update(events)
        mainmenu.draw(surface)
        if (mainmenu.get_current().get_selected_widget()):
            arrow.draw(surface, mainmenu.get_current().get_selected_widget())

    pygame.display.update()
At the end we also wrote some code to draw the “arrow” to the Menu. The get_current() method returns the currently selected Menu/submenu, and the get_selected_widget() returns the currently selected widget in that menu.
We then pass the screen object (surface) and the currently selected widget into the arrow’s draw function.
Now let’s throw all this code together.
from time import sleep
import pygame
import pygame_menu
from pygame_menu import themes

pygame.init()
surface = pygame.display.set_mode((600, 400))

def set_difficulty(value, difficulty):
    print(value)
    print(difficulty)

def start_the_game():
    mainmenu._open(loading)
    pygame.time.set_timer(update_loading, 30)

def level_menu():
    mainmenu._open(level)


mainmenu = pygame_menu.Menu('Welcome', 600, 400, theme=themes.THEME_SOLARIZED)
mainmenu.add.text_input('Name: ', default='username')
mainmenu.add.button('Play', start_the_game)
mainmenu.add.button('Levels', level_menu)
mainmenu.add.button('Quit', pygame_menu.events.EXIT)

level = pygame_menu.Menu('Select a Difficulty', 600, 400, theme=themes.THEME_BLUE)
level.add.selector('Difficulty :', [('Hard', 1), ('Easy', 2)], onchange=set_difficulty)

loading = pygame_menu.Menu('Loading the Game...', 600, 400, theme=themes.THEME_DARK)
loading.add.progress_bar("Progress", progressbar_id = "1", default=0, width = 200, )

arrow = pygame_menu.widgets.LeftArrowSelection(arrow_size = (10, 15))

update_loading = pygame.USEREVENT + 0

while True:
    events = pygame.event.get()
    for event in events:
        if event.type == update_loading:
            progress = loading.get_widget("1")
            progress.set_value(progress.get_value() + 1)
            if progress.get_value() == 100:
                pygame.time.set_timer(update_loading, 0)
        if event.type == pygame.QUIT:
            exit()

    if mainmenu.is_enabled():
        mainmenu.update(events)
        mainmenu.draw(surface)
        if (mainmenu.get_current().get_selected_widget()):
            arrow.draw(surface, mainmenu.get_current().get_selected_widget())

    pygame.display.update()
And here is our completed Pygame Menu Screen. You should run the code yourself and navigate the menus for the best experience.
We can now see a little arrow beside the currently selected widget.
And here is a screenshot of the progressbar during it’s loading.
This marks the end of the “Create Menu Screens in Pygame” Tutorial. Any suggestions or contributions for CodersLegacy are more than welcome. Questions regarding the tutorial content can be asked in the comments section below.
trust the process
I am attempting to use this in my game but when the progress bar gets to 100, it freezes and i have to quit the program. any suggestions?
Great tutorial. The one issue I am having when adapting this, is the arrow placement when I use a different size display screen to the menu.
I have a display screen of 840×1050 and a menu of 400×300. The menu displays in the middle of the screen. But the selection “arrow” is displaying and functioning as if the menu was located at 0,0. It also isn’t removing the previous arrow so that I end up with an arrow at every menu option I move to & have moved to.
Any ideas?