
In this tutorial, we will be discussing the “base code” that is required in every PyQt6 GUI application for creating a basic Window. This kind of code is also often referred to as the “Boiler Plate” Code. This code provides us with the base foundation for the Window, after which we begin creating widgets inside it,
Once you have completed this tutorial, move onto the main PyQt6 series where we will teach you about all the different widgets in PyQt6 and how to use the effectively.
We’ll be using PyQt6, the latest version of the PyQt library in Python. For the older PyQt5 version, follow this link to our Tutorial Series for PyQt5.
Installing and Setting up a PyQt6 GUI
The first step is to download and install the pyqt6 library on your system. You can do this in a variety of ways depending on your OS and setup. If you’re using the command prompt in windows, use the following command.
pip install pyqt6This command should work in most IDE’s and OS’s. (Remember to execute it in the Python installation directory if you haven’t added it to PATH)
Importing PyQt6 Modules
The next step is importing the required modules within PyQt6. There are also several different methods through which we can create PyQt6 GUI Windows, so expect to see some difference in other tutorials.
from PyQt6.QtWidgets import QApplication, QVBoxLayout, QWidget, QLabel
from PyQt6.QtGui import QIcon
from PyQt6.QtCore import Qt
import sys
This is just a standard number of imports for a basic application. You will require many more for a proper program, depending on the number of features and size of your application. We will discuss more of these later in the series.
Adjusting Window Size and Position
There are two functions we can use to adjust the Window Size and Position. The first is resize() which takes just two parameters, the width and the height.
resize(width, height)
The second function is the setGeometry() method which takes 4 inputs in the format shown below.
setGeometry( X-coordinate, Y-coordinate, width, height)
The X and Y coordinate define the origin point of the Window when it is displayed. Keep in mind that these two coordinates do not define the center of the window, rather they define the origin point of the top left hand corner of the window. Passing ( 0, 0 ) as coordinates would draw the window to the top left hand corner of your screen.
Main Code
Here is the main chunk of our code. We create a new Class called “Window”, which is inherited from QWidget. This gives it the ability to access many powerful functions and methods belonging to the QWidget Class. Because are we inheriting from this Class, we need to initialize it’s constructor using super().init().
class Window(QWidget):
def __init__(self):
super().__init__()
self.resize(300, 300)
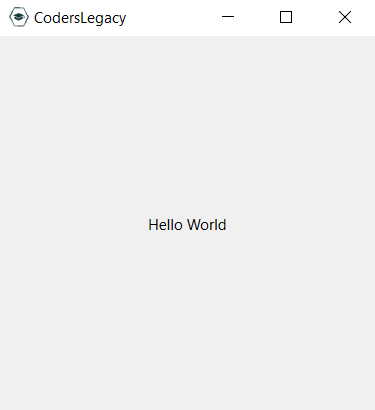
self.setWindowTitle("CodersLegacy")
self.setWindowIcon(QIcon("icon.jpg"))
layout = QVBoxLayout()
self.setLayout(layout)
label = QLabel("Hello World")
label.setAlignment(Qt.AlignmentFlag.AlignCenter)
layout.addWidget(label)
The rest of the code is fairly easy to follow. We set a Title and Icon on our Window, followed by creating a Layout and putting a single Widget inside it. We also aligned the widget to the center.
Launching the PyQt6 Window
Now we need to actually create the Window Class Object, and use the correct commands to run it. The first thing you need to do is create a QApplication object. You can leave it’s parameters blank by passing an empty list, or simply passing sys.argv (allowing you to pass arguments from the command prompt).
app = QApplication(sys.argv)
window = Window()
window.show()
sys.exit(app.exec())
While calling Window() will create the window, it will not display it as it is hidden by default. For this we need to call the show() method on the window that we created.
Finally we must call sys.exit(app.exec()). This is a compulsory line that you need to add to all your PyQt6 applications. It’s necessary to achieve a “clean exit” from your GUI application. It waits until you’ve pressed the “X” button on your window, and then shuts down the application properly.
Full Code
Here’s a complete version of the code shown above.
from PyQt6.QtWidgets import QApplication, QVBoxLayout, QWidget, QLabel
from PyQt6.QtGui import QIcon
from PyQt6.QtCore import Qt
import sys

class Window(QWidget):
    def __init__(self):
        super().__init__()
        self.resize(300, 300)
        self.setWindowTitle("CodersLegacy")
        self.setWindowIcon(QIcon("icon.jpg"))

        layout = QVBoxLayout()
        self.setLayout(layout)

        label = QLabel("Hello World")
        label.setAlignment(Qt.AlignmentFlag.AlignCenter)
        layout.addWidget(label)

app = QApplication(sys.argv)
window = Window()
window.show()
sys.exit(app.exec())
To continue learning more about PyQt6, head to back to the home page for the our PyQt6 Tutorial Series.
This marks the end of the PyQt6, Creating a Basic Window Tutorial. Any suggestions or contributions for CodersLegacy are more than welcome. Questions regarding the article content can be asked in the comments section below.