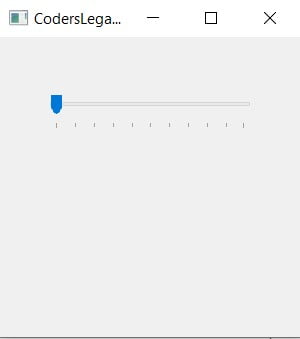
This article covers the QSlider widget in Python PyQt6.
This widget provides an interactive slider which the user may interact with to select from a range of values. PyQt6 allows us to customize the slider and it’s many values, such as changing its range of values, it’s intervals between values, as well as the size of the slider head (and more!)
You will find a complete list of methods and options for the PyQt6 Slider available at the end of this tutorial.
Creating a PyQt6 Slider
To create a basic Slider Widget, you will need the QSlider() Class from the QtWidgets module. By default, the orientation of the Slider is vertical. For a horizontal slider, you need to use Qt.Horizontal.
You must also define a minimum and maximum range of values for it, with the help of the setMinimum() and setMaximum() methods.
Using the setGeometry() method we decide both the location and the dimensions of the Slider. The first two parameters represent the X and Y position of the Slider on the window. The third and fourth parameters define the width and height.
Finally we need to determine the type, and interval of the Ticks. The Ticks are these little markers on the side of the Slider, placed at equal intervals between the minimum and maximum values. You can pick one out of many different Tick placements (see the end of the article) and set an interval for the distance between the Ticks.
from PyQt6.QtWidgets import QApplication, QWidget, QSlider
from PyQt6.QtCore import Qt
import sys

class Window(QWidget):
    def __init__(self):
        super().__init__()
        self.resize(300, 250)
        self.setWindowTitle("CodersLegacy")

        slider = QSlider(Qt.Orientation.Horizontal, self)
        slider.setGeometry(50,50, 200, 50)
        slider.setMinimum(0)
        slider.setMaximum(20)
        slider.setTickPosition(QSlider.TickPosition.TicksBelow)
        slider.setTickInterval(2)

app = QApplication(sys.argv)
window = Window()
window.show()
sys.exit(app.exec())
The GUI output of the above code.

Retrieving Slider Values
We’ve added another widget called QLabel here to help us display the values from the QSlider widget. Be sure to convert any integer values to strings before trying to display them as Labels only shown string values.
Using the valueChanged() signal in PyQt6, we can link the slider’s value to the display() function. Any time the value of the slider is modified in any way, the display function will be called, and the value of the Label will be updated.
from PyQt6.QtWidgets import QApplication, QWidget, QSlider, QLabel
from PyQt6.QtCore import Qt
import sys

class Window(QWidget):
    def __init__(self):
        super().__init__()
        self.resize(300, 250)
        self.setWindowTitle("CodersLegacy")

        self.label = QLabel(self)
        self.label.move(130, 100)

        slider = QSlider(Qt.Orientation.Horizontal, self)
        slider.setGeometry(50,50, 200, 50)
        slider.setMinimum(0)
        slider.setMaximum(20)
        slider.setTickPosition(QSlider.TickPosition.TicksBelow)
        slider.setTickInterval(1)
        slider.valueChanged.connect(self.display)

    def display(self):
        print(self.sender().value())
        self.label.setText("Value: "+str(self.sender().value()))
        self.label.adjustSize()  # Expands label size as numbers get larger

app = QApplication(sys.argv)
window = Window()
window.show()
sys.exit(app.exec())
We can access the slider widget by using the .sender() attribute on self. This allows us to access the widget which triggered the function.

You can also link the Slider to the QPushButton widget in order to retrieve values. However, with this approach, the value will only be returned when you press the button.
QSlider Methods
This is a compilation of the most common and important methods for the QSlider widget.
| Method | Description |
|---|---|
setMaximum() | Defines the minimum value for the Slider. |
setMinimum() | Defines the maximum value for the Slider. |
setSingleStep() | Sets the increment between values. |
setValue() | Sets the current value of the Slider. |
value() | Returns the current value of the Slider. |
setTickInterval() | Sets the distance between ticks on the Slider. |
setTickPosition() | Possible options: 1. QSlider.NoTicks 2. QSlider.TicksBothSides 3. QSlider.TicksAbove 4. QSlider.TicksBelow 5. QSlider.TicksLeft 6. QSlider.TicksRight |
Want to learn more about GUI Programming with PyQt6? Follow the link to other amazing tutorials!
This marks the end of the Python PyQt6 QSlider article. Any suggestions or contributions for CodersLegacy are more than welcome. Questions regarding the article content can be asked in the comments section below.

What is self.sender in display function? I think this is a typo.
It’s not a typo. I should have explained it properly. I added a small description below the code.