
This Article is about the Python Tkinter Scale, what it is and how to use it.
What is the Python Tkinter Scale?
The Python Tkinter Scale widget is used to implement a graphical slider to the User interface giving the user the option of picking through a range of values. The Maximum and minimum values on the Scale can be set the programmer.
Options
| No. | Option | Description |
|---|---|---|
| 1 | activebackground | Color of the background when widget is under focus. |
| 2 | bg | Background color for the area around the widget. |
| 3 | bd | Size of the border around the widget. Default value is 2 pixels. |
| 4 | command | If the value on the slider is changed, this procedure is called. |
| 5 | cursor | When the mouse is hovering over this widget, it can be changed to a special cursor type like an arrow or dot. |
| 6 | digits | Defines the way the program reads the values on the Scale. Determines number of digits shown. Takes integer values. |
| 7 | font | The type of font to be used for this widget. |
| 8 | fg | The color for the text. |
| 9 | from_ | Defines the start point of the scale |
| 10 | highlightcolor | The text color when the widget is under focus. |
| 11 | label | Used to create a label within the scale widget. Used to display text. |
| 12 | length | Length of Scale widget. Default is 100 pixels. |
| 13 | orient | Sets the Orientation of the Scale. Default is HORIZONTAL. For displaying vertically, use VERTICAL. |
| 14 | relief | It specifies the type of the border. Default is Flat, other options include RAISED and SUNKEN. |
| 15 | repeatdelay | Determines the time in milliseconds for how long the button in the trough must be pressed before the slider moves in that direction repeatedly. Default value is 300. |
| 16 | resolution | Defines the resolution, or smallest increment. Setting this to say 0.5 on a scale with a range from 0 to 10, will result in 20 possible values. Like, 0, 0.5, 1, 1.5……. |
| 17 | showvalue | Current value of the scale is displayed in a label beside it. Set to 0 to turn the label off. |
| 18 | sliderlength | Sets the length of the slider. Default is 30 pixels. |
| 19 | state | Defines the state of the widget. ACTIVE is when it is under focus, and DISABLED causes the widget to turn unresponsive. |
| 20 | tickinterval | Similar to resolution, but this time, only for displaying the values on the scale. Set’s the “tick” interval. |
| 21 | to | The co-partner to the from option. Defines the value at the other end of the scale. |
| 22 | troughcolor | Sets the color of the trough in the widget |
| 23 | variable | The control variable for this scale. May be StringVar(), IntVar() or DoubleVar(). DoubleVar is for float values. If StringVar is used, the numerical value, whether float or int will be converted to string. |
| 24 | width | The width of the trough in the scale. Default value is 15 pixels. |
Creating Tkinter Scales
Example 1
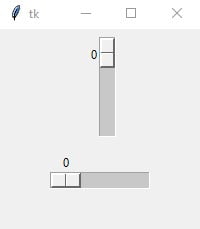
Here we have created two Tkinter scales, with different orientations. The first is by default VERTICAL, and we have set the second to HORIZONTAL.
We defined the range of the scales from 0 to 10 by setting these values in the from and to options respectively.
from tkinter import *

root = Tk()
root.geometry("200x200")
frame = Frame(root)
frame.pack()

Scala = Scale(frame, from_=0, to=10)
Scala.pack(padx=5, pady=5)

Scala2 = Scale(frame, from_=0, to=10, orient=HORIZONTAL)
Scala2.pack(padx=5, pady=5)

root.mainloop()
Example 2
The following code has two new features. For one, it has the command option linked to the function val. Because of this, anytime the value of the slider is changed, that function will be called. The value of the slider is sent as a argument to the function.
Secondly, in the second Tkinter Scale we have set the resolution to 0.5. This allows us to pick a larger range of values than we can in the first Tkinter Scale. See the output to understand.
from tkinter import *

def val(value):
    print(value)

root = Tk()
root.geometry("200x200")
frame = Frame(root)
frame.pack()

Scala = Scale(frame, from_=0, to=10, command=val)
Scala.pack(padx=5, pady=5)

Scala2 = Scale(frame, from_=0, to=10, resolution = 0.5, command=val, orient=HORIZONTAL)
Scala2.pack(padx=5, pady=5)

root.mainloop()
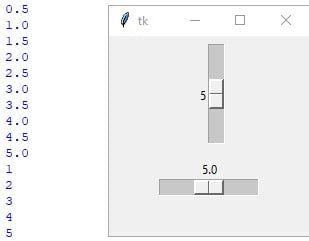
This image was taken side by side the Standard Python IDE. You can see the output that is a result of us moving the slider.
Example 3
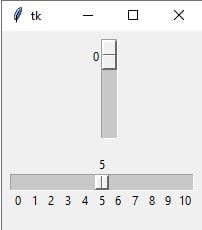
Sometimes you may want your scale to be labelled. Which is where the tick interval comes in. Setting it to 1, creates intervals of 1, in the range 0 to 10.
Make sure that the length of your Scale is large enough to hold that much text, else it will appear all jumbled up together. We’re also going to decrease the slider length, because it’s default size is pretty big.
from tkinter import *

def val(value):
    print(value)

root = Tk()
root.geometry("200x200")
frame = Frame(root)
frame.pack()

Scala = Scale(frame, from_=0, to=10, command=val)
Scala.pack(padx=5, pady=5)

Scala2 = Scale(frame, from_=0, to=10, length = 200,
               tickinterval = 1, command=val,
               orient=HORIZONTAL, sliderlength = 15)
Scala2.pack(padx=5, pady=5)

root.mainloop()
Video Code
The Code from our Video on Tkinter Scale Widget on our YouTube Channel for CodersLegacy.
import tkinter as tk


class Window:
    def __init__(self, master):
        self.master = root

        # Frame
        self.frame = tk.Frame(self.master, width = 300, height = 200)
        self.frame.pack()

        # Scale
        self.scale = tk.Scale(self.frame, from_ = 0, to = 10, orient = tk.HORIZONTAL, command = self.ret,
                              resolution = 1, digit = 2, tickinterval = 1, length = 200, sliderlength = 20,
                              label = "My Scale", showvalue = 0, troughcolor = "blue")
        self.scale.place(x = 30, y= 30)

        # Button
        self.button = tk.Button(self.frame, text = "DISABLE the Scale", command = self.disable)
        self.button.place(x = 30, y = 100)


    def disable(self):
        self.scale.config(state = tk.DISABLED, troughcolor = "grey")


    def ret(self, value):
        print(value)


root = tk.Tk()
window = Window(root)
root.mainloop()
This marks the end of the Python Tkinter Scale page. You can head back to the main Tkinter article using this link to learn about other widgets.
Any contributions or suggestions you may have are more than welcome. Feel free to ask any questions in the comments below.