
In this Tkinter tutorial, we will explore how to use the Python tkCalendar widget to create a Date Picker Calendar. What is a “Date Picker” Calendar though? Well its basically a regular calendar from which you can select a date, and have that value returned to your Tkinter application.
Lets begin!
Calendars with Tkinter tkCalendar
The very first thing you need to do is download and install tkcalendar. This is not actually a part of the Tkinter Library, rather it is a separate package that we need to acquire.
pip install tkcalendarRun the above command (or its equivalent depending on your coding environment) on the Command Prompt, and now you are ready to begin making Calendars in Tkinter.
Lets start off with a very basic example.
Here we import the Calendar class as a regular widget, and pass it into our Window. We will focus more on customizing it and interacting with it as we proceed through the tutorial.
import tkinter as tk
from tkcalendar import Calendar

root = tk.Tk()

calendar = Calendar(root)
calendar.pack()

root.mainloop()
Here is our output.
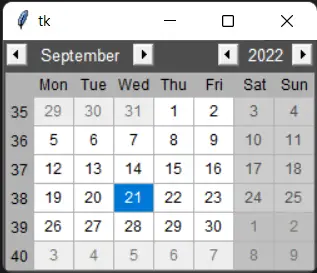
It is important to note, that the default date that shows on the Calendar is the current day/month/year. This will not obvious to you until you run this code for yourself and check the default date.
You can also control the default date by changing the year, month and day parameters as shown below.
import tkinter as tk
from tkcalendar import Calendar

root = tk.Tk()

calendar = Calendar(root, year=2023, month=4, day=4)
calendar.pack()

root.mainloop()
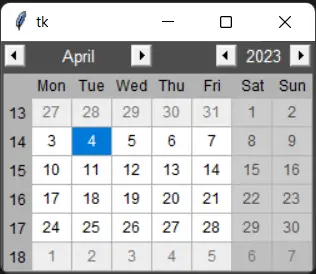
As you can see, we are now showing a different date as the default date.
Customizing Python tkCalendar
We can also specify a “range” of values from which the user is allowed to select from. This can be done by passing a datetime object (part of the Python standard library) into the mindate and maxdate parameters of the Calendar class.
from datetime import datetime
import tkinter as tk
from tkcalendar import Calendar

root = tk.Tk()

calendar = Calendar(root, mindate=datetime(2021, 1, 1),
                          maxdate=datetime(2023, 12, 30),
                          showweeknumbers=False,
                          showothermonthdays=False)
calendar.pack()

root.mainloop()
Try running this code, and you will see you cannot select a date from before 2021 or after 2023.
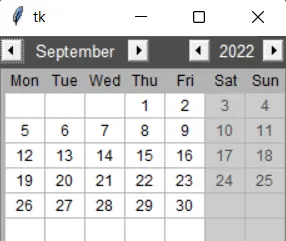
We also went for a more “minimalistic” approach by disabling some extra details such as the week numbers and the dates for the next month. (Compare this output to the previous one)
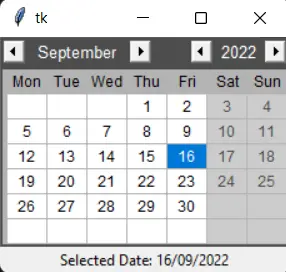
Lets take a look at one last thing in this tutorial. That is, how to interact and get the current date from the Calendar.
What we will do is bind a function called updateLabel() to the <<CalendarSelected>> virtual event. This event triggers whenever we select a date on the Calendar.
Inside this function, we will update a label (which we will also create) with the selected date. We can get the current date by using the get_date() function on the Calendar object.
from datetime import datetime
import tkinter as tk
from tkcalendar import Calendar

def updateLabel(event):
    label.config(text="Selected Date: " + calendar.get_date())


root = tk.Tk()
calendar = Calendar(root, mindate=datetime(2021, 1, 1),
                          maxdate=datetime(2023, 12, 30),
                          showweeknumbers=False,
                          showothermonthdays=False)
calendar.pack()
calendar.bind('<<CalendarSelected>>', updateLabel)

label = tk.Label(root, text="Selected Date: ")
label.pack()
root.mainloop()
Instead of using events, we could also have retrieved the current date with a button.
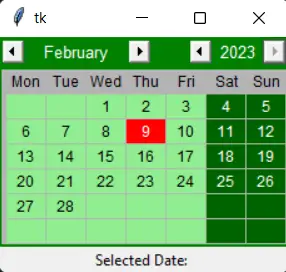
Customizing the Color of the tkCalendar
Having a good looking Calendar that matches the color theme of your application is also quite important. You can customize the color, text, and background of your tkCalendar widget using some of the options provided in the documentation, demonstrated below.
from datetime import datetime
import tkinter as tk
from tkcalendar import Calendar


def updateLabel(event):
    label.config(text = "Selected Date: " + calendar.get_date())

root = tk.Tk()

calendar = Calendar(root, mindate = datetime(2020, 1, 1),
                          maxdate = datetime(2023, 12, 30),
                          showweeknumbers = False,
                          showothermonthdays = False,
                          background = "green",
                          foreground = "white",
                          selectbackground = "red",
                          normalbackground = "lightgreen",
                          weekendbackground = "darkgreen",
                          weekendforeground = "white")
calendar.pack()

calendar.bind("<<CalendarSelected>>", updateLabel)

label = tk.Label(root, text = "Selected Date: ")
label.pack()
root.mainloop()
This marks the end of the Python tkCalendar, Creating a Date Picker Calendar Tutorial. Any suggestions or contributions for CodersLegacy are more than welcome. Questions regarding the tutorial content can be asked in the comments section below.
I have a couple of questions. How do we display the date as Month, Day, Year (as four digit)? How do we save the date to a variable that can be used after the selection?
date_pattern =”d/m/yyyy” 9/11/2024 or “d/m/yy” to 9/11/24 Save the date to a variable, just calendar.get_date() when user press button.