
In this Python tutorial we are going to take a look at the Tkinter LabelFrame Widget. As the name implies, it’s a combination of the Label and Frame widgets in Tkinter. It combines the ability of the frame to hold widgets inside it, with the text options you get with a label.
Tkinter LabelFrame Syntax
Here is the syntax for creating a LabelFrame in Tkinter.
label_frame = tkinter.LabelFrame(parent, options....)We will discuss several of the LabelFrame’s options in the below examples. For a complete list of them, refer to the table at the end of the tutorial.
Creating a Tkinter LabelFrame Widget
Let’s begin with a simple example of the Tkinter LabelFrame Widget.
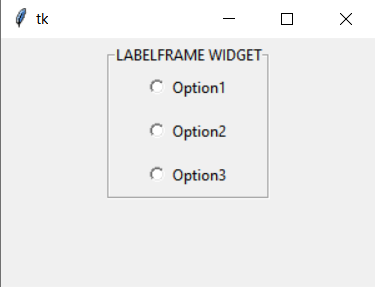
The below example features a simple LabelFrame widget, with three RadioButtons placed inside of it. The main take away here, is how we are using the LabelFrame widget as a container, and how to display text on it.
import tkinter as tk


class Window:
    def __init__(self, master):

        label_frame = tk.LabelFrame(master, text = "LABELFRAME WIDGET")
        label_frame.pack(padx = 5, pady = 5)

        var = tk.IntVar()

        radio1 = tk.Radiobutton(label_frame, text = "Option1",
                                variable = var, value = 1)
        radio1.pack(padx = 5, pady = 5)

        radio2 = tk.Radiobutton(label_frame, text = "Option2",
                                variable = var, value = 2)
        radio2.pack(padx = 5, pady = 5)

        radio3 = tk.Radiobutton(label_frame, text = "Option3",
                                variable = var, value = 3)
        radio3.pack(padx = 5, pady = 5)


root = tk.Tk()
root.geometry('300x200')
window = Window(root)
root.mainloop()
The output:
Example# 2
Let’s take a look at another example where we use some of the options belonging to the LabelFrame widget.
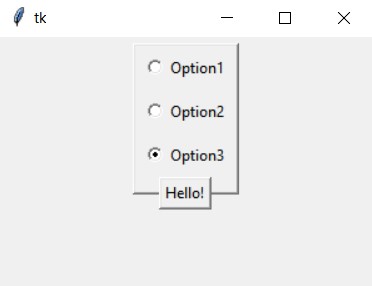
The below example utilizes three new options, labelanchor, labelwidget and relief. The simplest is relief, which simply changes the border look of the widget. labelanchor changes the position of the text/widget from it’s position on the top-left corner. For e.g, passing “ne” (north east) into label-anchor will make it appear on the top-right corner.
labelwidget can be used to change what kind of widget is displayed on the border of the LabelFrame. (It doesn’t have to be just a label!). If you use the labelwidget option, the text option gets over-written.
import tkinter as tk

class Window:
    def __init__(self, master):
        button = tk.Button(master, text = "Hello!")
        button.pack(padx = 5, pady = 6)

        label_frame = tk.LabelFrame(master, text = "OPTION MENU",
                                    labelanchor = "s", labelwidget = button,
                                    relief = "raised")
        label_frame.pack(padx = 5, pady = 5)

        var = tk.IntVar()

        radio1 = tk.Radiobutton(label_frame, text = "Option1",
                                variable = var, value = 1)
        radio2 = tk.Radiobutton(label_frame, text = "Option2",
                                variable = var, value = 2)
        radio3 = tk.Radiobutton(label_frame, text = "Option3",
                                variable = var, value = 3)
        radio1.pack(padx = 5, pady = 5)
        radio2.pack(padx = 5, pady = 5)
        radio3.pack(padx = 5, pady = 5)


root = tk.Tk()
root.geometry('300x200')
window = Window(root)
root.mainloop()
The output:
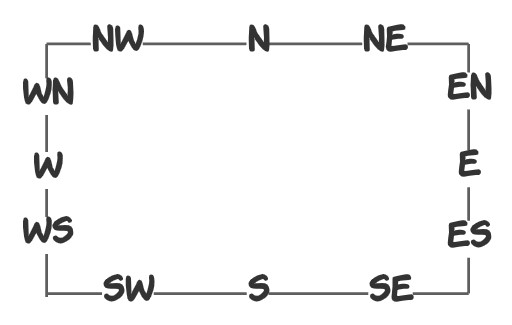
Here is a nice image to show you the various anchors that you can use in the LabelFrame widget, and where they are located.
LabelFrame Options
A list of all available options for the Tkinter LabelFrame Widget.
| Options | Description |
|---|---|
bg | The Background color for the label of this widget. |
bd | Size of border around the LabelFrame. Default is 2. |
cursor | When the mouse is hovering over this widget, it can be changed to a special cursor type like an arrow or dot. |
fg | The Foreground color for the text of this widget. |
highlightbackground | Color of the focus highlight when the widget does not have focus. |
highlightcolor | The color of the focus highlight when the widget has focus. |
highlightthickness | Thickness of the focus highlight. |
labelanchor | Determines the position of the widget on the LabelFrame’s border. (options discussed earlier in the image) |
labelwidget | Determines the widget to be displayed on the LabelFrame’s border. Simply pass the widget’s name into this option to make it work. |
padx | Horizontal Padding around the widget. |
pady | Vertical Padding around the widget. |
relief | Controls the appearence of the borders. Options are, Raised, Sunked, Ridge, Groove and Flat. |
text | The text to be displayed on the Label. |
height | Determines the height of the widget. Will not work normally with pack(). |
width | Determines the width of the widget. Will not work normally with pack(). |
This marks the end of the Python Tkinter Label Frame Tutorial. Any suggestions or contributions for CodersLegacy are more than welcome. Questions regarding the tutorial content can be asked in the comments section below.