
This tutorial covers the use of the Python Tkinter Frame.
The Tkinter Frame
The Python Tkinter Frame outlines the frame or “structure” for your Tkinter window of a fixed size. Just like the human skeleton, a Tkinter window requires a frame to support it and give it a proper shape.
The Tkinter frame is useful for organizing your widgets in a specified area within the window. You also have the option to create Frames within Frames, allowing for better organization of widgets.
Frame Syntax:
frame1 = tk.Frame(master, option1, option2, .........)The first parameter of the Frame Widget always has to point to a Tkinter instance and is the only compulsory parameter. All others are optional.
List of Options
These are the different parameters or “options” that one may use with the Tkinter frame. These will be discussed in examples further on.
| No. | Option | Description |
|---|---|---|
| 1 | bg | Background Color of the Frame |
| 2 | bd | Border size of frame in pixels. Default is 2. |
| 3 | width | The width of the frame |
| 4 | height | The height of the frame |
| 5 | cursor | When the mouse is hovering over this widget, it can be changed to a special cursor type like an arrow or dot. |
| 6 | highlightbackground | The color of the background color when it is under focus. |
| 7 | highlightcolor | The text color when the widget is under focus. |
| 8 | highlightthickness | The thickness around the border when the widget is under the focus. |
| 9 | relief | It specifies the type of the border for the Frame. Default is Flat. |
Tkinter Frame Example:
Every widget in Tkinter requires a “parent” or “master” which they take as the first parameter. Normally, the object created from Tk() called root is used as the parent. However when using frames, the widgets meant to be in the frame will take the frame as their parent.
Basically while the Tkinter frame will take root as the parent, the widgets will take one of the many frames we created as their parent.
from tkinter import *

root = Tk()
root.geometry("200x150")
frame = Frame(root)
frame.pack()

leftframe = Frame(root)
leftframe.pack(side=LEFT)

rightframe = Frame(root)
rightframe.pack(side=RIGHT)

label = Label(frame, text = "Hello world")
label.pack()

button1 = Button(leftframe, text = "Button1")
button1.pack(padx = 3, pady = 3)
button2 = Button(rightframe, text = "Button2")
button2.pack(padx = 3, pady = 3)
button3 = Button(leftframe, text = "Button3")
button3.pack(padx = 3, pady = 3)

root.title("Test")
root.mainloop()
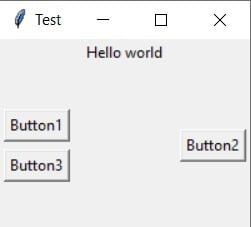
In the code above we’ve created several Tkinter frames and packed them side by side. Next we’ve created a few other widgets like a Buttons and a Label which we insert into the frames we made. Check the image below to see the output of the above code.
The above code will make more sense once you go through the tutorials for other widgets (buttons) and layouts (pack). Also remember that a Tkinter frame is also a widget. which is why you can add a frame within a frame. Instead of passing root as the frame’s parent, simply write the name of another frame. You can use this technique to create nested frames and diversify the layout options on your GUI program.
Code Explanation
- Using
pack()instead of other placement functions likeplace()allows the frames and their contents to auto adjust as window size is adjusted.pack()can also take several parameters to adjust position of the widget. root.geometry("width x height")is another way of setting the size for the whole window.root.title()is used to add a title on the title bar of the window.root.mainloop()triggers the GUI. Any modifications and widgets to be included should be written before it. More information on it can be found in this article.
Output:
We chose not to define any width or height for our Tkinter frames, thus their default size is that of the widgets contained within them.
Customizing the Tkinter Frame:
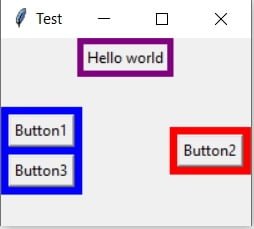
By updating the following lines in our code, we can add some extra color to our Tkinter frame, and by extension, our Tkinter window.
frame = Frame(root, bd = 5, bg = "purple")
frame.pack()

leftframe = Frame(root, bg = "blue", bd = 3)
leftframe.pack(side=LEFT)

rightframe = Frame(root, bg = "red", bd = 3)
rightframe.pack(side=RIGHT)
You can see the boundaries of the Frames much clearer in here, now that they are colored.
You can make use of many other options shown in the table at the start of the article to further customize your frame.
Tkinter LabelFrame
Tkinter offers a variant of the Frame widget, called LabelFrame. This offers the same functionality as a regular frame, with a few additional features. Below is a simple implementation of the LabelFrame widget.
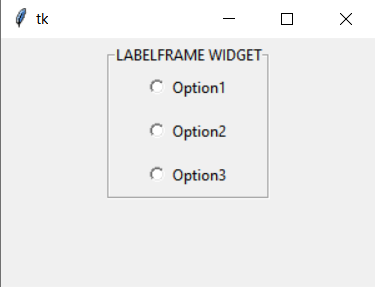
If you want to learn how to make this, follow this link to the Tkinter LabelFrame tutorial.
This marks the end of the Python Tkinter Frame Article. You can head back to the main Tkinter article using this link.. Any suggestions or contributions for our site, CodersLegacy are more than welcome. Questions regarding the tutorial can be asked in the comments section below.
Good help!
How to add a frame inside a frame?
Instead of passing root as the frame’s parent, simply write the name of another frame. Like,
subframe = Frame(mainframe)That Helped a lot, thank you
is it possible to change a Frame’s state to DISABLED that would disable all child widgets and back to NORMAL, that would ENABLE all all child widgets?
I made a video based of your comment here, which explains how to change the state of the children within a Frame widget. Check it out here.