
In this Python tutorial, we will discuss the cx_Freeze library, used to effectively and efficiently create standalone EXE’s for our Python applications. These standalone applications can then be distributed to users, who can use the applications without having to install any additional software or dependencies.
Cx_Freeze has been one of my personal favorites ever since I discovered it. Here are a short list of its benefits.
- Fast compilation time
- Fast EXE load time
- Low storage requirements
- Good online resources + community
Tutorial: How to setup Python Cx_Freeze?
First, we are going to install cx_freeze using pip (you can use any equivalent method).
pip install cx_freezeOnce we are done with the installation, we can begin converting our Python file to an EXE.
There are several ways of working with cx_Freeze, but the easiest to manage is using a setup file. Another common approach is to do everything on the console, without having to create a setup file.
However, we do not recommend the console approach, because you need to re-enter the commands each time you want to compile. This is especially annoying if you have many special configurations and settings enabled (which is quite common when using cx_Freeze). The setup file on the other hand, can be re-run instantly as all settings are permanent there.
All you need to do is create a file called “setup.py” and insert the appropriate code. Cx_Freeze gives us an easy way to create a setup file with default settings using the below command.
cxfreeze-quickstart It will ask you several questions, and then create a setup file based on your answers. Shown below are the questions we were asked, and our answers.
Project name: app
Version [1.0]: 1
Description: A tutorial app
Python file to make executable from: graphingapp.py
Executable file name [graphingapp]: app
(C)onsole application, (G)UI application, or (S)ervice [C]: G
Save setup script to [setup.py]: setup.py
The last question above can be left as blank (just press enter). It’s asking you for the name of the setup file, which is setup.py by default.
Now we have ourselves a setup file, which looks like this.
from cx_Freeze import setup, Executable

# Dependencies are automatically detected, but it might need
# fine tuning.
build_options = {'packages': [], 'excludes': []}

import sys
base = 'Win32GUI' if sys.platform=='win32' else None

executables = [
    Executable('graphingapp.py', base=base, target_name = 'app')
]

setup(name='app',
      version = '1',
      description = 'A tutorial app',
      options = {'build_exe': build_options},
      executables = executables)
Tutorial: How to configure cx_Freeze Setup.py
Lets discuss the cx_Freeze setup file and its contents briefly.
build_options = {'packages': [], 'excludes': []}This dictionary here stores two lists. The first one is a list of packages you wish to include. cx_Freeze will automatically detect 90% of your dependencies/packages, but there are certain situation in which we need to explicitly declare some of them in this list. We will discuss this a bit more later.
The second list is for when we wish to exclude certain libraries, which are being detected by cx_Freeze, but are not needed in our application. This helps reduce the final EXE size, and speed up load time.
base = 'Win32GUI' if sys.platform=='win32' else NoneThe base here specifies that our program is a GUI based one. For console applications, we use “console” instead of “Win32GUI”.
executables = [
    Executable('graphingapp.py', base=base, target_name = 'app')
]

setup(name='app',
      version = '1',
      description = 'A tutorial app',
      options = {'build_exe': build_options},
      executables = executables)
Shown above is the remaining configuration settings, such as name, description, file paths, and version numbers. Additional settings can also be applied here, some of which we will discuss later.
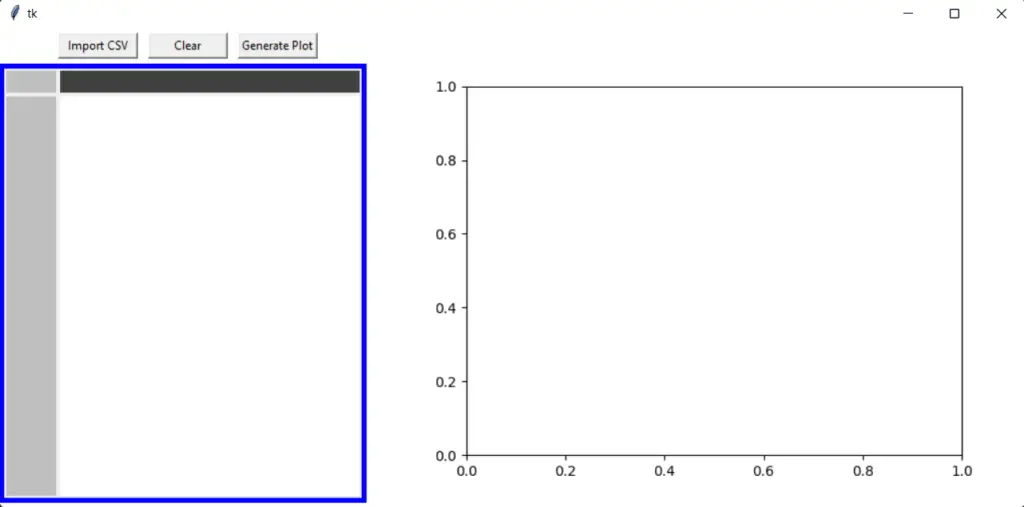
The below code features a simple Tkinter + Matplotlib application, where we can draw plots on a Tkinter Window. We have some features like importing CSV files, and a table which shows all the plot coordinates.
import tkinter as tk
from matplotlib.figure import Figure
from matplotlib.backends.backend_tkagg import FigureCanvasTkAgg
from pandastable import Table
import pandas as pd
from tkinter.filedialog import askopenfilename

class Window():
    def __init__(self, master):
        self.main = tk.Frame(master, background="white")

        self.rightframe = tk.Frame(self.main, background="white")
        self.rightframe.pack(side=tk.LEFT)
        self.leftframe = tk.Frame(self.main, background="white")
        self.leftframe.pack(side=tk.LEFT)

        self.rightframeheader = tk.Frame(self.rightframe, background="white")
        self.button1 = tk.Button(self.rightframeheader, text='Import CSV',  command=self.import_csv, width=10)
        self.button1.pack(pady = (0, 5), padx = (10, 0), side = tk.LEFT)

        self.button2 = tk.Button(self.rightframeheader, text='Clear',  command=self.clear, width=10)
        self.button2.pack(padx = (10, 0), pady = (0, 5), side = tk.LEFT)

        self.button3 = tk.Button(self.rightframeheader, text='Generate Plot',  command=self.generatePlot, width=10)
        self.button3.pack(pady = (0, 5), padx = (10, 0), side = tk.LEFT)
        self.rightframeheader.pack()

        self.tableframe = tk.Frame(self.rightframe, highlightbackground="blue", highlightthickness=5)
        self.table = Table(self.tableframe, dataframe=pd.DataFrame(), width=300, height=400)
        self.table.show()
        self.tableframe.pack()

        self.canvas = tk.Frame(self.leftframe)
        self.fig = Figure()
        self.ax = self.fig.add_subplot(111)
        self.graph = FigureCanvasTkAgg(self.fig, self.canvas)
        self.graph.draw()
        self.graph.get_tk_widget().pack()
        self.canvas.pack(padx=(20, 0))
        self.main.pack()


    def import_csv(self):
        types = [("CSV files","*.csv"),("Excel files","*.xlsx"),("Text files","*.txt"),("All files","*.*") ]
        csv_file_path = askopenfilename(initialdir = ".", title = "Open File", filetypes=types)

        tempdf = pd.read_csv(csv_file_path)
        self.table.model.df = tempdf
        self.table.model.df.columns = self.table.model.df.columns.str.lower()
        self.table.redraw()
        self.generatePlot()

    def clear(self):
        self.table.model.df = pd.DataFrame()
        self.table.redraw()
        self.ax.clear()
        self.graph.draw_idle()

    def generatePlot(self):
        self.ax.clear()
        if not(self.table.model.df.empty):
            df = self.table.model.df.copy()
            self.ax.plot(pd.to_numeric(df["x"]), pd.to_numeric(df["y"]), color ='tab:blue', picker=True, pickradius=5)
        self.graph.draw_idle()

root = tk.Tk()
window = Window(root)
root.mainloop()
We picked this code on purpose, rather than a simple 10 line application, so that we could try emulating a real life situation.
Tutorial: Freezing our Cx_Freeze Application
It’s time to finally freeze our application! (freeze is the term for converting to an EXE). We will encounter some problems along the way, but don’t worry. We will show you how to solve them.
One such problem is when the console window shows up in our GUI application. Luckily we already solved this when we specified we were using a GUI application while creating our setup.py file.
To freeze our application, we need to call the following command (if we are using a setup file)
python setup.py buildThis will create a “build” folder in the same directory we called this command from.
Here is a screenshot of our build folder, and its contents. The “lib” folder contains all the dependencies, DLL’s and libraries our application needs. The Python DLL’s are an exception, and kept outside the lib folder.

For most of you, chances are that this was the only thing you needed to do. But there are alot of other problems that can occur, such as this one, which our current application faces when you double-click the EXE.
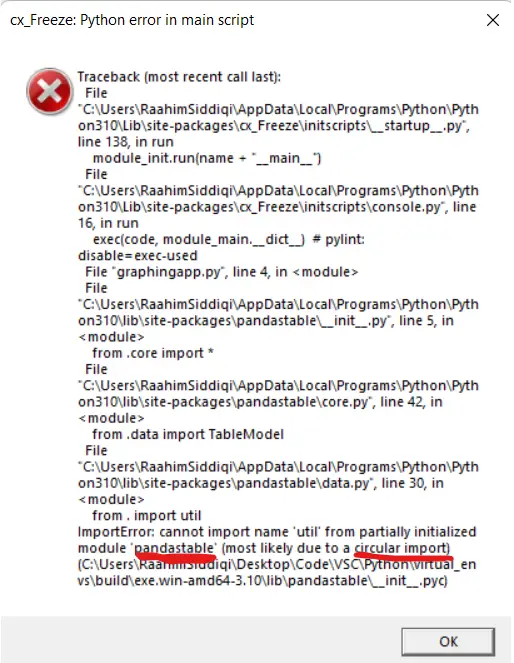
Why is this happening? It is an issue due to “Circular imports”. To resolve this, which ever library is throwing the error, must be included in the “packages” list in build_options.
build_options = {'packages': ["pandastable"], 'excludes': []}Now lets run the follow command again.
python setup.py buildThe application now works!
Optimizing Cx_Freeze build
On my machine, the output folder is 500+ mb. This is rather odd isn’t it? That is far too large for such a simple application with only a few libraries. This is because cx_freeze automatically includes all (or most) installed libraries into our build folder, regardless of whether it is being used or not.
To resolve this, we can navigate over to our “lib” folder inside “build” and note down the names of all the un-needed libraries. For example, I have PyQt5 and PyQt6 libraries installed, which are over 130mb each.
I will add these two libraries to my “excludes” list now.
build_options = {'packages': ["pandastable"], 'excludes': ["PyQt6", "PyQt5"]}
And then re-run the setup build command.
python setup.py buildThis produces a build folder of size 250mb now. That is a massive difference.
Hand picking libraries like this is a bit tricky, and you might end up excluding something important (which might be a dependency of a library that you installed).
A better way of removing un-needed libraries is to use a Virtual environment, which only has the libraries that you need. We actually tried this, and got a “build” folder of just 100mb! That is a massive boost, from 500mb down to 100mb.
With this, the main part of our Cx_Freeze Tutorial is now complete!
Common Problems in cx_Freeze
I advise you to go through this section carefully, where we discuss common issues that can occur with certain libraries and how to resolve them. Even if the library you are having trouble with is not listed below, chances are that you will figure out a solution by going through the list below.
There are a limited number of problems that can occur after all, and many libraries share the same problem with cx_freeze.
Library not installed
There’s a small chance that you actually don’t even have the library installed! This is an easy mistake to make, especially if you setup a new virtual environment to execute your code in.
Use the below command to check:
pip show nameOr just run your code normally as a Python file, and see if it throws an error too.
Manual Inclusion
Like we discussed in the article, sometimes you need to manually include libraries. There can be several reasons why this needs to be done. But in in general, if you are having issues with a library not showing up or being detected, try manually including it.
build_options = {'packages': ["pandastable"], 'excludes': []}
Missing DLLs or Dependencies
This is an issue I faced with the “shapely” library in a different program of mine, which i tested with cx_freeze. It was able to detect the “shapely” library, but not a dependency it used (a folder with some DLLs in it).
I manually went to my Python installation, and located the “Shapely.libs” folder which was showing up in the error. You can find Python dependencies in the “Lib\site-packages” folder of your Python installation.
C:\Users\CodersLegacy\AppData\Local\Programs\Python\Python310\Lib\site-packages\Shapely.libsNext, I went and copy pasted that folder into the “lib” folder of my cx_freeze application.
C:\Users\CodersLegacy\Desktop\build\exe.win-amd64-3.10\libAnd now it works!
You might face similar issues with other libraries, so hopefully this gave you an idea on how to deal with such issues.
Circular import issue
If you face an error that talks about a “circular import”, this means you have an issue where “module A” is importing “module B” and “module B” is importing “module A” (there can be multiple imports involved in such a cycle).
To solve this issue, you need to manually include the import in packages section like we described earlier. Here is the same example again, where we include “pandastable”.
build_options = {'packages': ["pandastable"], 'excludes': []}
Including Microsoft C/C++ runtime files
Sometimes your client’s machine may not have the Microsoft C/C++ runtime files which often needed by newer version of Python (3.7+). You can have cx_Freeze include this library by passing in an additional command as shown below.
build_exe_options = {"packages": [], "excludes": [], "include_msvcr": True}
Alternatives to cx_Freeze
cx_Freeze not working out for you? Hoping for something better? Check out these two options.
This marks the end of the cx_Freeze Tutorial for creating Python EXE’s from .py files. Any suggestions or contributions for CodersLegacy are more than welcome. Questions regarding the tutorial content can be asked in the comments section below.
Really good tutorial!
Hey! I’m running exactly this example and I am encountering this error:
File “<frozen importlib._bootstrap_external>”, line 1004, in source_to_code
File “<frozen importlib._bootstrap>”, line 241, in _call_with_frames_removed
RecursionError: maximum recursion depth exceeded during compilation
It seems to have some kind of problem with the finder.py in the cx_Freeze library too. If anyone has encountered this problem, please help me 🙂