
Welcome to our Tutorial on the Python Library, ‘Shapely’. The Shapely library is used for the manipulation and analysis of planar geometric objects. It is built upon on the widely used GEOS and JTS libraries, with which it also shares quite a bit in common (concept wise).
In simpler words, Shapely can be used to create geometric objects, such as Polygons, Meshes and much more. It also gives us a wide selection of operations to perform on these objects, such as combining, merging, re-orienting and extracting.
Our goal in this tutorial is to cover as many of the base fundamentals as we can, and show you how Shapely can be used.
Note: We will be using a popular Python graph library called Matplotlib throughout this tutorial to visualize the geometric objects that we create in Shapely to help us understand it better.
We won’t be showing you any Matplotlib code here, to keep things relevant. However if you want to learn how to do the same thing yourself, refer to these tutorials.
Creating shapes and geometric objects in Shapely
Here we will discuss several of the most important objects used inside Shapely.
Note: If you haven’t installed Shapely yet, refer to our Shapely Installation Guide to help you through the process.
Points
This is the most basic “shape” which represents a single coordinate. Many of the other shapes that we will explore actually consist of a collection of Point objects.
from shapely.geometry import Point

object = Point(5, 7)
print(object.area)
print(object.length)
print(object.x)
print(object.y)
print(list(object.coords))  # Tuple of x-y coordinates
0.0
0.0
5.0
7.0
[(5.0, 7.0)]
We can’t actually visualize this point properly, because its just a single “dot”. It has no area, and no length. If you print out the area and length as shown in the example above, it will return 0.
We still need to know how to use this and extract its coordinates, as it is important elsewhere.
As you will soon realize, Shapely has no Class for creating a Circle. However, the point object can be modified using a certain method called buffer(), which takes the radius as a parameter and returns a Polygon object which represents a circle.
from shapely.geometry import Point

circle = Point(5, 5).buffer(3)
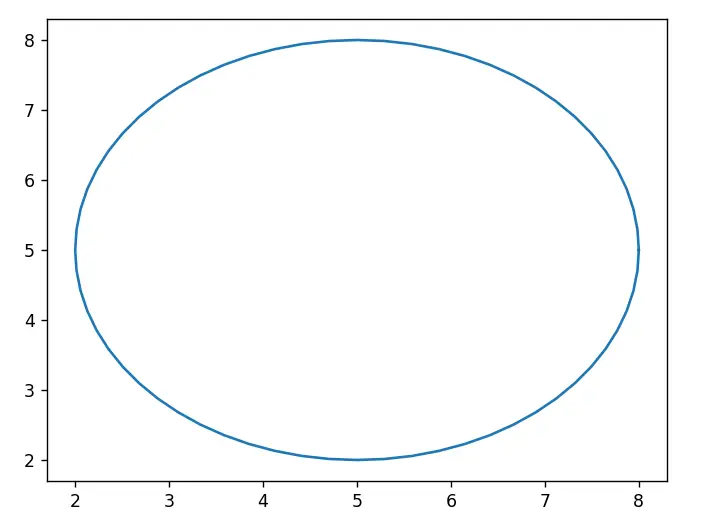
Follow the link for more detailed explanation + a way to plot Ellipses in Shapely.
Boxes
A box, or “bounding box” as its commonly called is another important object in Shapely. It is an easy way of quickly constructing rectangular polygons.
from shapely.geometry import box

object = box(2, 2, 5, 10)
print(object.bounds)
print(list(object.exterior.coords))
(2.0, 2.0, 5.0, 10.0)
[(5.0, 2.0), (5.0, 10.0), (2.0, 10.0), (2.0, 2.0), (5.0, 2.0)]
A box is constructed by passing in a set of “bounds”. The first two parameters represent the x-y coordinates where the bounding box will begin, and the other two parameters define the width and height respectively.
Here is a visual representation using Matplotlib.
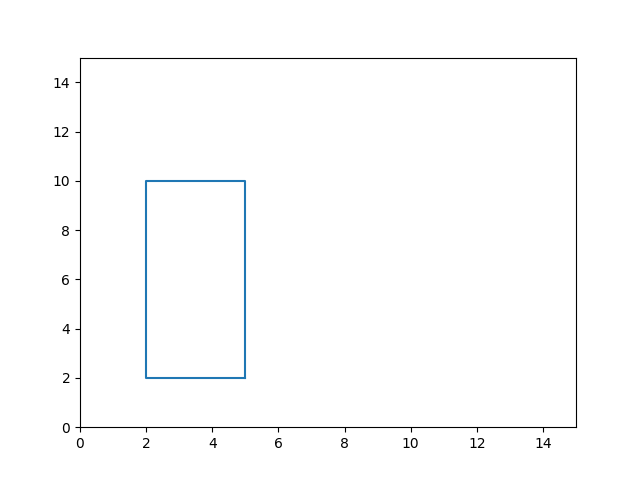
The box coordinate tuples are ordered counter-clockwise by default.
LineStrings
Don’t let the fancy name confuse you. This is just a regular line in Shapely. To create this, all you have to do is pass a list of tuples of x-y coordinates into the LineString() constructor.
from shapely.geometry import LineString

object = LineString([(1,1), (2,3), (4,1), (2,6), (7,5)])
print(list(object.coords))
[(1.0, 1.0), (2.0, 3.0), (4.0, 1.0), (2.0, 6.0), (7.0, 5.0)]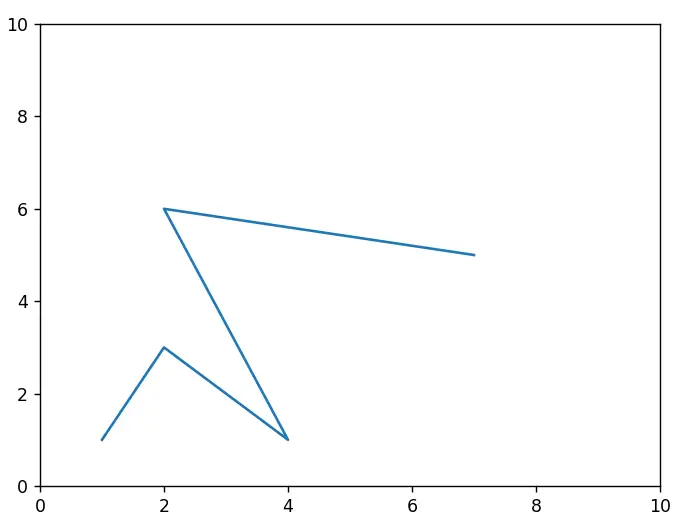
Polygons
Polygons are one of the most important objects that we can create inside Shapely. There is alot that we can do with it, and many variations of polygons that we can create, such as regular Polygons, MultiPolygons, Polygons with interiors, etc.
object = Polygon([(20, 20), (200, 20), (200, 180), (20, 180)])
print(object.type)
print(list(object.exterior.coords))
Polygon
[(20.0, 20.0), (200.0, 20.0), (200.0, 180.0), (20.0, 180.0), (20.0, 20.0)]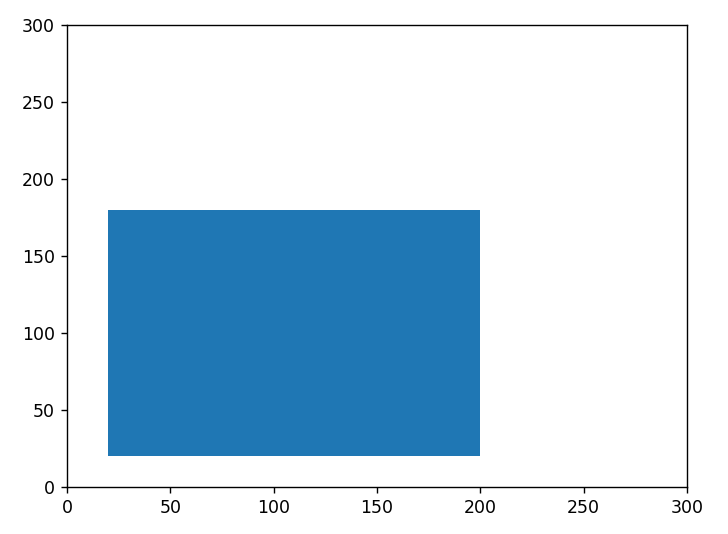
Note: The orientation of a Polygon’s coordinate pairs can actually be very important in certain situations. Refer to this tutorial on orient() to learn more about this, and how to reorient your Polygons (if needed).
Now lets try a Polygon with an interior (a hole).
from shapely.geometry import Polygon

exterior = [(20, 20), (200, 20), (200, 180), (20, 180)]
interior = [(110, 40), (60, 120), (160, 120)]
object = Polygon(exterior, holes=[interior])
print(object.type)
print(list(object.exterior.coords))
print(list(object.interiors[0].coords))
Polygon
[(20.0, 20.0), (200.0, 20.0), (200.0, 180.0), (20.0, 180.0), (20.0, 20.0)]
[(110.0, 40.0), (60.0, 120.0), (160.0, 120.0), (110.0, 40.0)]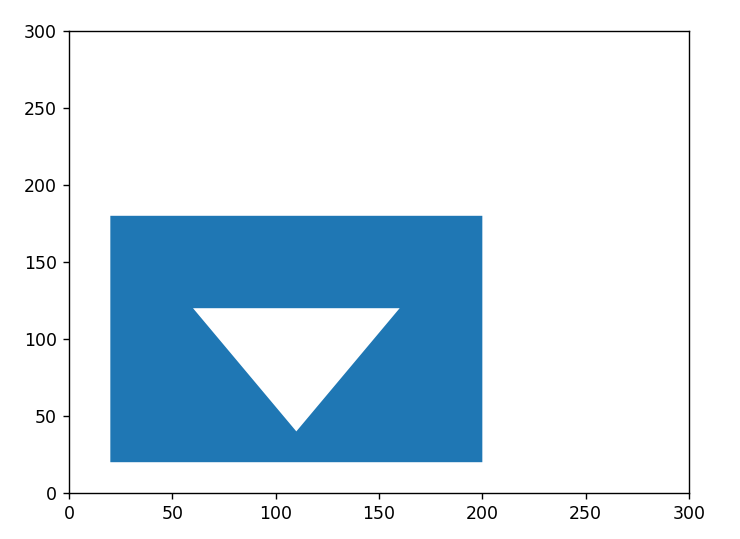
We normally iterate over the interiors in a for-loop. The method we used in the above example will just retrieve the first interior.
We will explore how to create a MultiPolygon in the next section.
Collections in Shapely
All of the objects that we discussed earlier, have another alternate version called “collections”. For example, we can have a “collection of Points” or a “collection of Polygons”. These are used when we want to group together several points/polygons/objects in a single object. These are also often given to us as a return value in certain operations, like the intersection or union between various objects (in some cases).
Lets take a look at how to create some of these.
First we lets take a look at MultiPolygons. There are various ways to create MutliPolygons, but the easiest is to first create the individual Polygons, and then pass them as a list to the MultiPolygon Class.
from shapely.geometry import Polygon, MultiPolygon

poly_1 = Polygon([(10, 10), (13, 12), (5, 10), (3, 4)])
poly_2 = Polygon([(20, 20), (28, 16), (25, 7), (18, 19)])
poly_3 = Polygon([(2, 20), (6, 23), (16, 18), (12, 13)])
polygons = MultiPolygon([poly_1, poly_2, poly_3])
print(polygons.type)

for poly in polygons.geoms:
    print(list(poly.exterior.coords))
We can also iterate over these collection objects, to access the original single objects within them.
[(10.0, 10.0), (13.0, 12.0), (5.0, 10.0), (3.0, 4.0), (10.0, 10.0)]
[(20.0, 20.0), (28.0, 16.0), (25.0, 7.0), (18.0, 19.0), (20.0, 20.0)]
[(2.0, 20.0), (6.0, 23.0), (16.0, 18.0), (12.0, 13.0), (2.0, 20.0)]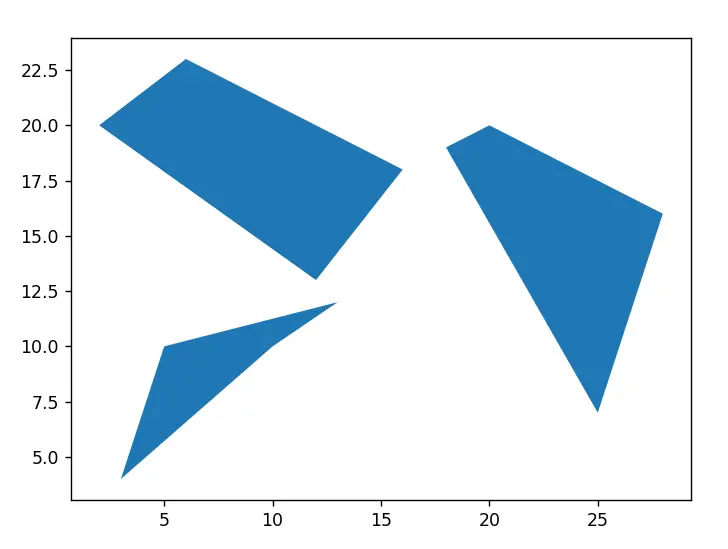
Now lets try the same for Line Strings.
from shapely.geometry import LineString, MultiLineString

line1 = LineString([(15,15), (20,12), (26,28)])
line2 = LineString([(2,5), (6,10), (8,2),(10,16)])
line3 = LineString([(20,20), (25,30), (15,35), (17,38)])
linestrings = MultiLineString([line1, line2, line3])
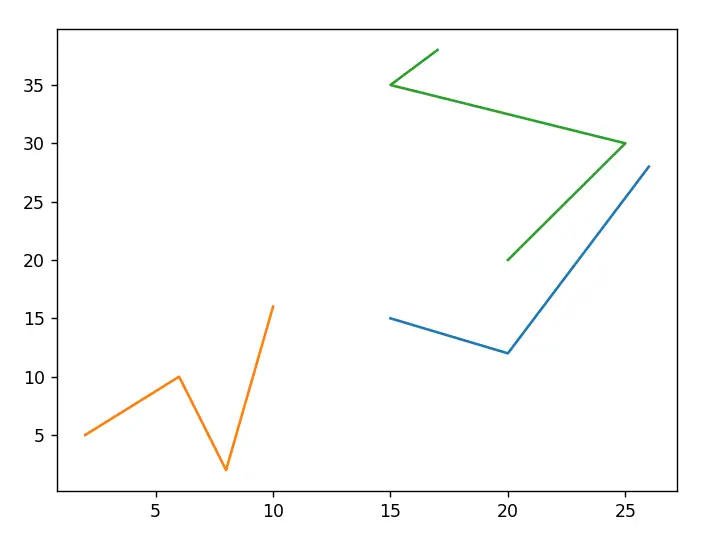
As you can see, all shapely collections we have discussed in this tutorial follow the same theme. They are simply two dimensional versions of their original counterparts. All you have to do is wrap the coordinates for individual objects into a list, and pass it in to the constructor for a Collection Class.
Interacting with Shapely objects
So far we have only really discussed how to create Shapely objects in this Python Tutorial. We will now explore how to interact with them, call functions and even show to create interactions with multiple shapely objects.
Due to the fact that most Shapely Classes share a common parent class, many of the methods we show you here can in-fact be used on other objects as well (other than the ones we show you here).
Intersection between Objects
Here we have two overlapping Polygons. Lets say we want to find the intersection between these two polygons, and plot the result. How do we do this?
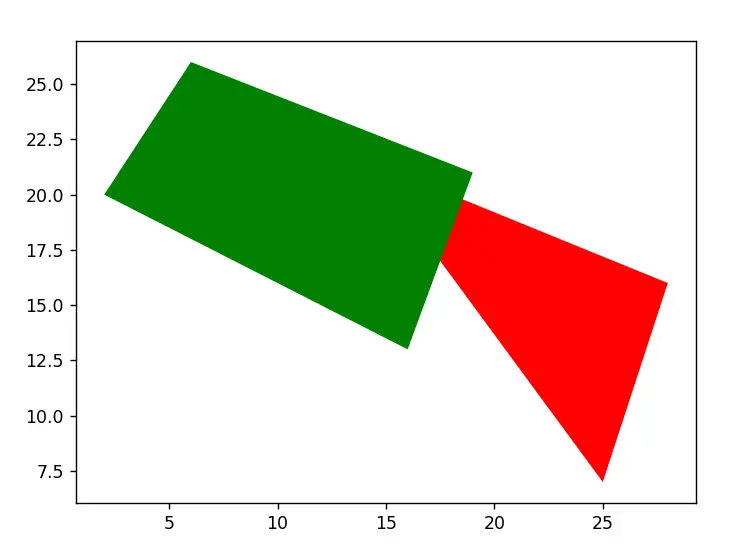
Note: There is overlap in the above Polygons. You just can’t see it because the Green Polygon was plotted after the Red one, so it shows up on top of it.
Well, we use the intersection() method of course.
poly_1 = Polygon([(18, 20), (28, 16), (25, 7), (16, 19)])
poly_2 = Polygon([(2, 20), (6, 26), (19, 21), (16, 13)])
poly_3 = poly_1.intersection(poly_2)
Here we have created three polygons. We then plotted them, to get the following result.
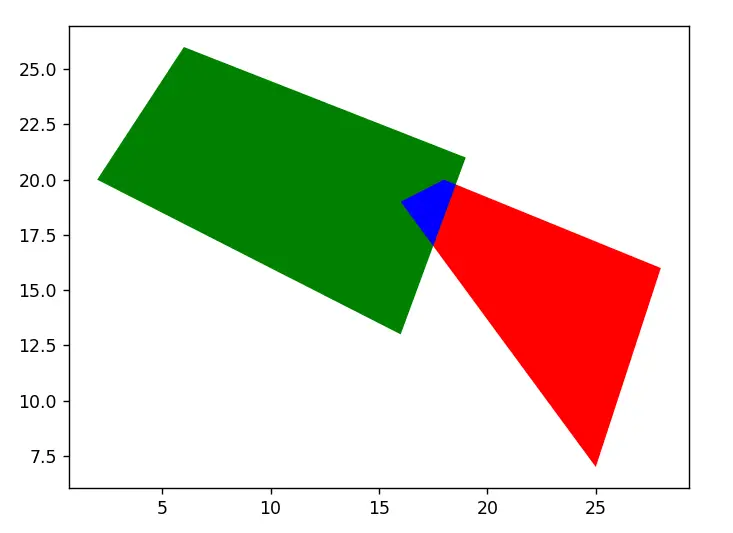
The blue part is the Polygon that represents the intersection between the two original polygons.
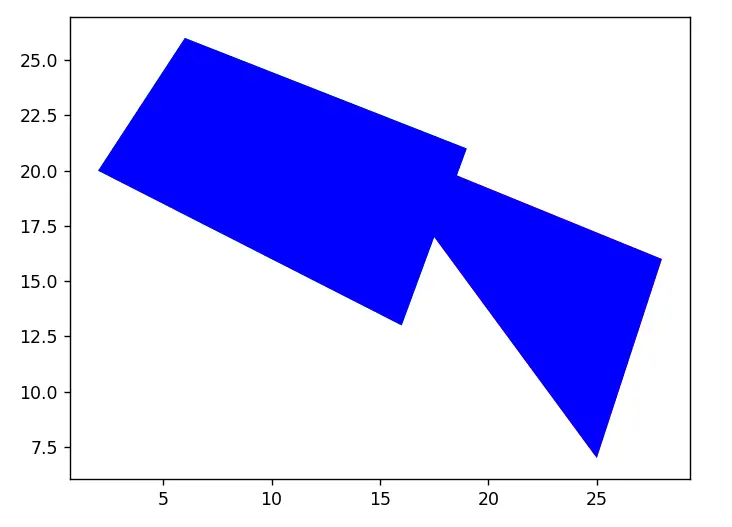
Union
This is another popular method that we can use on Shapely objects. The Union operation returns the a “combined” object, based on the two original objects. Lets take a look at an example using the same polygons from the previous example.
poly_1 = Polygon([(18, 20), (28, 16), (25, 7), (16, 19)])
poly_2 = Polygon([(2, 20), (6, 26), (19, 21), (16, 13)])
poly_3 = poly_1.union(poly_2)
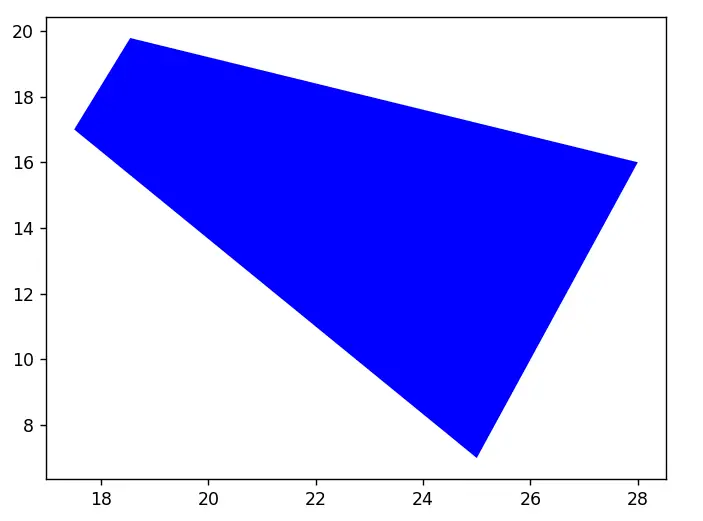
Difference
This is the last operation we will be discussing in this Shapely tutorial.
If you are familiar with Set operations, you might already know what this operation does. If we have two geometric objects, the difference operation returns a representation of the points making up object “A” that do not make up the object “B”.
Here is an example. This time we will only output the result, not the original two polygons.
poly_1 = Polygon([(18, 20), (28, 16), (25, 7), (16, 19)])
poly_2 = Polygon([(2, 20), (6, 26), (19, 21), (16, 13)])
poly_3 = poly_1.difference(poly_2)
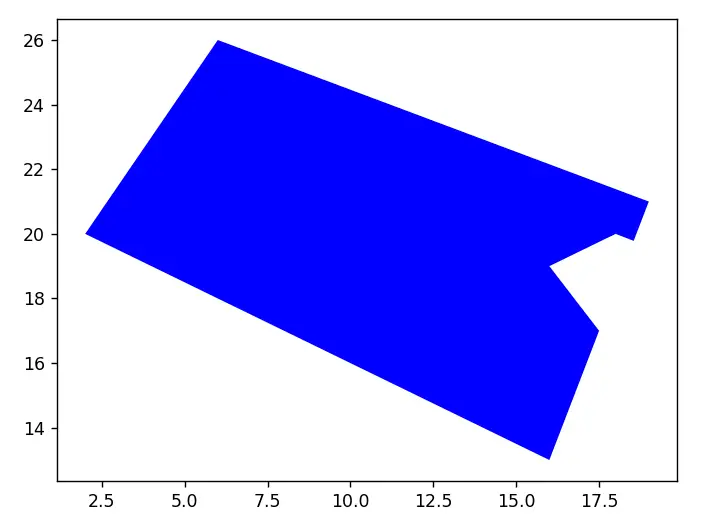
Keep in mind that unlike the previous two operations we discussed, the order matters here. If we reverse the positions of the two objects, the output changes.
poly_1 = Polygon([(18, 20), (28, 16), (25, 7), (16, 19)])
poly_2 = Polygon([(2, 20), (6, 26), (19, 21), (16, 13)])
poly_3 = poly_2.difference(poly_1)
This marks the end of the Shapely Python Tutorial. Any suggestions or contributions for CodersLegacy are more than welcome. Questions regarding the tutorial content can be asked in the comments section below.