
This article is a tutorial on the use of Multithreading in Python.
Once you’ve graduated from simple programs and begin some large scale, resource intensive program, you’ll find multi-threading to be a blessing. It’s use isn’t restricted to resource intensive programs though, it can be used almost anywhere (with the correct implementation).
What is MultiThreading in Python?
Simply put, multithreading allows you to have multiple parts of your code running at the same time. Normally your code executes sequentially (line by line) on a single thread. The act of breaking your program into smaller pieces and having each part run on a separate thread is called multithreading.
Fair warning, multithreading is not for absolute beginners. Unless you have a strong grasp over the basics, you should not be attempting multithreading. The more complicated the program, the harder it is to split it into smaller pieces and manage have each section run in sync with the others. Being able to identify where and when to apply multithreading is an important skill you’ll have to learn.
What is a Thread?
By now we’ve mentioned the word “thread ” several times. A thread is like a “virtual” core. For the purpose of this article, you need to maintain this line of thinking. Think of each thread as a separate processing unit that can execute a program. And adding more threads into your program gives you more processing units to work with.
We’ll be using the “threading” library in order to create and manage threads. The threading library comes with the Python standard library so you don’t have to install it separately or anything.
Here’s a little diagram we came up with to help you understand threads and multithreading. It’s a very simplified version, but it explains the basic principle behind multithreading. Each circle represents a thread and each rectangle represents a task that will take a minute to perform..
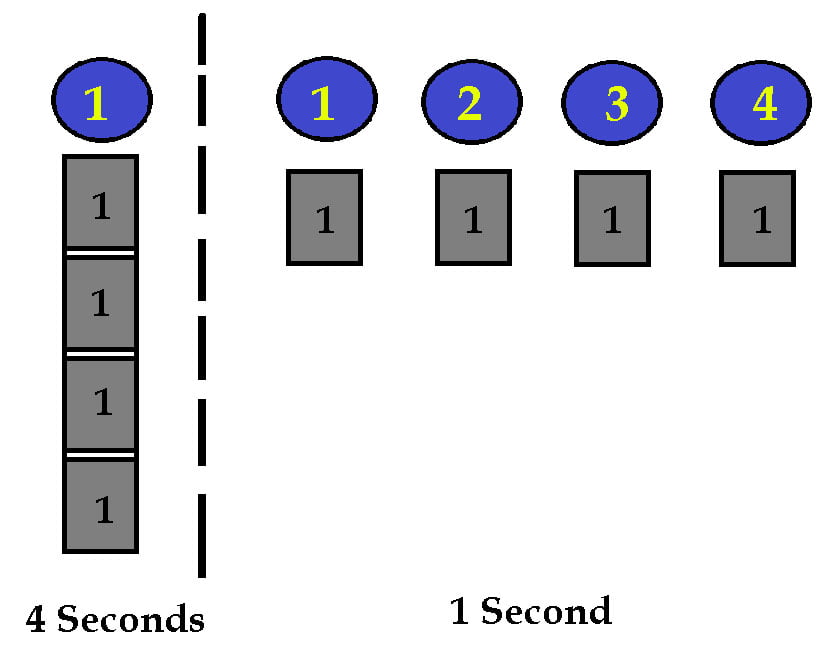
Realistically, things are significantly more complicated. Things like “dependencies” come into play, where a Task-B may depend on Task-A begin completed before it can begin. As a result, threading will not benefit us in this situation as Task-A and Task-B cannot be executed at the same time on different threads.
As a result, increasing the number of threads does not proportionally speed up your program (generally speaking). (e.g: Doubling the threads will not double performance)
Creating a Thread
We’ll start with explaining the syntax of creating of a thread. To create a thread, we’ll be using the Thread() function from the threading module.
thread = threading.Thread(target = function, args=(argument,))In the above code, “function” represents the function which the thread is meant to execute. “argument” represents the argument that you will be passing to the target function. (And yes, that comma is there on purpose. Don’t forget to add it.) If there are no arguments, just leave the space inside the brackets blank (no comma required).
Once we’ve successfully created a thread, we have to use the start() method on it to actually “start” it. You’ll see this in the later examples of our multithreading tutorial.
Using the Join method
The join method is a rather important concept in threading, so we’ll dedicate this section for it. We’ll also be desmontrating how to create and use threads in this section.
Keep in mind, that there are two threads in this example. One is the “Main” thread upon which we are working. The second is the one we create using the Thread function.
import threading
import time

def a_function(number):
    print("Thread " + str(number) + ": starting")
    time.sleep(1)
    print("Thread " + str(number) + ": finishing")

if __name__ == "__main__":
    thread1 = threading.Thread(target = a_function, args=(1,))
    thread1.start()

    print("Program Complete!")
This is the output shown on the Python IDE.
Program Complete!
Thread 1: starting
>>> Thread 1: finishing
What’s happening here is that the Main thread has executed and closed itself, shutting down the program. It did not wait for thread1 to finish executing. This can be major problem in certain scenarios, where you want all or certain threads to finish what they are doing before continuing.
Luckily, there is an easy fix. Using the join function, your thread/program will wait for the other threads to finish executing before continuing. With the addition of this single line below, we can fix this problem.
if __name__ == "__main__":
    thread1 = threading.Thread(target = a_function, args=(1,))
    thread1.start()
    thread1.join()

    print("Program Complete!")
This is what the output looks like now.
Thread 1: starting
Thread 1: finishing
Program Complete!
Bonus: If any of you have used the sleep() function, you’ll have noticed that it basically freezes your program for the allotted amount of time. It’s not actually freezing your program, it’s putting the thread on which the program is executing, to sleep.
My point is that if you want to use the sleep() function to make an event occur after a few seconds, and you want to avoid the program freezing up, create a separate thread for the sleep function. It will bypass the problem entirely.
Handling Multiple Threads in Python
When creating three or more threads, a good idea is to begin creating threads in for loops. For instance, let’s say you want 5 threads. You can have a for loop iterate 5 times, calling the Thread function each time. You should also append each thread into a list during each iteration. Having a list of all the created threads allows you to easily access them later on.
We will be creating a total of 3 threads (excluding the Main thread) and handle them in the manner described above.
import threading
import time

def a_function(number):
    print("Thread " + str(number) + ": Executing")
    time.sleep(1)
    print("Thread " + str(number) + ": Finished")

if __name__ == "__main__":
    threads = []

    for x in range(1, 4):
        thread = threading.Thread(target = a_function, args=(x,))
        threads.append(thread)
        thread.start()

    for thread in threads:
        thread.join()

    print("Program Complete!")
The benefit of this is that no matter how many threads there are, you can join them together in just two lines.
Thread 1: Executing
Thread 2: Executing
Thread 3: Executing
Thread 1: Finished
Thread 2: Finished
Thread 3: Finished
Program Complete!
You should try running this without the part where we join all the threads together. You’ll see that the program (Main thread) finishes before the threads.
Final Notes
Multithreading a massive topic with another dozen of massive sub topics. You can’t hope to master multithreading over night or even within a few days. Our multithreading tutorial has covered most of major topics well enough, but there is still more to learn about Python and multithreading.
If you’re building a program and intend to implement multithreading at some point, you must build your program accordingly. If your program is built in a way that it can’t be separated into smaller pieces, you’ll be wasting extra time changing your code. For example, if you create some natural divisions in your program, when implementing multithreading you can simple assign each part a thread. Since the divisions were already there, giving each thread a division was also easier.
Here are some important multithreading concepts you should look up if you’re really serious about this.
This marks the end of the Python MultiThreading Tutorial. Any suggestions or contributions for CodersLegacy are more than welcome. Questions regarding the article content can be asked in the comments section below.