
This article covers the game development of a Platformer game in Pygame.
Welcome to the Pygame Platformer Game Development! In this section, we’ll be building a 2D Platformer game using the Python game library, Pygame. Fair warning to all our readers, this article is primarily targeted towards people already somewhat familiar with Pygame.
We will only be skimming over basic pygame concepts, reserving most of our time for the more advanced concepts. If you’re quick and intuitive you’ll probably be able to follow along, but I still recommend you read our Pygame Tutorial (aimed towards absolute beginners) first.
This article will cover some advanced concepts (listed below). Due to the sheer size of the code (300+ lines) and the explanation required, we’ll be splitting the game across several articles, each tackling a certain number of problems and features.
About the Game
Chances are you’ve played one of these platformer games before. It’s a simple game where you keep moving your character upwards by jumping on the available platforms. If you miss a platform and fall to your doom, it’s game over. You earn a point for every platform you cross. There’s no limit to the game, ending only when you fall and die (or get bored and quit).
Included Concepts
Below are all the Pygame game programming concepts included in this game. Don’t worry, all of them will be explained alongside the source code. As mentioned earlier, these will be split across several articles due to size limitations.
- Collision Detection
- Player movement (realistic sideways movement)
- Jump mechanics
- Gravity and Friction
- Random Level Generation
- Warpable screen movement
- Scrolling the screen (creating an infinite height)
- Creating a Score counter
- “Game Over” Mechanic
- Random Platform movement
Part 1 – Setting the Foundation
In this article we’ll set the foundation for our game. Creating our player sprite and setting up some movement controls.
Initialization and Constants
import pygame
from pygame.locals import *

pygame.init()
vec = pygame.math.Vector2  # 2 for two dimensional

HEIGHT = 450
WIDTH = 400
ACC = 0.5
FRIC = -0.12
FPS = 60

FramePerSec = pygame.time.Clock()

displaysurface = pygame.display.set_mode((WIDTH, HEIGHT))
pygame.display.set_caption("Game")
The above code is all pre-game related. You can see us importing the pygame module(s), calling pygame.init() to initialize pygame, setting up several constants such as screen height and width etc. We also set up a clock in pygame, which we’ll use later to control the Frames displayed per second.
Next we’ve set up the display screen using the WIDTH and HEIGHT variables and given the display window the name “Game”.
You’ll have noticed the constants ACC and FRIC and the variable called vec. These, we’ll be using later on in the article to create realistic movement and implement gravity.
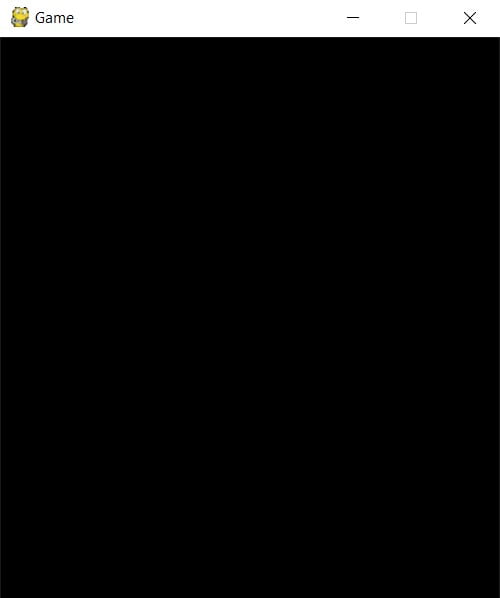
Above is an image of our current progress. A 450 by 500 pixel display screen. We have no objects made, so it’s a blank screen with the default black color.
Player and Platform Classes
In this game, we’re going to have two different types of entities. The player who we will be controlling and the platforms on which we’ll be jumping. We’re going to create two different classes for each one of these entities.
If you haven’t been using classes until now, this is a good time to start. This approach allow us to easily duplicate and access the objects we’re going to be creating. You’ll realize this once we begin creating many platforms. For now we’re just making one.
class Player(pygame.sprite.Sprite):
    def __init__(self):
        super().__init__()
        self.surf = pygame.Surface((30, 30))
        self.surf.fill((128,255,40))
        self.rect = self.surf.get_rect(center = (10, 420))

class platform(pygame.sprite.Sprite):
    def __init__(self):
        super().__init__()
        self.surf = pygame.Surface((WIDTH, 20))
        self.surf.fill((255,0,0))
        self.rect = self.surf.get_rect(center = (WIDTH/2, HEIGHT - 10))

PT1 = platform()
P1 = Player()
Most of this should only require basic Pygame knowledge. We create surface objects for each class with a fixed size. We give each of them a color using the fill() function (RGB format). Finally, we create a rect object from the surface object using the get_rect() method on the surface object.
The center = (10, 420) and center = (WIDTH/2, HEIGHT - 10) parameters we passed are used to define the starting position of the objects when they are drawn to screen. Remember, top left hand corner is the origin point with the co-ordinates (0, 0).
Finally, we create two objects, PT1 (stands for platform 1) and P1 (stands for Player 1). These names are completely arbitrary of course, and you can change them to whatever you want.
We have no images to show our progress so far, because the screen still shows the same black screen as before. This is because we haven’t drawn any of the objects we created above to the display screen.
Sprites Groups + Game Loop
In this section we’ll work on creating the game loop as well as introducing sprite groups.
For now we’ll go with a generic “all_sprites“, Sprite group and if the need arises, we’ll create more later. We’ve proceeded to add both the platform and the player to this sprite group. This enables us to easily access all these sprites at the same time as you’ll see later.
all_sprites = pygame.sprite.Group()
all_sprites.add(PT1)
all_sprites.add(P1)

while True:
    for event in pygame.event.get():
        if event.type == QUIT:
            pygame.quit()
            sys.exit()

    displaysurface.fill((0,0,0))

    for entity in all_sprites:
        displaysurface.blit(entity.surf, entity.rect)

    pygame.display.update()
    FramePerSec.tick(FPS)
We’ve setup the game loop to be able look for the QUIT event and shut down Pygame accordingly. Besides this, we use the fill() function on the displaysurface to refresh the screen with each iteration.
Next up in the game loop, we iterate through the all_sprites() group, drawing all of them to the screen. Without sprite groups, we would have to individually draw each one of them to screen.
Finally, we use the update() function to push all the changes to the screen and update it. The tick() function, used on the Clock() object we created earlier limits the Game loop to refreshing 60 times per second.
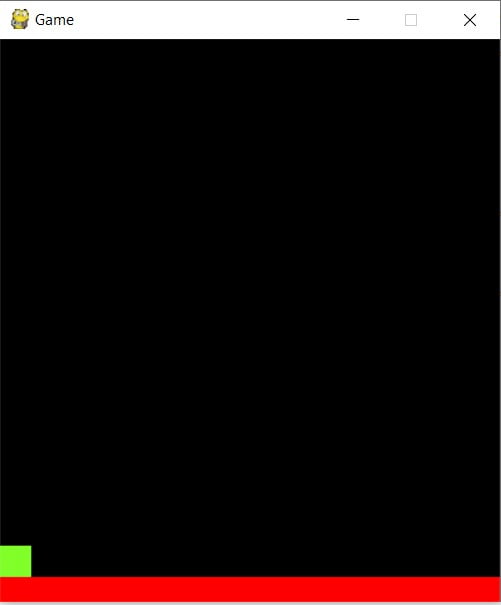
This is what our current progress in our Platformer game has resulted in. However, we can’t interact with or control our player in any way yet. We’ll be dealing with this in the next section.
Implementing Movement
Now, this is a fairly complex part that uses concepts from Kinematics (Physics) and the equations of motion to bring in the concept of acceleration and deceleration. Furthermore, we’ve also added the element of friction, else your speed would be sending you flying all over the place.
Due to the complexity, we’ll study this in shorter pieces. First we’re going to add the following three lines to the Player class (init function).
class Player(pygame.sprite.Sprite):
    def __init__(self):
        super().__init__()
        self.surf = pygame.Surface((30, 30))
        self.surf.fill((128,255,40))
        self.rect = self.surf.get_rect()

        self.pos = vec((10, 385))
        self.vel = vec(0,0)
        self.acc = vec(0,0)
It’s not as complicated as it looks. vec is simply used to create variables with two dimensions. If you go back and look at the start where we initialized it, you’ll see that it’s creating vectors. If you’re good with maths and physics, you’ll understand this quickly.
Creating two dimensional vectors allows us to keep things simpler. Remember, velocity and acceleration are vector quantities. There is horizontal acceleration and also vertical acceleration. Same goes for velocity.
The first parameters represents acceleration/velocity along the X axis and the second is for the Y axis. Notice that we’ve removed the center parameter. This is because we’ve shifted control of the Player’s position to the self.pos variable. Next up is the move() function that will allow us to control our player.
    def move(self):
        self.acc = vec(0,0)

        pressed_keys = pygame.key.get_pressed()

        if pressed_keys[K_LEFT]:
            self.acc.x = -ACC
        if pressed_keys[K_RIGHT]:
            self.acc.x = ACC
This first part is pretty simple. The function first re-sets the value of the acceleration to 0, then checks for key presses. If the left key has been pressed, it will update the acceleration with a negative value (acceleration in the opposite direction). If the right key has been pressed, acceleration will have a positive value.
        self.acc.x += self.vel.x * FRIC
        self.vel += self.acc
        self.pos += self.vel + 0.5 * self.acc
This part is a bit complicated, so you can simply copy it if you want. You can see an equation of motion there on the third line. We also use friction to to decrease the value of the velocity. Without friction, our player would not de-accelerate. You can tweak the value of the FRIC variable to adjust the movement.
        if self.pos.x > WIDTH:
            self.pos.x = 0
        if self.pos.x < 0:
            self.pos.x = WIDTH

        self.rect.midbottom = self.pos
These two if statements are a clever trick that allows “screen warping”. In other words, you can “go through” the left side of the screen, and pop up on the right side. Of course, if you don’t want this feature, you can re-purpose the two if statements and wrap them around the whole code to ensure you don’t move off screen.
The last line updates the rect() object of the Player with the new position that it has gained after being moved.
If you don’t want to add these concepts of Friction and acceleration, you can just go with the regular movement system that most games use. You can find it anywhere online or at our own Pygame Tutorial here.
We’ve created the move function, but it’s useful until we’ve actually connected it to the rest of our code. Simply add the following line into your game loop.
P1.move()
This will cause the move() function of Player 1 to be called in every iteration of the game loop.
Below is a short video, show casing what we’ve accomplished so far.
If you have any trouble with some of the code above, I recommend you try running it piece by piece and experimenting with it on your own. Leave out certain lines to discover their effect on the game. Game development in Pygame is a skill learnt best when you’re the one tinkering with the Platformer (or any game) code yourself.
Click on the button below to head over to the next Part in this series of Game Development with Pygame Platformer. The complete code for this article is also available in Part 2.
Related Articles:
- Pygame – The full tutorial
- Pygame projects with source code
- Audio and Sound – Pygame Mixer
- Pygame RPG Tutorial Series
Interested in taking things to the next level? Check out this article on Game Development Books to become a real Game Developer!
This marks the end of the Pygame Platformer Game Development article. Any suggestions or contributions for CodersLegacy are more than welcome. Questions regarding the article material can be asked in the comments section below.
this error comes
Take a look at the next tutorial (part 2) in this series. It has the compiled code for part 1, which is working perfectly. You can match your version against it.
The whole section that starts with:
def move(self):
needs to be in the “class player:” section and indented further in than shown in the screenshot above. It should be indented so that the “def move(self)” line is indented the same amount as the “def __init__(self)” line, and all the other lines in the move function should indented further in by the same amount
The move() function is in the player class part
I changed it to “move(player)” and it works
If you don’T know how to pice the the code snippets together go to the second part wich showes the hole code at the beginning.
if i try to import pygame it tells me that there is no module named pygame
Have you downloaded pygame first? It’s not part of the standard Python Library, hence needs to be downloaded separately. Look up a good video online on how to download libraries if you don’t know how to, and get started!
yea bruh,it says that for me too
go in cmd then type
open cmd and type pip install pygame.
if that doesn’t work than try pip3 install pygame
use pip package manager and type “pip install pygame” in cmd
why is everyone disliking lol
Hermoso el tutorial, lo seguiré hasta el final
muchas gracias
Why do we need to define
self.acc = vec(0,0) in the init when it just get resets with every move? Is this just setting something up for later? if I comment that line out I can't tell any difference on the movement of the player.