
This Article is a tutorial on the Python Pygame framework (library).
The Pygame library is probably the most well known python library when it comes to making games. It’s not the most advanced or high level library, but it’s comparatively simple and easy to learn. Pygame serves as a great entry point into the world of graphics and game development, especially for beginners.
The Pygame framework includes several modules with functions for drawing graphics, playing sounds, handling mouse input, and other things that you’ll need while developing games in Python.
Here’s a little sneak peak of the game we’re going to be building throughout our Pygame tutorial.
It’s like one of those old fashioned games where you’re moving a character sideways to avoid the incoming obstacles. Short and Fun!
But before any of that, we need to learn the basics of Pygame and how it works. Let’s get started.
Setting up our Game
We’ll begin this Python tutorial by explaining several core concepts related to the Pygame library and about creating games in general. Also keep in mind, that many of these concepts are transferable skills. Should you switch to a more advanced game engine later many of these concepts will still hold true.
import pygame
from pygame.locals import *
In the above code we begin importing pygame and it’s modules into our python program. The second line allows us to use the functions and variables in the pygame.locals module without having to add the lengthy pygame.locals prefix.
pygame.init()
The init() function in pygame initializes the pygame engine. This line must be included before you begin writing any pygame code.
The images, sound files and code used in this tutorial are available for download through a link provided at the end of this Pygame Tutorial Series (This series is split into three parts).
The Game Loop
The Game Loop is where all the game events occur, update and get drawn to the screen. Once the initial setup and initialization of variables is out of the way, the Game Loop begins where the program keeps looping over and over until an event of type QUIT occurs.
Shown below is what a typical Game loop in Pygame looks like. Despite the fancy, it is just a simple “while” loop that runs infinitely.
#Game loop begins
while True:
      # Code
      # More Code
      .
      .
      pygame.display.update()
Changes in the game are not implemented until the pygame.display.update() function has been called. This function is responsible for updating your game window with any changes that have been made within that specific iteration of the game loop. It’s essential to place this within the game loop, to keep our display screen updated with the latest changes from every iteration.
We place it at the very end so that all possible changes to the Sprites on the screen have already taken place. We could call this more than once (e.g. every time we make a change in the game loop), but that would be more performance intensive and inefficient.
Quitting the Game loop
Every game loop must have a end point, or some action that triggers the end point (such as clicking the quit button), else your game will run indefinetly.
while True:
    for event in pygame.event.get():
        if event.type == QUIT:
            pygame.quit()
            sys.exit()
    pygame.display.update()
We call both pygame.quit() and sys.exit() to close the pygame window and the python script respectively. Simply using sys.exit() can cause your IDE to hang due to a common bug. (Remember to import the sys library to use this function).
Note: If you didn’t import everything from pygame.locals as we did you would have to use pygame.locals.QUIT instead of QUIT. As you can see, it is more efficient to use this import statement.
Event Objects in Pygame
A Pygame “Event” occurs when the user performs a specific action, such as clicking his mouse or pressing a keyboard button. Pygame records each and every event that occurs. However, it won’t really do anything with this information because that part is upto us to do.
We can find out which events have happened by calling the pygame.event.get() function (shown previously), which returns a list of pygame.event.Event objects (which we will just call Event objects for short).
One of the many attributes (or properties) held by event objects is type. The type attribute tells us what kind of event the object represents.
while True:
    for event in pygame.event.get():
        if event.type == QUIT:
            pygame.quit()
            sys.exit()
    pygame.display.update()
If you take a look at the example above again, you’ll see we used event.type == QUIT to determine whether the game was to be closed or not. We can even create our own custom events to signal certain types of events (such as an enemy spawning or a level up).
Creating a Display Screen
For every game, we need to create a window of a fixed size by passing a tuple containing the width and height. This tuple is then passed into the display.set_mode() function.
DISPLAYSURF = pygame.display.set_mode((300,300))
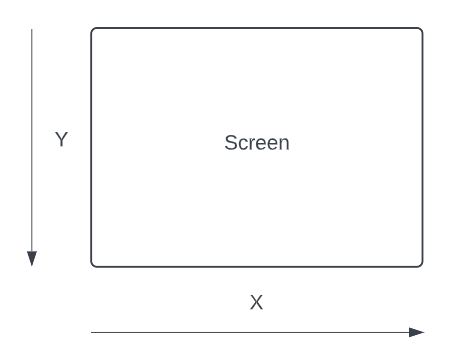
In pygame and other game libraries, we regard the (0, 0) coordinate as the top-left most corner. Similarly, the maximum x-point and maximum y-point is the bottom-right corner. Which in this case is (300, 300).
The X-values grow larger as you move left to right, and the Y-values grow larger from top to bottom.
You can also customize this window later by changing it’s title and the default icon.
Pygame Colors
Colors are going to be a big part of any game development framework or engine, so you should understand it well.
Pygame uses the typical RGB system of colors. To those who aren’t aware, this stand for Red, Green and Blue respectively. These three colors combined (in varying ratios) are used to create all the colors you see on computers, or any device that has a screen.
The values for each color range from 0 – 255, a total of 256 values. You can find the total number of possible color combinations by evaluating 256 x 256 x 256, which results in a value well over 16 million.
In order to use colors on Pygame, we first create Color objects using RGB values. RGB values must be in a tuple format, with three values, each corresponding to a respective color.
color1 = pygame.Color(0, 0, 0)         # Black
color2 = pygame.Color(255, 255, 255)   # White
color3 = pygame.Color(128, 128, 128)   # Grey
color4 = pygame.Color(255, 0, 0)       # Red
Shown above are examples of how we can create Colors. We will use these later on in our Pygame tutorial when we begin creating backgrounds or shapes.
Frames per second
Computer’s are extremely fast and can complete millions of loop cycles in under a second. Now obviously, this is a little fast for us humans. As reference, movies are run at 24 frames per second. Anything less than that will have an obvious stutter to it, whereas values over 100 may cause the things to move too fast for us to see.
By default, if we do not create a limitation the computer will execute the game loop as many times as in can within a second. This is actually a major problem, because without a “limiter” the frame rate will fluctuate greatly throughout the game depending on what’s currently happening (number of objects on screen, player moving or not, etc.)
To limit it we use the tick(fps)method where fps is an integer. The tick() method belongs to the pygame.time.Clock class and must be used with an object of this class.
FPS = pygame.time.Clock()
FPS.tick(60)
This can vary from game to game, depending on how it was designed but you should aim for a value between 30 – 60. Keep in mind, that if you create a rather complex and heavy game the computer might not be able to run it well at higher frames.
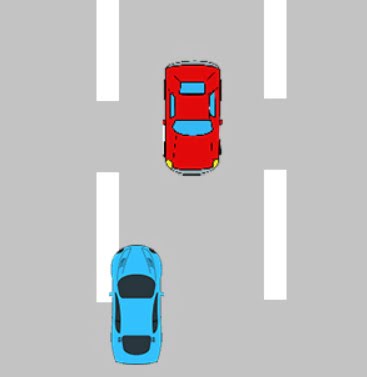
Rects & Collision Detection in Pygame
In every game, each object has fixed boundaries that define the space that it currently occupies. These fixed boundaries are essential when the object interacts or “collides” with other objects.
By defining these boundaries, the game is able to detect when two or more boundaries overlap or touch. This allows it to then handle the interact based on which objects are touching. Such as the Player picking up an item, or attacking another entity.

Shown in the image above is a typical “rect” object (colored in black) around a Car. It’s not 100% accurate, as it does not full take on the shape of the Car but it is accurate enough for most purposes.
To check for collisions, we have various methods and functions, each used for a slightly different purpose. For example the below code is used to check for collisions between two Rects. (Can you guess whether it will return True or False?)
object1 = pygame.Rect((20, 50), (50, 100))
object2 = pygame.Rect((10, 10), (100, 100))

print(object1.colliderect(object2))
We can also check for a collision between a Rect and a pair of coordinates.
object1 = pygame.Rect((20, 50), (50, 100))

print(object1.collidepoint(50, 75))
There is another trick we can use to automatically create a Rect based off an image’s dimensions. We will explore this later on in this Pygame tutorial, when we create our game.
Tip: If you are busy creating your Pygame application, and are suffering from low performance, don’t worry! We have a guide for exactly this purpose. It will teach you how to optimize and speed up your game by up-to 10 times the original performance!
With this, we are now done with basic theory in our Pygame Tutorial. We will now move on to actually utilizing and applying these concepts to create a proper game.
Game Creation – Part#1
Time to begin the second half our Python Pygame Tutorial. We’ve discussed some basic concepts and code, now lets explore how we can use this information to make a proper game.
Whether it’s GUI, Pygame or any other large application, the Classes approach (OOP) is almost always the best idea (Unless you have a really simple and small program). Using Classes, we’ll be using methods to store blocks of code that are to be repeated several times throughout the game. An object of each Class will represent an entity in our game (such as an Enemy, or the Player).
Although our game will only have one Enemy and one Player, this may not always be the case. We may expand this game later by adding more enemies, in which case all we would have to do, is create a new enemy object from our Enemy Class.
Below is the initial version of our game. It’s not yet complete, but the foundation has been set.
import pygame, sys
from pygame.locals import *
import random

pygame.init()

FPS = 60
FramePerSec = pygame.time.Clock()

# Predefined some colors
BLUE  = (0, 0, 255)
RED   = (255, 0, 0)
GREEN = (0, 255, 0)
BLACK = (0, 0, 0)
WHITE = (255, 255, 255)

# Screen information
SCREEN_WIDTH = 400
SCREEN_HEIGHT = 600

DISPLAYSURF = pygame.display.set_mode((400,600))
DISPLAYSURF.fill(WHITE)
pygame.display.set_caption("Game")


class Enemy(pygame.sprite.Sprite):
      def __init__(self):
        super().__init__()
        self.image = pygame.image.load("Enemy.png")
        self.rect = self.image.get_rect()
        self.rect.center=(random.randint(40,SCREEN_WIDTH-40),0)

      def move(self):
        self.rect.move_ip(0,10)
        if (self.rect.bottom > 600):
            self.rect.top = 0
            self.rect.center = (random.randint(30, 370), 0)

      def draw(self, surface):
        surface.blit(self.image, self.rect)


class Player(pygame.sprite.Sprite):
    def __init__(self):
        super().__init__()
        self.image = pygame.image.load("Player.png")
        self.rect = self.image.get_rect()
        self.rect.center = (160, 520)

    def update(self):
        pressed_keys = pygame.key.get_pressed()
       #if pressed_keys[K_UP]:
            #self.rect.move_ip(0, -5)
       #if pressed_keys[K_DOWN]:
            #self.rect.move_ip(0,5)

        if self.rect.left > 0:
              if pressed_keys[K_LEFT]:
                  self.rect.move_ip(-5, 0)
        if self.rect.right < SCREEN_WIDTH:
              if pressed_keys[K_RIGHT]:
                  self.rect.move_ip(5, 0)

    def draw(self, surface):
        surface.blit(self.image, self.rect)


P1 = Player()
E1 = Enemy()

while True:
    for event in pygame.event.get():
        if event.type == QUIT:
            pygame.quit()
            sys.exit()
    P1.update()
    E1.move()

    DISPLAYSURF.fill(WHITE)
    P1.draw(DISPLAYSURF)
    E1.draw(DISPLAYSURF)

    pygame.display.update()
    FramePerSec.tick(FPS)
Code Explanation
class Player(pygame.sprite.Sprite):
    def __init__(self):
        super().__init__()
        self.image = pygame.image.load("Player.png")
        self.rect = self.image.get_rect()
        self.rect.center = (160, 520)
Above you can see the Code for the Player Class. The benefit of using classes here is that we can spawn multiple entities from the same block of code. Now, this doesn’t really apply to the Player Class, since most games will only have one player but it does apply to the Enemy Class as most games will have multiple enemies.
Passing pygame.sprite.Sprite into the parameters,makes the Player Class it’s child class. Passing super().init() then calls the init() function of the Sprite class. super().__init__() is a whole different concept related to Classes in Python. You can look it up if you’re interested, else just include it the way we’ve shown above.
Next is the image.load() function to which we pass the file path of our image. Note, this does not define the borders for our Player Sprite. This is instead done using the get_rect() function. This function is able to automatically create a rectangle of the same size as the image. We will be using this in Collision Detection later on.
The last line, self.rect.center, defines a starting position for the Rect. Later we’ll use the Rect’s coordinates to draw the image to the exact same location. If you aren’t careful, you might end up with the Rect and the Image in two different places.
    def update(self):
        pressed_keys = pygame.key.get_pressed()
       #if pressed_keys[K_UP]:
            #self.rect.move_ip(0, -5)
       #if pressed_keys[K_DOWN]:
            #self.rect.move_ip(0,5)

        if self.rect.left > 0:
              if pressed_keys[K_LEFT]:
                  self.rect.move_ip(-5, 0)
        if self.rect.left > 0:
              if pressed_keys[K_RIGHT]:
                  self.rect.move_ip(5, 0)
This is a method from the Player class that controls the movement of the player. When this function is called, the checks to see if any keys are pressed down or not.
The if statements we’ve included after this, check for 4 keys, UP, DOWN, LEFT and RIGHT. If the if statement proves true, then the move_ip() method is called on Player.rect moving it in a certain direction. The move_ip() takes two parameters, the first representing the distance to be moved in the X direction and second, the distance to be moved in the Y direction.
The two if statements, if self.rect.left > 0: and if self.rect.left > 0: ensure that the player isn’t able to move off screen.
Two of the if statements are commented out because this is a side scroller game. We don’t need up and down movement here. We only included them to show you how it would be done.
    def draw(self, surface):
        surface.blit(self.image, self.rect)
The blit() method takes two inputs, the first the surface to be drawn to and second, the object which we want to draw. Normally we would write surface.blit(self.surf, self.rect) since we’re drawing the rectangle to the surface we’ve defined. But since we’re using an image, we pass self.image instead of self.surf. (An image is in fact, a surface in Pygame)
Surfaces play an important role in Pygame, and we can’t hope to cover it all here, so we’ve given it’s own article. Read it if you’ve had any difficulty understanding surfaces, the blit() function or anything related to it.
The enemy class is setup very similarly. We have initialized a new class, inheriting from the base class “Sprite”. We have loaded an image, and generated a rect based on this image.
class Enemy(pygame.sprite.Sprite):
      def __init__(self):
        super().__init__()
        self.image = pygame.image.load("Enemy.png")
        self.rect = self.image.get_rect()
        self.rect.center = (random.randint(40,SCREEN_WIDTH-40), 0)
The only change is with the last line, where we included randomized starting points. (It would be pretty boring if the Enemy appeared from the same location each time)
      def move(self):
        self.rect.move_ip(0,10)
        if (self.rect.top > 600):
            self.rect.top = 0
            self.rect.center = (random.randint(30, 370), 0)
This method is part of the Enemy Class. It first calls the move_ip() function, moving the Enemy object down by 10 pixels. Next it checks to see if the top of the Enemy has reached the end of the screen. If True, it resets it back to the top of screen and at a random location on the X axis.
    P1.update()
    E1.move()

    DISPLAYSURF.fill(WHITE)
    P1.draw(DISPLAYSURF)
    E1.draw(DISPLAYSURF)

    pygame.display.update()
    FramePerSec.tick(FPS)
The commands shown above are all in the game loop, so they are repeating continuously. First the update and move functions for both the Enemy and Player class are called.
Next we refresh the screen using the DISPLAY.fill(WHITE) function, finally we call the draw functions for both the Player and Enemy objects, drawing them to the screen.
Finally, the pygame.display.update() command updates the screen with all the commands that have occurred up-till this point, and the tick() makes sure it repeats only 60 times per second.
Shown below is a short GIF showing our current progress in this Python Pygame Tutorial Series (Part 1).
Next Section
In the next tutorial, we will implement collision detection between the Player and Enemy, and work on making a “Game Over” situation.
Proceed to the next part of this Python Pygame Tutorial Series by clicking the button below. The complete code for the whole game + the images used will be found at the end of the series.
There are a total of 3 tutorials, including this one.
Other Resources for Pygame
We have more interesting and exciting projects just like this one on our website. If you’re interested in learning more about Python Pygame and making interesting games, follow the tutorial series mentioned below.
In a game like this, static backgrounds can be a little boring, whereas scrolling backgrounds help add to the “realistic” aspect to the game. We have another article on our site where we’ve discussed how to create “scrolling backgrounds” in Pygame. We’ve used the exact same code as shown above, so you should have no trouble adjusting.
If you’re into reading books, I advise you to check out this one, Making games with Python and Pygame. It’s a great book, written in a fun and engaging style. In fact, this article actually takes quite a bit of inspiration from it too. It has almost a dozen different types of game projects in it, each explained through a step by step process.
This marks the end of the Python Pygame Tutorial. Any suggestions or contributions for CodersLegacy are more than welcome. Questions regarding the Tutorial can be asked in the comments section below.
good
yes
nice tutorial lol
thank you for this tutorial! <3
this did not help at all the code didnt even work
I left out the imports on the code for Part 3. Maybe that’s why? Otherwise I just re-tested it all and it’s working.
I did fix a slight issue or two so you should try again. If it’s still not working, you probably don’t have the images in the correct directory.
lines 25 from part 1, 37 from part 2, and 43 from part 3 all give either syntax errors due to a lack of closing parentheses, or an error with the random.randint() due to not giving a closing range to work with.
The closing parentheses are actually there. You need to scroll the code a bit.
Never mind that now though. The Tutorial has received a long overdue update, which includes some code improvements, and splits the tutorial across 3 separate pages. This will help keep things more clear. The code should be more readable now, so take another look.
obviously it wont since the Player.png and Enemy.png probably doesnt exist in your file directory. of course you would’ve known that was the issue if you had any idea about programming. Go play roblox or something, you’re too mentally challenged for this kind of work.
When I put the code in for the first version of the car game, the Player Car sits at the top of the screen instead of at the bottom of the screen. Is there a way to change this?
Of course. Just draw the image and the rect to a set location.
For example:
player.rect.topleft = (100, 300)
and then later:
display.blit(player.image, player.rect)
YOU HELP A LOT
where can I find png images like the ones used in this tutorial?
Continue on in the series, and you’ll find a download button with all the code + images used.
nevermind, found them in the last step 🙂
just do it
Why did everyone downvote you for this question lmao
stupid
Hey, great tutorial.
Cheers!
Just followed the instruction and also tried the downloaded sourcecode but always I get this error:
Traceback (most recent call last):
File “coderslegacy.py”, line 64, in <module>
E1 = Enemy( )
File “coderslegacy.py”, line 24, in __init__
super().__init__()
TypeError: super() takes at least 1 argument (0 given)
yo there. the line in the code with the SCREEN_WIDTH says it’s not defined….did I miss something there as I can’t see where SCREEEN_WIDTH was defined.
Ty \o/
Looks like I forgot to include the declaration for Screen Width and Height in Part 1 of this series. This has now been corrected.
oh awesome. thank you so much! 👌
great tutorial..helped a lot and it looked like it took some time to create as well. thanks 🙂
Nice game
i love this fye code makes fyi its really cool and it is like gta v
Small issue in the quit event handler
It should be if event.type == pygame.QUIT:
ok, so, i get a non type object not defined ‘left’ , but if a copy the code from the page and run it it soes recognize it, why is this happening?
Tho
Those lefties deleted my comments! THEY ARE ALL WOKE.
want to fight geoffrey mate ill spark you mate
dude acting all tough n shit on a pygame tutorial 😭🤦♂️🥀
get this guy out 😭
Diddy didn’t do it.
youre not funny kys
Thanks lol!. Very helpful and educative, great job!!!.
can some one plz post a download for pygame I don’t have internet so I have to download everything from my cell phone and then upload it to my computer this is a hassle yes I know but if anybody could please help me out thank you
why you did not elaborate on how the randomizer in the enemy placement works?
I’m having troubles accessing the other parts of the tutorial, it takes me a a page where I have to do a reCAPTCHA and once I finish the reCAPTCHA it takes me a page with a 503 error
Now it just keeps refreshing the reCAPTCHA page pls send help T.T
same
this tutorial is for liberals