
This article covers the PyQt QRadioButton widget (PyQt5)
Radio Buttons are commonly seen in GUI’s where the user is presented with a list of options. Unlike a CheckBox, only one Radio Button out of many can be picked. The PyQt5 widget, QRadioButton is what we will be using to create Radio Buttons for our GUI program.
You can find a complete list of methods and options for the QRadioButton at the bottom of this page.
Creating a QRadioButton
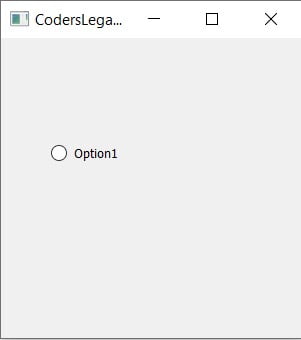
Below is a simple example of what a Radiobutton in PyQt looks like. Calling the QtWidgets.QRadioButton() function ad passing the window (win) creates a PyQt RadioButton.
from PyQt5 import QtWidgets
from PyQt5.QtWidgets import QApplication, QMainWindow
import sys

app = QApplication(sys.argv)
win = QMainWindow()
win.setGeometry(400,400,300,300)
win.setWindowTitle("CodersLegacy")

check = QtWidgets.QRadioButton(win)
check.setText("Option1")
check.move(50,100)

win.show()
sys.exit(app.exec_())
The output to the above code:
Retrieving QRadioButton values
You can retrieve QRadioButton values using the text() method, which will return the text value you assigned to the Radio Button.
There is another method you can use called isChecked(). This returns an integer number that represents whether the Radiobutton is selected or not.
We’re using a rather unique form of calling the show() function here. Instead of creating a submit button, we’ve used the toggled.connect() method on the QRadioButton. This causes the show() function to be called whenever the state of the Radio Button has been changed.
from PyQt5 import QtWidgets
from PyQt5.QtWidgets import QApplication, QMainWindow
import sys

def show():
    print(check.text())
    print(check.isChecked())

app = QApplication(sys.argv)
win = QMainWindow()
win.setGeometry(400,400,300,300)
win.setWindowTitle("CodersLegacy")

check = QtWidgets.QRadioButton(win)
check.toggled.connect(show)
check.setText("Option1")
check.move(50,100)

win.show()
sys.exit(app.exec_())
Below is the GUI output of the above code, screen-shotted alongside it’s output. To achieve this output we clicked the RadioButton twice, selecting and deselecting it. Each time we clicked, 2 lines of output were printed on-screen.

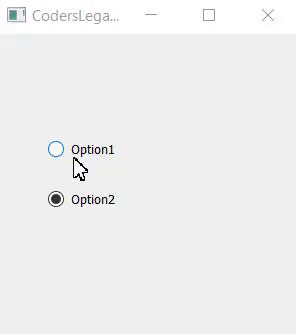
RadioButton Groups
Radio Buttons are meant to be used in groups. A single radio button does not have much use. In order to do so, we must use a grouping widget such as QGridLayout.
In a group of radio buttons, only one radio button at a time can be checked. If the user selects another button, the previously selected radio button will be switched off.
from PyQt5 import QtWidgets
from PyQt5.QtWidgets import QApplication, QMainWindow, QGridLayout
import sys

app = QApplication(sys.argv)
win = QMainWindow()
win.setGeometry(400,400,300,300)
win.setWindowTitle("CodersLegacy")

layout = QGridLayout()

radio = QtWidgets.QRadioButton(win)
radio.setText("Option1")
radio.move(50,100)
layout.addWidget(radio, 0, 0)

radio2 = QtWidgets.QRadioButton(win)
radio2.setText("Option2")
radio2.move(50,150)
layout.addWidget(radio, 0, 1)

win.show()
sys.exit(app.exec_())
Below is a GIF of the above output. It shows clearly the fact that you cannot have two of these selected at the same time.
Remember to include that extra import, QGridLayout. You can also use other Layout Managers of course, depending on what type of layout you want for your GUI Applications.
Methods Compilation
Below is a compilation of the methods available for the QRadioButton widget.
| Method | Description |
|---|---|
setChecked() | Changes the state of the Checkbox to checked. |
setText() | Sets the text associated with the checkbox. |
text() | Retrieves the text value of the CheckBox. |
isChecked() | Checks to see if the checkbox is selected. Returns True is selected, else False. |
This marks the end of the PyQt QRadioButton article. Any suggestions or contributions for CodersLegacy are more than welcome. Questions regarding the article content can be asked in the comments section below.
Head over to the PyQt Homepage to learn about the other great widgets!