
In this Tkinter Tutorial, we will discuss the PanedWindow Class. The PanedWindow Class (or Widget) is used very similar to Frames, as a container widget which can store other widgets (and even nested PanedWindows).
How to use Tkinter PanedWindow?
To create a PanedWindow in Tkinter, we must use the PanedWindow Class. There are many different parameters that this Class can take. Let us discuss a few of the important ones that you will want to use often.
parent:The compulsory first parameter required in every tkinter widget. Specifies the container in which the widget will be stored.sashrelief: This can be used to change the look of the “sash” which divides a window into multiple panes. If you are on Windows, then make sure to keep this value totk.RAISED, else the draggable sash will not be visible.showhandle: Displays a small “handle” in the form of a square on the sash.- width: Size in pixels (horizontally)
- height: Size in pixels (vertically)
This is what a standard definition for a PanedWindow might look like.
mainpanel = tk.PanedWindow(master,
                           sashrelief=tk.RAISED,
                           showhandle=True,
                           width=300,
                           height=300)
There is one more important thing to remember about PanedWindows. Unlike Frames, where we just have to specify the Frame as the “parent” (to place widgets inside it), with PanedWindows we need to perform one additional operation with the add() method.
For example, we have a PanedWindow object called mainpanel and we have a label object called label_1. After creating this label, we need to add it to the mainpanel in the following manner.
mainpanel.add(label_1)With this knowledge in mind, let us take a look at a proper example with some output.
import tkinter as tk

class Window():
    def __init__(self, master):
        mainpanel = tk.PanedWindow(master,
                                   sashrelief=tk.RAISED,
                                   showhandle=True,
                                   width=300,
                                   height=300)
        mainpanel.pack(fill=tk.BOTH, expand=True)

        label_1 = tk.Label(mainpanel, text="Main Panel")
        label_2 = tk.Label(mainpanel, text="Other Text")
        mainpanel.add(label_1)
        mainpanel.add(label_2)

root = tk.Tk()
window = Window(root)
root.mainloop()
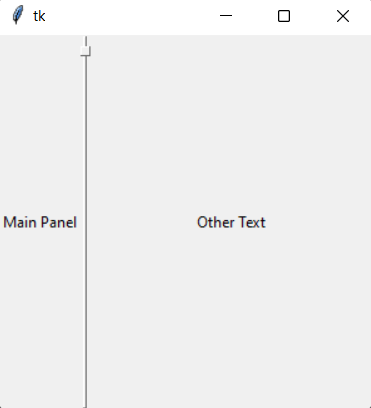
As you can see above, the screen has been split into two. We added two widgets into our Panel, which have been equally divided (one on each side of the divider).
PanedWindows can be a little tricky with their layout and behavior. Lets take a look at some more examples.
PanedWindow Stretch and Orientation
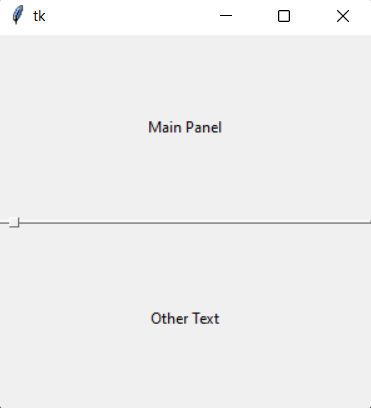
Here is the same code from before, with some minor changes to the parameters. In our PanedWindows class, we changed the orientation of the PanedWindow to Vertical.
Secondly, we added the stretch option into our add() functions. This is rather similar to expand and fill used in pack(). The stretch parameter can take the following possible values:
- always: This pane will always stretch (expand and occupy available space).
- first: Stretch only if this pane is the first pane (left-most or top-most) .
- last: Stretch only if this pane is the last pane (right-most or bottom-most). This is the default value.
- middle: Stretch only if this pane is not the first or last pane.
- never: This pane will never stretch.
By specifying “always” as parameters to both our widgets, we can have them expand to occupy space equally.
import tkinter as tk

class Window():
    def __init__(self, master):
        mainpanel = tk.PanedWindow(master,
                                   orient=tk.VERTICAL,
                                   sashrelief=tk.RAISED,
                                   showhandle=True,
                                   width=300,
                                   height=300)
        mainpanel.pack(fill=tk.BOTH, expand=True)

        label_1 = tk.Label(mainpanel, text="Main Panel")
        label_2 = tk.Label(mainpanel, text="Other Text")
        mainpanel.add(label_1, stretch="always")
        mainpanel.add(label_2, stretch="always")

root = tk.Tk()
window = Window(root)
root.mainloop()
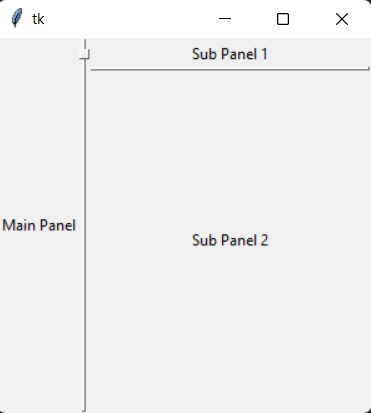
Here is a slightly more complex example with nested PanedWindows. We create a “subpanel”, add a widget or two into it, then add into the mainpanel just like we would to any other widget.
import tkinter as tk
import tkinter.ttk as ttk

class Window():
    def __init__(self, master):
        ttk.Style().theme_use("classic")
        mainpanel = tk.PanedWindow(master,
                                   sashrelief=tk.RAISED,
                                   showhandle=True,
                                   width=300,
                                   height=300)
        mainpanel.pack(fill=tk.BOTH, expand=True)

        label_0 = tk.Label(mainpanel, text = "Main Panel")
        mainpanel.add(label_0)

        subpanel_1 = tk.PanedWindow(mainpanel,
                                    sashrelief=tk.RAISED,
                                    orient=tk.VERTICAL)
        mainpanel.add(subpanel_1)

        label_1 = tk.Label(subpanel_1, text = "Sub Panel 1")
        label_2 = tk.Label(subpanel_1, text = "Sub Panel 2")
        subpanel_1.add(label_1)
        subpanel_1.add(label_2)


root = tk.Tk()
window = Window(root)
root.mainloop()
This marks the end of the Tkinter PanedWindow Tutorial. Any suggestions or contributions for CodersLegacy are more than welcome. Questions regarding the tutorial content can be asked in the comments section below.