
In this Python tutorial we will discuss the Tkinter SpinBox widget. This widget is used to take input from the user by offering them a range of values to pick from, which they navigate using arrow keys. In many ways, the SpinBox widget resembles the ComboBox widget, but with arrow keys to help the user.
Spinbox Example – Picking a Number
In this example we will demonstrate how to create a simple Tkinter SpinBox widget, and use it to pick from a range of values.
We also have the increment option, which changes by how much the value is incremented/decrements when the arrowheads are used. In the example below we have this set to 1, but you can change this if you wish.
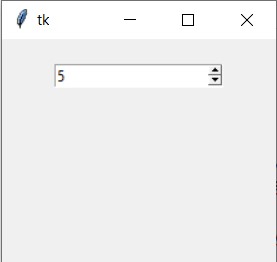
We can also use link a variable to the Spinbox, which we can use set and get values to and from the Spinbox. For example, using the set() function on the variable to manually define a value for the Spinbox. Calling set(5) in the start will cause the Spinbox’s default value to be 5, instead of 0.
(Remember to actually assign to variable to the Spinbox in the textvariable option)
import tkinter as tk


class Window:
    def __init__(self, master):
        frame = tk.Frame(master, width = 200, height = 100)

        Var1 = tk.IntVar()
        Var1.set(5)

        spinbox = tk.Spinbox(master, from_ = 0, to = 10,
                                     increment = 1, textvariable = Var1)
        spinbox.pack(padx = 5, pady = 20)

        frame.pack(padx = 10, pady = 10, expand = True, fill = tk.BOTH)


root = tk.Tk()
window = Window(root)
root.mainloop()
The output:
Spinbox Example – Picking a Value
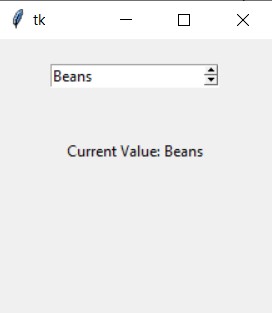
In this example we will explore how to define a set of values ourselves, which we pass into the Spinbox when creating it. This allows us to make the SpinBox display more than just numbers, as from_ and to take integer values only.
We will create a list called values, where we have a bunch strings saved. We will then pass this into the values option of the Spinbox, and use the arrow heads to cycle between them.
Another interesting thing we can do is link the SpinBox to a function, so every time one of the arrowheads are pressed, the function will be called. We will link the SpinBox to a function that uses the get() function on the variable associated with the SpinBox to return it’s current value and display it in a label widget.
import tkinter as tk


class Window:
    def __init__(self, master):
        frame = tk.Frame(master, width = 200, height = 80)

        values = ["Apple", "Banana", "Cabbage", "Beans"]

        self.spinbox = tk.Spinbox(master, from_ = 0, to = 10,
                                  increment = 1, values = values,
                                  command = self.display)
        self.spinbox.pack(padx = 5, pady = 20)

        text = "Current Value: " + str(self.spinbox.get())
        self.label = tk.Label(master, text = text)
        self.label.pack(padx = 10, pady = 20)

        frame.pack(padx = 10, pady = 10, expand = True, fill = tk.BOTH)


    def display(self):
        text = "Current Value: " + str(self.spinbox.get())
        self.label.configure(text = text)


root = tk.Tk()
window = Window(root)
root.mainloop()
The output:
Exploring Spinbox Options
In this example we will try to cover several interesting options that the Python Tkinter Spinbox has, and explain their usage.
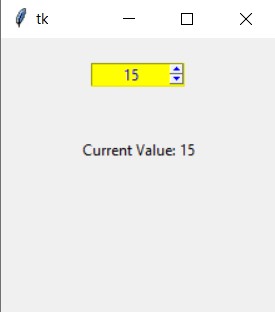
The first option we will explore is wrap, which allows us “wrap” around the highest value to the lowest value, and vice versa. In the example below, the max value is 100, so if we reach the value 100, and click on the up-arrowhead, nothing will happen. But if wrap is enabled, it will go wrap around to the starting, and take on the value 1 (minimum value defined by from_)
We have also made some color changes, by changing some options like fg. For a proper description of each option, refer to the table at the bottom of this tutorial. We have also used the justify option to center the text.
import tkinter as tk


class Window:
    def __init__(self, master):
        frame = tk.Frame(master, width = 200, height = 80)

        self.spinbox = tk.Spinbox(master, from_ = 0, to = 100,
                                  increment = 5, wrap = True,
                                  command= self.display, justify= tk.CENTER,
                                  fg = "blue", bg = "yellow", width = 10)
        self.spinbox.pack(padx = 5, pady = 20)

        text = "Current Value: " + str(self.spinbox.get())
        self.label = tk.Label(master, text = text)
        self.label.pack(padx = 10, pady = 20)

        frame.pack(padx = 10, pady = 10, expand = True, fill = tk.BOTH)


    def display(self):
        text = "Current Value: " + str(self.spinbox.get())
        self.label.configure(text = text)


root = tk.Tk()
window = Window(root)
root.mainloop()
The output:
Tkinter Spinbox – Options
A compiled version of the most useful options available to the Tkinter Spinbox widget.
| Option | Description |
|---|---|
activebackground | Background color when the cursor is over the widget. |
bg | Background color of the widget. |
buttonbackground | The background color displayed on the arrowheads. The default is gray. |
buttoncursor | The cursor to be displayed when the mouse is over the arrowheads. |
command | Use this option to specify a function or method to be called whenever the user clicks on one of the arrowheads. |
cursor | Selects the cursor that is displayed when the mouse is over the entry part of the widget. |
exportselection | Setting this option to True, prevents data from being copied/cut from the entry part of the widget and pasted elsewhere. |
font | Changes the font for the widget. |
fg | Defines color of the arrowheads and the text. |
from_ | Use this option in combination with the to option to define a range for values. (Values are inclusive between from_ and to_) |
increment | Used to specify how much value increases when arrowheads are pressed. |
justify | This option controls the position of the text in the entry part of the widget. Values may be tk.LEFT to left-justify the text; tk.CENTER to center it; or RIGHT to right-justify the text. |
relief | Defines a relief style for widget. Default style is tk.SUNKEN. |
repeatdelay/ repeatinterval | The repeatdelay value specifies how long the mouse button must be held down on the arrowhead before it begins incrementing repeatedly. repeatinterval specifies how often the function repeats. Default values are 400 and 100 milliseconds, respectively. |
selectbackground | The background color to use displaying selected items. |
selectforeground | The foreground color to use displaying selected items. |
state | Can be either tk.NORMAL (regular state), tk.DISABLED (unresponsive) or “readonly” (value can only be changed through arrowheads) |
textvariable | A control variable that reflects the current value of the widget. |
to | This option specifies the upper limit of a range values. See the from_ option, above, and also the increment option. |
values | Instead of using to and from_ to define a range of values, you can define a discrete list of values yourself. For example values=('red', 'blue', 'green') would allow only those three strings as values. |
width | Number of characters allowed in the entry part of the widget. Default value is 20. |
wrap | Setting this option to True makes the values wrap from highest to lowest and vice-versa when using the arrowheads. Otherwise upon reaching the highest/lowest values, the up-arrow/down-arrow head respectively will have no effect. |
xscrollcommand | Use this option to connect a scrollbar to the entry part of the widget. |
This marks the end of the Python Tkinter SpinBox Tutorial. Any suggestions or contributions for CodersLegacy are more than welcome. Questions regarding the tutorial content can be asked in the comments section below.