
The Notebook is a powerful widget introduced the by Tkinter ttk module. It is a basically of collection of windows or “tabs” as they often called. Behind the scenes it is a collection of containers (e.g frames) which have many widgets as children inside.
You can swap between these containers like you would on a regular text editor. Each “tab” or “window” has a tab ID associated with it, which is used to determine which tab to swap to.
Tkinter ttk Notebook Syntax
The syntax for the Tkinter ttk Notebook Widget.
notebook = ttk.Notebook(master, *options)
There aren’t any parameters to discuss here as most of our work will comprise of creating various containers (frames) with widgets, and merely adding them to the notebook widget. There are however, many functions related to the management of these containers or “tabs” as we call them, that we will discuss in this tutorial.
Notebook Example# 1
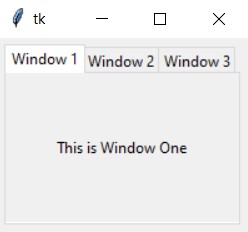
In this example we explore how to add 3 windows to our Notebook widget in two different ways. The first method involves the add() function, which simply appends a new tab to the end. The other method is the insert() function which can be used to add a tab to a specific position.
The first two tabs have been added in using add(), and the third using insert(). The add() function takes one mandatory parameter which is the container widget to be added, and the rest are optional parameters such as text (text to be displayed as tab title), image and compound.
The insert() function has the same syntax, with one small difference. It requires a tab_id, which defines the location where it should be inserted. The tab_id can be either an index value or it can be string literal like “end”, which will append it to the end.
import tkinter as tk
import tkinter.ttk as ttk


class Window:
    def __init__(self, master):
        self.master = master

        self.notebook = ttk.Notebook(self.master)

        # Frame 1 and 2
        frame1 = ttk.Frame(self.notebook)
        frame2 = ttk.Frame(self.notebook)

        label1 = ttk.Label(frame1, text = "This is Window One")
        label1.pack(pady = 50, padx = 20)
        label2 = ttk.Label(frame2, text = "This is Window Two")
        label2.pack(pady = 50, padx = 20)

        frame1.pack(fill= tk.BOTH, expand=True)
        frame2.pack(fill= tk.BOTH, expand=True)

        self.notebook.add(frame1, text = "Window 1")
        self.notebook.add(frame2, text = "Window 2")

        # Frame 3
        frame3 = ttk.Frame(self.notebook)

        label3 = ttk.Label(frame3, text = "This is Window Three")
        label3.pack(pady = 50, padx = 20)

        frame3.pack(fill= tk.BOTH, expand=True)

        self.notebook.insert("end", frame3, text = "Window 3")
        self.notebook.pack(padx = 5, pady = 5, expand = True)


root = tk.Tk()
window = Window(root)
root.mainloop()
The output:
Accessing a Tab
Many functions for the Notebook require a tab_id, so let’s take a look at what counts as a tab_id in ttk.
- An integer between zero and the number of tabs
- The container/child object (such as frame1 in the previous example)
- The string “current”, which refers to the currently-selected tab
- The string “end”, which returns the number of tabs
Notebook Example# 2
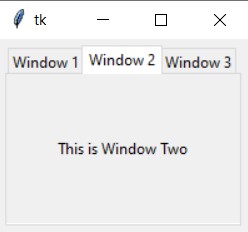
In this example we will focus on how to manage multiple tabs. Let’s take a look at selecting tabs first.
The most obvious method of switching between tabs is through the mouse. However, let’s take a look at how to do this programmatically using the select(tab_id) function which switches to and displays the tab with the matching tab_id.
Tip: Calling select() without any parameters returns the currently selected tab.
Another function we will use in this example is the tab() function, which takes upto two parameters. In single parameter mode, it takes a tab_id, and returns a dictionary containing all it’s options and their corresponding values. In two parameter mode, it takes a tab_id and an option, and simply returns the value for that option.
One handy trick is to enable keyboard traversal, allowing you to use keyboard shortcuts to scroll through tabs. We can do this by using the enable_traversal() function, with which CTRL + TAB will take you to the next tab, and SHIFT + CTRL + TAB will take you to previous tab.
import tkinter as tk
import tkinter.ttk as ttk

class Window:
    def __init__(self, master):
        self.master = master

        self.notebook = ttk.Notebook(self.master)

        # Frame 1, 2 and 3
        frame1 = ttk.Frame(self.notebook)
        frame2 = ttk.Frame(self.notebook)
        frame3 = ttk.Frame(self.notebook)

        label1 = ttk.Label(frame1, text = "This is Window One")
        label1.pack(pady = 50, padx = 20)
        label2 = ttk.Label(frame2, text = "This is Window Two")
        label2.pack(pady = 50, padx = 20)
        label3 = ttk.Label(frame3, text = "This is Window Three")
        label3.pack(pady = 50, padx = 20)

        frame1.pack(fill= tk.BOTH, expand=True)
        frame2.pack(fill= tk.BOTH, expand=True)
        frame3.pack(fill= tk.BOTH, expand=True)

        self.notebook.add(frame1, text = "Window 1")
        self.notebook.add(frame2, text = "Window 2")
        self.notebook.add(frame3, text = "Window 3")

        self.notebook.select(frame2)
        print(self.notebook.tab(frame2))
        print(self.notebook.tab(1, "text"))

        self.notebook.pack(padx = 5, pady = 5, expand = True, fill = tk.BOTH)


root = tk.Tk()
window = Window(root)
root.mainloop()
The console output, showing a dictionary containing all the tab options for frame2, as well as their values. This is a followed by a single output, which is the value of the text option for frame2.
{'padding': [0], 'sticky': 'nsew', 'state': 'normal', 'text': 'Window 2', 'image': '', 'compound': 'none', 'underline': -1}
Window 2
The output: (Notice how Window 2 is selected by default instead of Window 1, due to the select() function)
Notebook Example# 3
In this example we will explore how to customize tabs using the variety of tab-related options available to us. We’ve already shown how you can use the text option, so let’s take a look at some others.
Adding an image can be a fairly tricky task, as there are some very easy-to-make mistakes during the process. Luckily, we will guide you through all that here. We will also use the compound option, which determines the relation between the text and image.
There is also the padding option, which changes the amount of padding for the window belonging to that tab. This helps in keeping some distance between the widgets and the edge of the notebook.
Adding an Image to a Tab
Just to clarify, we mean adding an Image to the tab title, not the actual notebook with which the tab is associated. Adding a regular image can be done with the Label widget if you are interested.
What we need is an image object that we can assign to the “image” option. To create this image object we can use either Pillow or Tkinter PhotoImage. For this example we will use Tkinter PhotoImage as it’s a more native option.
import tkinter as tk
import tkinter.ttk as ttk

class Window:
    def __init__(self, master):
        self.master = master

        self.notebook = ttk.Notebook(self.master)

        # Frame 1, 2 and 3
        frame1 = ttk.Frame(self.notebook)
        frame2 = ttk.Frame(self.notebook)
        frame3 = ttk.Frame(self.notebook)

        label1 = ttk.Label(frame1, text = "This is Window One")
        label1.pack(pady = 50, padx = 20)
        label2 = ttk.Label(frame2, text = "This is Window Two")
        label2.pack(pady = 50, padx = 20)
        label3 = ttk.Label(frame3, text = "This is Window Three")
        label3.pack(pady = 50, padx = 20)

        frame1.pack(fill= tk.BOTH, expand=True)
        frame2.pack(fill= tk.BOTH, expand=True)
        frame3.pack(fill= tk.BOTH, expand=True)

        self.tab1_image = tk.PhotoImage(file = "closeIcon.png")

        self.notebook.add(frame1, text = "Window 1", image = self.tab1_image,
                          compound = "left", padding = [10, 0, 10, 0])
        self.notebook.add(frame2, text = "Window 2")
        self.notebook.add(frame3, text = "Window 3")

        self.notebook.pack(padx = 5, pady = 5, expand = True, fill = tk.BOTH)


root = tk.Tk()
window = Window(root)
root.mainloop()
The output:
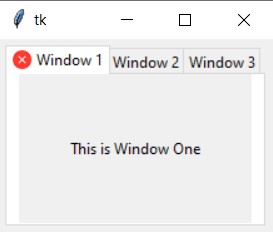
The white spaces you see around the side because of the padding. You can alternatively just pass in a single value instead of a list like “10”, which will apply 10 padding on each side.
The compound option can take on the following values:
- text: display text only
- image: display image only
- top, bottom, left, right: display image above, below, left of, or right of the text, respectively.
- none: the default. display the image if present, otherwise the text.
List of Options for Notebook
| Option | |
|---|---|
| height | If present and greater than zero, specifies the desired height of the pane area (not including internal padding or tabs). Otherwise, the maximum height of all panes is used. |
| padding | Specifies the amount of extra space to add around the outside of the notebook. The padding is a list up to four length specifications: left, top, right, bottom. |
| width | If present and greater than zero, specified the desired width of the pane area (not including internal padding). Otherwise, the maximum width of all panes is used. |
List of options for Tabs
| Option | Description |
|---|---|
| state | Either “normal”, “disabled” or “hidden”. If “disabled”, then the tab is greyed out. If “hidden”, then the tab is not displayed. |
| sticky | Specifies how the child window is positioned within the pane area. Value is a string containing zero or more of the characters “n”, “s”, “e” or “w”. Each letter refers to a side (north, south, east or west) that the child window will stick to, as per the grid() geometry manager. |
| padding | Specifies the amount of extra space to add between the notebook and this pane. Syntax is the same as for the option padding used by this widget. |
| text | Specifies a text to be displayed in the tab title. |
| image | Specifies an image icon to display in the tab. |
| compound | Specifies how to display the image relative to the text, in the case both options text and image are present. |
| underline | Specifies the index (0-based) of a character to underline in the text string. |
This marks the end of the Tkinter ttk Notebook Widget Tutorial. Any suggestions or contributions for CodersLegacy are more than welcome. Questions regarding the tutorial content can be asked in the comments section below.
