
In this Guide, we will teach you how to get Ezoic setup on your website so you can begin earning. The Ezoic Integration can get pretty complicated at times, due to their integration methods. While it’s possible you’ll be able to setup Ezoic in just a few clicks, it may also require days of constant hair pulling and frustration before you figure it out.
Luckily, I’ve already gone through most of these problems so I can explain how to avoid them. If you follow these steps properly, and without skipping any, I can almost guarantee that your integration will be seamless.
And yes, there is no one golden way of setting Ezoic up, so I will be suggesting many different options. I’ll also link several useful Ezoic articles towards the end, which you can use as reference.
Ezoic Requirements
Ezoic Requirements are fairly low and simple, resulting in a large number of websites being qualified for it. The most toughest requirement is the monthly traffic, otherwise the others are fairly simple.
- 10,000 Monthly Visitors
- Must not be banned by Google AdSense
- Must be following the same policies laid down by AdSense (no inappropriate content etc.)
- Unique and Original content
- Organic traffic is preferred (but not compulsory)
However! Ezoic has recently launched a new program called Access Now, which allows people who do not meet minimum traffic requirements to join the Ezoic program in a limited scope. Head over to the Ezoic website for more info.

The Process
- Your Ezoic Representative will contact you. You can rely on him for support throughout your time with Ezoic.
- You will have to clear some basic steps like connecting Google AdSense and Ezoic.
- Integration between Ezoic and your Site
- Settings up Ad Placeholders on your site
- Turning Traffic On
- (Optional) Turning on the Site Speed Accelerator
Your Ezoic representative should get you through the beginning phases without any difficulty. It’s the integration part that causes problems, so that’s what we will be focusing on here.
1. Setting up your Ezoic Account
First thing to do is signup with Ezoic. You can do so using this link over here. Once you have been approved, a Ezoic representative will contact you and help you with the process till your account is fully setup and running.
After your account has been approved, you will need to setup a few things in your dashboard, some of which are purely optional.
- You’ll need to connect your Google AdSense to Ezoic. There are several parts to this, involving adding Ezoic as an approved third party in your Google account and applying to the Google AdSense Exchange program (can take upto 24 hours for approval). Merely follow the on-screen instructions and fill in the required information.
- You can also choose to import your historical AdSense Data into Ezoic to improve it’s Machine Learning process. This can be done by either granting it access to your AdSense data, or uploading a CSV file with your data.
- To improve your Ezoic experience, you can also connect your Google Search Console to Ezoic to get valuable insights into your site’s search rankings and how they affect user experience metrics and revenue.
- Mediation App: Another great benefit of Ezoic is that you can add in other partners you may be associated with, who will all bid for the ad-space on your site. The benefit of this that there will be more advertisers bidding for ads on your site, hence the higher chance of earning more. If you are already using AdSense, with a few clicks you can connect it to the Mediation App.
- Payment Methods: You can setup your payment methods for Ezoic, or leave this step for later. The options are quite diverse though, so you should have no trouble coming up with a payment method that works for you. Your Options include:
- PayPal
- Payoneer
- Direct Deposit (US banks only)
- Cheque
The dashboard for Ezoic can change overtime, but the general outline will remain the same. Merely contact your Ezoic representative if you have any issues.
2. Integrating your site with Ezoic
Integrating your site with Ezoic can be pretty tricky, so if you face any issues check out our article on how to resolve common issues with Ezoic.
Types of Integration
Ezoic Nameservers: In this option, you have to change your nameservers to point to Ezoic, instead of your regular host. If you don’t already have your nameservers pointing elsewhere, like Cloudflare, then you should go with this option.
Cloudflare: Ezoic are Cloudflare partners, hence with a single click you can setup Integration without even having to change your nameservers. If all goes well, this is all you will have to do, and your setup is complete.
WordPress Plugin: Ezoic also offer a WordPress plugin, which you can download and install. You don’t have to change any nameservers along the way, so it’s a simple option. You do however, lose access to some Ezoic features as you aren’t using their nameservers to deliver your content.
Ezoic will recommend you use the Nameserver integration or the Cloudflare integration to take advantage of the Site Speed Accelerator and CDN features which are not available on the Plugin. And since the plugin is only for WordPress, it’s audience is a bit limited.
Changing Nameservers
If you picked the Ezoic Nameserver option, then you will have to change your nameservers to point to Ezoic, instead of your hosting provider. For this, you will need to open up the dashboard provided to you by your hosting provider, and make the required changes there.
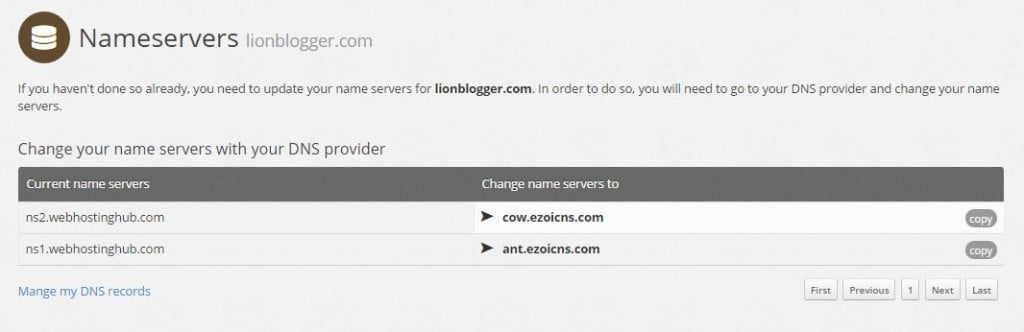
It should look something like the above image. (the above image is not from my site)
3. Adding Placeholders
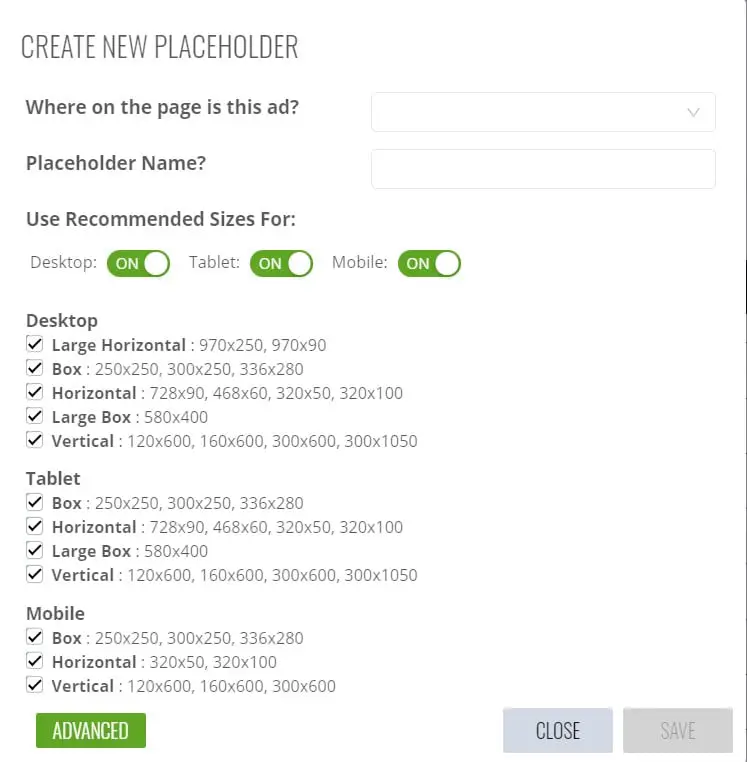
If you have made it past the Integration phase, then great. It’s now time to add placeholders for your ads. What are placeholders? Well, they are basically potential Ad-slots. You will be asked to make about 10-15 Ad-slots for your website. This does not mean that 10-15 Ads will be displayed though.
Rather, it means that these 10-15 Ad slots will be used in various combinations where Ad-position, type of Ads, and number of Ads will be changed to determine the best possible layout.
There are two methods that you can use to create Placeholders.
1. Placing Code Snippets
The first method is by creating placeholders manually, and adding the code into your website.
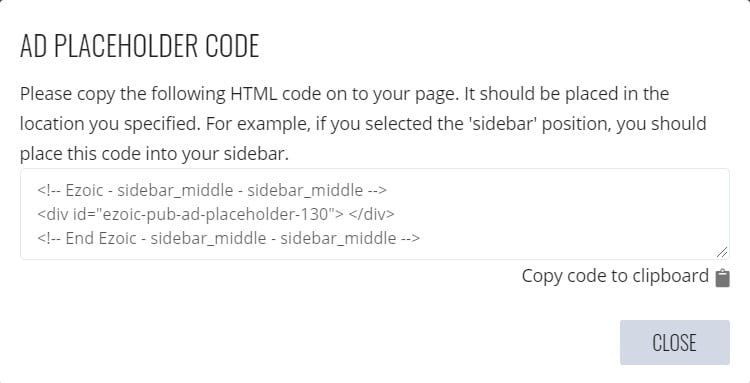
You will have to create the Placeholder from your Ezoic dashboard, then take the generated code (shown in the image above) and then place it into the area where you want it to appear on your website.
2. Ezoic Chrome Extension
The second option here might be preferred by those with no little technical knowledge. All you need to do is download the Ezoic Chrome Extension and use it to place ads without having to insert any code anywhere or make placeholders from the Ezoic Dashboard.
Be sure that you are logged out of your Website’s admin section before trying to use it. Just open a random page on your site, and begin inserting Ads. The plugin will automatically locate similar pages and apply the same settings to them all.
4. Site Speed Accelerator
The Site Speed Accelerator is one of Ezoic’s most marketed abilities. It has a wide range of options and optimizations that you can make for your website to improve your page loading times and scores.
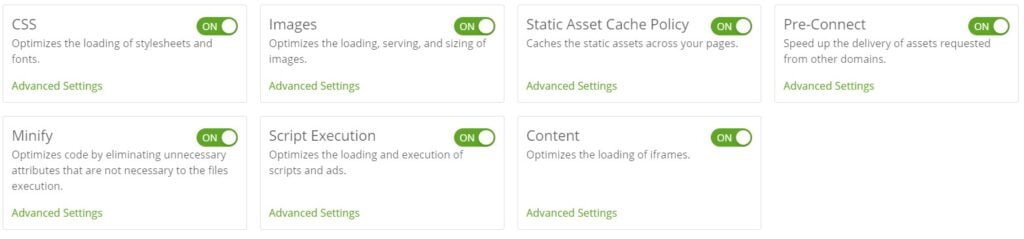
You can most of the options available in the Site Speed Accelerator in the image above. Be sure to test out each option carefully, as in certain cases, some of them may have negative effects or have compatibility issues.
You might already have a Caching Plugin or something similar that does this for you, but as Ezoic is not compatible with most caching plugins, you will need to remove them. The Ezoic Site Speed accelerator is a good substitute that can take it’s place and increase your Page speed scores to 90+.
5. Turn Traffic On!
Finally, turn your traffic on and watch the earnings increase!
You might face some issues at some point during the process, so be sure to check out our Common issues with Ezoic and their solutions article, which will help you resolve any errors you may encounter, and setup the ideal configuration.
If you are interested in trying out Ezoic, then use my referral link over here which will help me out a bit. (it will not effect your revenue in an way)
This marks the end of the Ezoic Setup Guide. Any suggestions or contributions for CodersLegacy are more than welcome. Questions regarding the tutorial content can be asked in the comments section below.
Such an informative article