
CustomTkinter is a powerful library that extends the functionality of Tkinter in Python. While CustomTkinter does not provide a built-in table widget, we can recreate a table-like structure using the grid() layout manager and entry widgets. In this tutorial, we will guide you through the step-by-step process of building a custom table in CustomTkinter.
We will start by creating the basic GUI layout of the Table, and gradually begin adding in functionality to make it a proper table application (like you see in Excel).
Section 1: Setting Up the GUI Layout
In this section, we will set up the initial GUI layout for our custom table. Follow these steps:
- Import the necessary modules:
import tkinter as tk
from customtkinter import CTkEntry
We import the required modules, tkinter for the main window and CTkEntry from the customtkinter library.
- Create the main window:
root = tk.Tk()
root.title("CustomTkinter Table")
We create the main window for our application using tk.Tk() and set the window title to “CustomTkinter Table”.
- Design the table headers:
headers = ["Name", "Age", "Email"]
for col, header in enumerate(headers):
    label = tk.Label(root, text=header, font=("Arial", 12, "bold"))
    label.grid(row=0, column=col, padx=10, pady=5)
Then, we define the table headers as a list of strings. Then, using a loop, we create labels for each header and position them in the first row of the grid layout.
- Add the entry widgets for data input:
data = [
    ["John Doe", "25", "[email protected]"],
    ["Jane Smith", "30", "[email protected]"],
    # Add more rows as needed
]

widths = [100, 50, 200]
for row, row_data in enumerate(data, start=1):
    for col, value in enumerate(row_data):
        entry = CTkEntry(root, width=widths[col])
        entry.insert(tk.END, value)
        entry.grid(row=row, column=col,
                   padx=10, pady=5)
We define the table data as a nested list of values. Using nested loops, we create entry widgets for each data value and position them in the respective row and column of the grid layout. We also populate the entry widgets with the corresponding values.
- Display the main window:
root.mainloop()
We start the Tkinter event loop to display the main window and handle user interactions.
Section 2: Adding Functionality to the Table
Now that we have the basic table layout, let’s add functionality to our custom table. Follow these steps:
- Implement a function to retrieve the table data:
def get_table_data():
    table_data = []
    for row in range(1, len(data) + 1):
        row_data = []
        for col in range(len(headers)):
            entry = root.grid_slaves(row=row, column=col)[0]
            row_data.append(entry.get())
        table_data.append(row_data)
    return table_data
This function retrieves the data from the table by iterating through the grid layout and fetching the values from the entry widgets. It returns the table data as a nested list.
- Implement a function to handle the submit button click:
def handle_submit():
    table_data = get_table_data()
    # Perform desired actions with the table data
    print(table_data)
This function is called when the submit button is clicked. It retrieves the table data using the get_table_data() function and performs the desired actions with the data. In this example, we simply print the table data to the console.
- Add a submit button to the table:
submit_button = tk.Button(root, text="Submit",
                          command=handle_submit)
submit_button.grid(row=len(data) + 1,
                   columnspan=len(headers),
                   padx=10, pady=10)
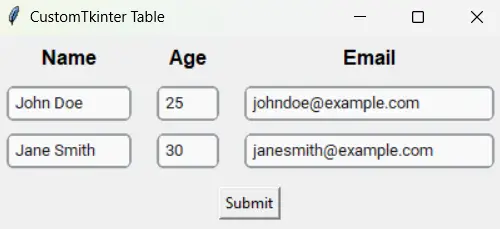
We create a submit button using tk.Button(), set its text to “Submit”, and associate it with the handle_submit() function. The button is positioned below the table, spanning across all columns.
This gives us the following result:
Complete Code:
Here is the complete code for the CustomTkinter table:
import tkinter as tk
from customtkinter import CTkEntry

def get_table_data():
    table_data = []
    for row in range(1, len(data) + 1):
        row_data = []
        for col in range(len(headers)):
            entry = root.grid_slaves(row=row, column=col)[0]
            row_data.append(entry.get())
        table_data.append(row_data)
    return table_data

def handle_submit():
    table_data = get_table_data()
    # Perform desired actions with the table data
    print(table_data)

root = tk.Tk()
root.title("CustomTkinter Table")

headers = ["Name", "Age", "Email"]
for col, header in enumerate(headers):
    label = tk.Label(root, text=header, font=("Arial", 12, "bold"))
    label.grid(row=0, column=col, padx=10, pady=5)

data = [
    ["John Doe", "25", "[email protected]"],
    ["Jane Smith", "30", "[email protected]"],
    # Add more rows as needed
]

widths = [100, 50, 200]
for row, row_data in enumerate(data, start=1):
    for col, value in enumerate(row_data):
        entry = CTkEntry(root, width=widths[col])
        entry.insert(tk.END, value)
        entry.grid(row=row, column=col,
                   padx=10, pady=5)

submit_button = tk.Button(root, text="Submit",
                          command=handle_submit)
submit_button.grid(row=len(data) + 1,
                   columnspan=len(headers),
                   padx=10, pady=10)

root.mainloop()
Section 3: Adding Copy and Paste Mechanics
In this section, we will enhance our custom table by adding copy and paste functionality using the Ctrl+C (copy) and Ctrl+V (paste) keyboard shortcuts for each individual entry cell.
Although these are available by default in your OS, it’s best to have this feature implemented. This allows us to add custom functionality, and/or extend it to perform other tasks.
Follow these steps:
- Implement functions to handle copy and paste operations:
def handle_copy(event):
    if isinstance(event.widget, CTkEntry):
        event.widget.clipboard_clear()
        event.widget.clipboard_append(event.widget.get())

def handle_paste(event):
    if isinstance(event.widget, CTkEntry):
        event.widget.delete(0, tk.END)
        event.widget.insert(tk.END, event.widget.clipboard_get())
The handle_copy() function is called when Ctrl+C is pressed, and it copies the contents of the selected entry widget to the clipboard. The handle_paste() function is called when Ctrl+V is pressed, and it clears the selected entry widget and inserts the contents from the clipboard.
- Bind the copy and paste functions to the entry widgets:
widths = [100, 50, 200]
for row, row_data in enumerate(data, start=1):
    for col, value in enumerate(row_data):
        entry = CTkEntry(root, width=widths[col])
        entry.insert(tk.END, value)
        entry.grid(row=row, column=col, padx=10, pady=5)
        entry.bind("<Control-c>", handle_copy)
        entry.bind("<Control-v>", handle_paste)
We iterate through the entry widgets and bind the copy and paste functions to the respective events (Ctrl+C and Ctrl+V) for each individual entry widget.
Complete Code:
Here is the complete code with the copy and paste functionality added:
import tkinter as tk
from customtkinter import CTkEntry

def get_table_data():
    table_data = []
    for row in range(1, len(data) + 1):
        row_data = []
        for col in range(len(headers)):
            entry = root.grid_slaves(row=row, column=col)[0]
            row_data.append(entry.get())
        table_data.append(row_data)
    return table_data

def handle_submit():
    table_data = get_table_data()
    # Perform desired actions with the table data
    print(table_data)

def handle_copy(event):
    if isinstance(event.widget, CTkEntry):
        event.widget.clipboard_clear()
        event.widget.clipboard_append(event.widget.get())

def handle_paste(event):
    if isinstance(event.widget, CTkEntry):
        event.widget.delete(0, tk.END)
        event.widget.insert(tk.END, event.widget.clipboard_get())

root = tk.Tk()
root.title("CustomTkinter Table")

headers = ["Name", "Age", "Email"]
for col, header in enumerate(headers):
    label = tk.Label(root, text=header, font=("Arial", 12, "bold"))
    label.grid(row=0, column=col, padx=10, pady=5)

data = [
    ["John Doe", "25", "[email protected]"],
    ["Jane Smith", "30", "[email protected]"],
    # Add more rows as needed
]

widths = [100, 50, 200]
for row, row_data in enumerate(data, start=1):
    for col, value in enumerate(row_data):
        entry = CTkEntry(root, width=widths[col])
        entry.insert(tk.END, value)
        entry.grid(row=row, column=col, padx=10, pady=5)
        entry.bind("<Control-c>", handle_copy)
        entry.bind("<Control-v>", handle_paste)

submit_button = tk.Button(root, text="Submit", command=handle_submit)
submit_button.grid(row=len(data) + 1, columnspan=len(headers), padx=10, pady=10)

root.mainloop()
Conclusion:
Congratulations! You have successfully built a custom table using CustomTkinter by recreating a table-like structure with entry widgets. In this tutorial, we learned how to create the GUI layout for the table, display headers, and populate data rows. We also added functionality to retrieve the table data and handle a submit button click. Feel free to further customize and enhance the table as per your specific application requirements.