
Tkinter is one of the most popular libraries for GUI development in Python. However, many people find it’s GUI to be rather outdated and bland-looking. Luckily, many solutions to this problem exist, such as the ttk sub-module and tkinter themes). In this tutorial we will be discussing a new library called “customtkinter” which introduces a set of new widgets, themes, and styles for creating Modern GUI in Tkinter.
Getting Started
To use this library, you will need the tkinter and customtkinter libraries. The tkinter library is included in all python installations by default, but for the customtkinter library you need to run the below command.
pip install customtkinterDo check that the installation was successful, try importing the library in your Python code.
import customtkinterIf this command works, then the installation was successful.
Creating a Basic Application with CustomTkinter
The first thing we will do is setup a basic application in CustomTkinter without any widgets. There are some small differences between Tkinter and CustomTkinter that we need to go through before proceeding further.
Here is sample code for a simple application which creates an empty tkinter window.
import tkinter as tk
from customtkinter import *

class App(CTk):
    def __init__(self, *args, **kwargs):
        super().__init__(*args, **kwargs)

        self.main_frame = CTkFrame(self)
        self.main_frame.pack(expand=True, fill=tk.BOTH)

app = App()
app.geometry("400x240")
app.mainloop()
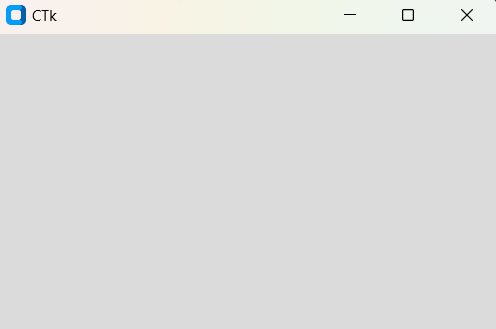
This creates the following window.
Here are some common differences between Tkinter and CustomTkinter applications that you can observe in the above code.
- Instead of using
Tk()to create a tkinter application, we now useCTk(). - All widgets in customtkinter have the same name as the ones in Tkinter, but are preceded with “CTk”. For example, the “Button” class in Tkinter is called “CTkButton” in CustomTkinter.
With these differences in mind, everything we know about tkinter can be applied to customtkinter applications. The widgets, functionality, and layout are all the same. However there are some minor differences here and there, like the parameter names.
So what exactly does CustomTkinter bring to the table?
CustomTkinter brings a completely different look to Tkinter UI’s (which we will see in this tutorial), and also introduces many new features such as the ability to change themes and widget styles on the go. Wait for the end tutorial to see how we can enable a Dark Mode theme for our application!
Developing a Login Application with CustomTkinter
Using our knowledge of tkinter, we have developed the following application. There are some minor differences you may notice in the below code. For example, instead of using “background” and “foreground” to change the color of the frame, we now have the parameter “bg_color” and “fg_color”. We used a special function called cget() to make the frame color match the color of the rest of the window (which for some reason did not happen by default).
Another minor difference in the below code is that the “CheckButton” widget is called “CheckBox” in CustomTkinter. A rare case where the widget name is different.
import tkinter as tk
from customtkinter import *

class App(CTk):
    def __init__(self, *args, **kwargs):
        super().__init__(*args, **kwargs)

        main_frame = CTkFrame(self, fg_color=self.cget("bg"))
        main_frame.grid(row=0, column=0, padx=10, pady=10)

        # Login Window title
        title = CTkLabel(master=main_frame, text="Login Window")
        title.grid(row=0, column=0, pady=(0, 20))

        # Username label and entry box
        user_label = CTkLabel(master=main_frame,
                                            text="Username:")
        user_label.grid(row=1, column=0, sticky="w", pady=(0, 10))
        user_entry = CTkEntry(master=main_frame)
        user_entry.grid(row=1, column=1, pady=(0, 10), padx=10)

        # Password label and entry box
        pass_label = CTkLabel(master=main_frame, text="Password:")
        pass_label.grid(row=2, column=0, sticky="w", pady=(0, 10))
        pass_entry = CTkEntry(master=main_frame, show="*")
        pass_entry.grid(row=2, column=1, pady=(0, 10), padx=10)

        # Remember Me check button
        remember_me = CTkCheckBox(master=main_frame, text="Remember Me")
        remember_me.grid(row=3, column=1, pady=(0, 10))

        # Login button
        login_button = CTkButton(master=main_frame, text="Login",
                                 command=self.button_function)
        login_button.grid(row=4, column=1, pady=(0, 20), sticky="e")


    def button_function(self):
        print("button pressed")


app = App()
app.mainloop()
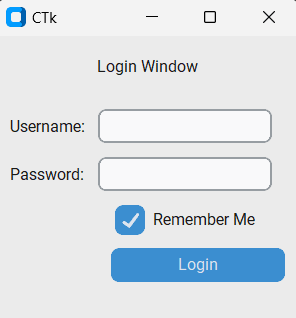
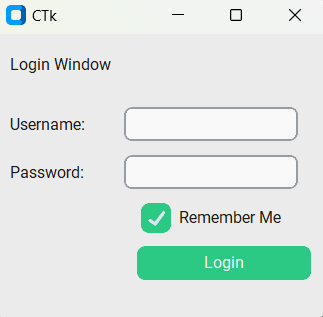
The gives us the following code. As you can see, the following GUI looks a bit better than normal tkinter GUI.
Here is a similar (normal) tkinter window for reference purposes.
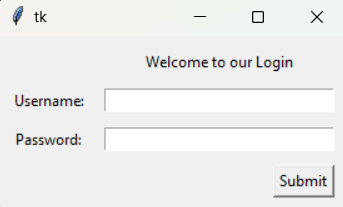
One thing that you cannot notice in the images, is that the CustomTkinter GUI has hover effects (like when you hover over the button), which the normal tkinter GUI does not.
Customizing GUI Appearance and Themes in CustomTkinter
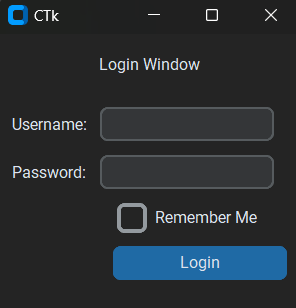
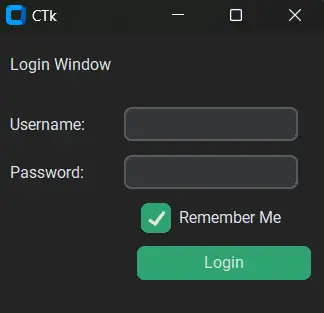
As promised, we also mentioned we would show you how to change themes. CustomTkinter comes with a few inbuilt themes, “light” and “dark”. By calling the below function from the customtkinter module, we can change these themes.
customtkinter.set_appearance_mode("dark")
This gives us the following look for our login application with CustomTkinter.
Another cool thing we can do is change the color theme of the widgets. By default, it is “blue”. So things like the buttons, sliders, check boxes, etc. will be colored blue as you can see above.
By calling the below function, we can change these settings.
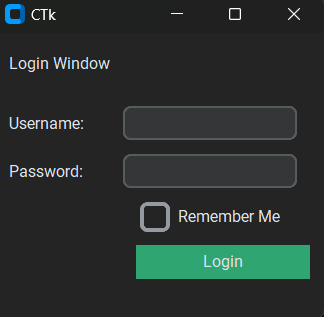
customtkinter.set_default_color_theme("green")
There are three such settings in total, “blue”, “dark-blue”, and “green”. You can also combine together the light/dark mode with one of these settings for widget color. If we add the two following commands to our login application:
customtkinter.set_appearance_mode("dark")
customtkinter.set_default_color_theme("green")
we will get this:
Other customizations in CustomTkinter
We have discussed the most relevant and important differences in CustomTkinter and Tkinter by now. The rest of the differences are mostly in parameter options. For example, the button in CustomTkinter, has several things that the Tkinter-version does not. As you might have noticed earlier, the corners of the button created by CustomTkinter were rounded. This is not possible in Tkinter.
The amount of “round-ness” is controlled by a parameter called “corner-radius”. By setting this to 0, we can make the corners sharp, or we can set it to a higher value to make it round. Here is an example.
        login_button = CTkButton(master=main_frame,
                                 text="Login",
                                 corner_radius=0)
There are dozens of other minor changes like this, which we cannot hope to cover in a single article. I recommend you refer to the documentation, which contains a list of parameter options for each widget. Here is a link to it.
This marks the end of the “CustomTkinter Tutorial: Creating Modern GUI in Tkinter” Article. Any suggestions or contributions for CodersLegacy are more than welcome. Questions regarding the tutorial content can be asked in the comments section below.
If you are interested, there is now CTk Theme Builder, which allows you to create your own CustomTkinter themes. It can be downloaded from GitHub
https://github.com/avalon60/ctk_theme_builder/wiki