
In this article, we will explore how to use CSS stylesheets to create themes for your PyQt6 application.
PyQt6 is a powerful library that allows developers to create desktop applications using Python. One of the most useful features of PyQt6 is the ability to customize the appearance of your application using CSS stylesheets. With stylesheets, you can create themes for your application, change the colors of your widgets, and create custom styles for your buttons, labels, and other widgets.
Setting up the PyQt6 Application
Before we begin creating a custom theme using CSS stylesheets, let’s set up a basic PyQt6 application that we can use to test our styles.
from PyQt6.QtWidgets import QApplication, QLabel, QWidget

class MainWindow(QWidget):
    def __init__(self):
        super().__init__()

        # Set up label
        self.label = QLabel("Hello World", self)
        self.label.move(50, 50)

        # Set up window
        self.setWindowTitle("PyQt6 Themes using CSS Stylesheets")
        self.setGeometry(100, 100, 200, 100)
        self.show()


app = QApplication([])
window = MainWindow()
app.exec()
This code sets up a basic PyQt6 application that displays a window with a label that says “Hello World”. Now, let’s explore how we can use CSS stylesheets to customize the appearance of our application.
Using CSS Stylesheets to Customize the Appearance of Widgets
CSS stylesheets work by setting the style properties of widgets. These style properties include things like background color, text color, font size, and many others. To set the style properties of a widget using a stylesheet, we can use the setStyleSheet method of the widget.
self.label.setStyleSheet("background-color: red")
This code sets the background color of the label to red. We can add more style properties by separating them with a semicolon.
self.label.setStyleSheet("background-color: red; color: white; font-size: 20px;")
This code sets the font size of the label to 20 pixels, the background color of the label to red, and the text color to white. Pretty cool right?
But the above code looks a bit ugly. To solve this, we will we use multi-line strings in Python.
        self.label.setStyleSheet("""background-color: red;
                                    color: white;
                                    font-size: 20px;""")
Creating Custom Themes
The changes we just made were all local to the widgets we were calling them on. If you have 1000 widgets, having to apply styles on each one of them would be a massive pain. To resolve this problem, we will apply the styles on the window within which all these widgets exist. We will also override the default classes used by PyQt6, so the styles we define are applied by default to all widgets.
Note: You need to do both of these things to apply global styles.
Let’s create a dark theme for our application using CSS Stylesheets! We will basically be overriding all the default styles with dark-themes styles (mostly involves changing the text color to white, and background to black or grey).
First, we will add some more widgets to our window.
from PyQt6.QtWidgets import QApplication, QLabel, QLineEdit, QPushButton, QVBoxLayout, QWidget

class LoginWindow(QWidget):
    def __init__(self):
        super().__init__()

        # Set up widgets
        self.label_username = QLabel("Username:")
        self.label_password = QLabel("Password:")
        self.input_username = QLineEdit()
        self.input_password = QLineEdit()
        self.btn_login = QPushButton("Login")

        # Set up layout
        layout = QVBoxLayout()
        layout.addWidget(self.label_username)
        layout.addWidget(self.input_username)
        layout.addWidget(self.label_password)
        layout.addWidget(self.input_password)
        layout.addWidget(self.btn_login)
        self.setLayout(layout)

        # Set up window
        self.setWindowTitle("Login")
        self.setGeometry(100, 100, 200, 150)
        self.show()


app = QApplication([])
window = LoginWindow()
app.exec()
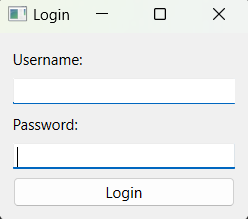
This is what our window looks like right now.
Now let’s create some styles. Place the below code in your Window class, and watch the magic.
        self.setStyleSheet("""
            QWidget {
                background-color: #333333;
                color: #ffffff;
            }
            QPushButton {
                background-color: #555555;
                color: #ffffff;
                border: none;
                padding: 5px;
            }
            QPushButton:hover {
                background-color: #666666;
            }
            QLineEdit {
                background-color: #444444;
                color: #ffffff;
            }
        """)
And here is the result!

We just created a theme for our PyQt6 application using CSS stylesheets, and then applied it.
If you are interested in a (more or less) complete dark mode implementation (covering the main widgets), here it is! Feel free to use it.
dark_theme = """
    QWidget {
        background-color: #333333;
        color: #ffffff;
        border: none;
    }
    QPushButton {
        background-color: #4d4d4d;
        border: 1px solid #4d4d4d;
        border-radius: 4px;
        color: #ffffff;
        padding: 5px;
    }
    QPushButton:hover {
        background-color: #5a5a5a;
        border: 1px solid #5a5a5a;
    }
    QCheckBox {
        color: #ffffff;
    }
    QLineEdit {
        background-color: #4d4d4d;
        border: 1px solid #4d4d4d;
        color: #ffffff;
        padding: 5px;
    }
    QTextEdit {
        background-color: #4d4d4d;
        border: 1px solid #4d4d4d;
        color: #ffffff;
        padding: 5px;
    }
    QProgressBar {
        border: 1px solid #444444;
        border-radius: 7px;
        background-color: #2e2e2e;
        text-align: center;
        font-size: 10pt;
        color: white;
    }
    QProgressBar::chunk {
        background-color: #3a3a3a;
        width: 5px;
    }
    QScrollBar:vertical {
        border: none;
        background-color: #3a3a3a;
        width: 10px;
        margin: 16px 0 16px 0;
    }
    QScrollBar::handle:vertical {
        background-color: #444444;
        border-radius: 5px;
    }
    QScrollBar:horizontal {
        border: none;
        background-color: #3a3a3a;
        height: 10px;
        margin: 0px 16px 0 16px;
    }
    QScrollBar::handle:horizontal {
        background-color: #444444;
        border-radius: 5px;
    }
    QTabWidget {
        background-color: #2e2e2e;
        border: none;
    }
    QTabBar::tab {
        background-color: #2e2e2e;
        color: #b1b1b1;
        padding: 8px 20px;
        border-top-left-radius: 5px;
        border-top-right-radius: 5px;
        border: none;
    }

    QTabBar::tab:selected, QTabBar::tab:hover {
        background-color: #3a3a3a;
        color: white;
    }
"""


app.setStyleSheet(dark_theme)
Did you notice we applied the Stylesheets on the “app” instead of the “window”. Do you know what the difference is?
.
.
.
Basically the application can have many different windows in it. If you apply the styles on just a window, it won’t affect any other windows. Applying the styles on the app applies it to all windows.
We also stored the multiline string inside a variable. This makes it easier to switch around. We could always define multiple themes, and then simply swap them dynamically on the go!
Another small tip. If your Stylesheets get too big, define them in separate files, and them import them from there. Helps to remove the clutter.
Video Tutorial
If there is something you don’t really understand about the above code, check out this video tutorial. We went into a lot of depth there, and explained many of the finer details.
This marks the end of the “PyQt6 Themes using CSS Stylesheets” Article. Any suggestions or contributions for CodersLegacy are more than welcome. Questions regarding the tutorial content can be asked in the comments section below.
Nice